2021年1月21日 星期四

python心得

環境

windows 10

檢查python版本

(使用git bash)
$ python --version
Python 3.7.7

查pip版本

$ pip --version
pip 19.2.3 from c:\users\user\appdata\local\programs\python\python37-32\lib\site-packages\pip (python 3.7)

看目前系統有安裝哪些套件

$ pip list
Package    Version
---------- -------
pip        19.2.3
setuptools 41.2.0
WARNING: You are using pip version 20.2.3; however, version 20.3.3 is available.
You should consider upgrading via the 'c:\users\bear\appdata\local\programs\python\python39\python.exe -m pip install --upgrade pip' command.

升級pip

$ python -m pip install --upgrade pip
Collecting pip
  Downloading pip-21.0-py3-none-any.whl (1.5 MB)
     |████████████████████████████████| 1.5 MB 469 kB/s
Installing collected packages: pip
  Attempting uninstall: pip
    Found existing installation: pip 20.2.3
    Uninstalling pip-20.2.3:
      Successfully uninstalled pip-20.2.3
Successfully installed pip-21.0

$ pip --version
pip 21.0 from c:\users\user\appdata\local\programs\python\python39\lib\site-packages\pip (python 3.9)


升級python

https://stackoverflow.com/a/57292808  How do I upgrade the Python installation in Windows 10?
直接到python官網下載最新的python安裝檔
如果你是要升級小版本3.x.y 到 3.x.z,可以直接【Upgrade Now】
如果你是要升級中版本3.x 到 3.y,安裝檔會提示你【Install Now】
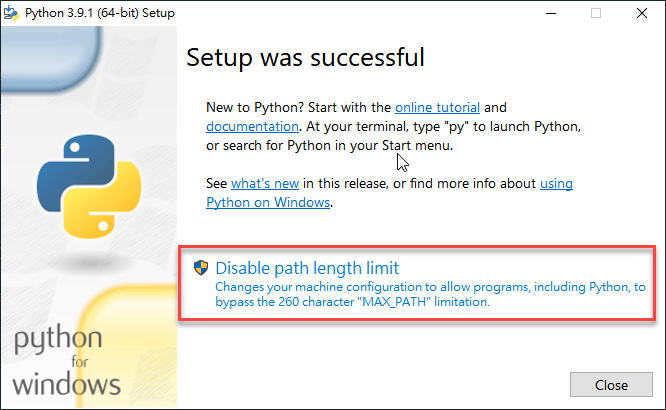
安裝完成(我有禁用path length limit)

In this case, you are not upgrading, but you are installing a new version of Python. You can have more than one version installed on your machine. They will be located in different directories.
這種情況,你不是升級,你是安裝新版本的python。你的系統有多個python版本在不同的目錄。

使用py指定python版本

$ py -3.7
Python 3.7.7 (tags/v3.7.7:d7c567b08f, Mar 10 2020, 09:44:33) [MSC v.1900 32 bit (Intel)] on win32
Type "help", "copyright", "credits" or "license" for more information.
>>>

$ py -3.9
Python 3.9.1 (tags/v3.9.1:1e5d33e, Dec  7 2020, 17:08:21) [MSC v.1927 64 bit (AMD64)] on win32
Type "help", "copyright", "credits" or "license" for more information.
>>>


設定環境變量

設定=》系統=》關於=》進階系統設定
環境變數
編輯Path
將原本python 3.7的路徑改成3.9的
C:\Users\user\AppData\Local\Programs\Python\Python37-32\Scripts\
C:\Users\user\AppData\Local\Programs\Python\Python37-32\
改成
C:\Users\user\AppData\Local\Programs\Python\Python39\Scripts\
C:\Users\user\AppData\Local\Programs\Python\Python39\

然後開新的prompt檢查版本
$ python --version
Python 3.9.1

$ pip --version
pip 20.2.3 from c:\users\user\appdata\local\programs\python\python39\lib\site-packages\pip (python 3.9)

編輯器

PyCharm Professional 2020.3

斷點

File => Open (打開空目錄時,如C:\python\hello),會自動生成 main.py
這個檔案會教你怎麼用PyCharm的斷點,Debug(Shift+F9)即可開始斷點


熱鍵

自定義

Resume Program => F9


正確打開新項目的姿勢

File => New Project 
New environment using(環境使用):【Virtualenv】(venv)
Base interpreter: C:\Users\user\AppData\Local\Programs\Python\Python39\python.exe  (如果你裝了2個python(3.7和3.9),要在這邊選IDE環境的python版本)

這樣項目下才會有venv目錄

.gitignore 忽略掉venv和.idea目錄

.gitignore
venv/
.idea/

爬蟲

https://www.learncodewithmike.com/2020/05/python-selenium-scraper.html  [Python爬蟲教學]整合Python Selenium及BeautifulSoup實現動態網頁爬蟲

在PyCharm 中安裝Selenium

Settings => Project: project_name => Python Interpreter => +
搜尋Selenium =》 Install Package
然後就可以看到成功安裝selenium,和相依賴的package(urllib3)
這樣只裝在IDE的環境中,沒安裝在系統上,所以git bash上面pip list還是沒有selenium。直接命令行執行會報錯
$ python crawler.py
Traceback (most recent call last):
  File "C:\bear\python\hello3\crawler.py", line 1, in <module>
    from selenium import webdriver
ModuleNotFoundError: No module named 'selenium'

系統安裝selenium

$ pip install selenium
Collecting selenium
  Using cached selenium-3.141.0-py2.py3-none-any.whl (904 kB)
Collecting urllib3
  Using cached urllib3-1.26.2-py2.py3-none-any.whl (136 kB)
Installing collected packages: urllib3, selenium
Successfully installed selenium-3.141.0 urllib3-1.26.2

命令行執行(需先配置好webdriver)

$ python crawler.py
DevTools listening on ws://127.0.0.1:60865/devtools/browser/c51ba9ea-08d4-45f8-bee0-5780695b15ef
老天尊的死期

安裝Webdriver

前往Python套件儲存庫PyPI(Python Package Index) 查詢Selenium 

點進去後,往下可以看到Drivers的地方,下載chromedriver

下載你chrome瀏覽器相對應的 ChromeDriver  
解壓縮 chromedriver_win32.zip 放到Python網頁爬蟲的專案資料夾中,如下圖:

第一個爬蟲程式


from selenium import webdriver
from selenium.webdriver.chrome.options import Options
import time

options = Options()
options.add_argument("--disable-notifications")

chrome = webdriver.Chrome('./chromedriver', options=options)
chrome.get("https://carlislebear.blogspot.com/")

print(chrome.title)
chrome.quit()
s
Line 5-6:options物件,主要用途為取消網頁中的彈出視窗,避免妨礙網路爬蟲的執行。
Line 8:就是建立webdriver物件,傳入剛剛所下載的「瀏覽器驅動程式路徑(chromedriver)-可略」及「瀏覽器設定(options)-可選」

執行


Line 11:chrome.title打印爬蟲網頁的標題,在Console 中也可以打印變數

第二個爬蟲程式

https://officeguide.cc/windows-python-selenium-automation-scripts-tutorial-examples/  Windows 使用 Python + Selenium 自動控制瀏覽器教學與範例
https://stackoverflow.com/a/39191349  NoSuchElementException - Unable to locate element
https://stackoverflow.com/a/44834542  Switch to an iframe through Selenium and python

目的:打開blog =》 搜尋python =》 取第一篇文章的標題


from selenium import webdriver
from selenium.webdriver.chrome.options import Options

from selenium.common.exceptions import TimeoutException
from selenium.webdriver.support.ui import WebDriverWait
from selenium.webdriver.support import expected_conditions as EC
from selenium.webdriver.common.by import By

options = Options()
options.add_argument("--disable-notifications")

# chrome = webdriver.Chrome('./chromedriver', options=options)
chrome = webdriver.Chrome()
chrome.get("https://carlislebear.blogspot.com/")

iframe = chrome.find_element_by_name('navbar-iframe')
chrome.switch_to.frame(iframe)
b_query = chrome.find_element_by_id('b-query').send_keys('python')
chrome.find_element_by_xpath('//*[@id="b-query-icon"]').click()

try:
    WebDriverWait(chrome, 3).until(EC.element_to_be_clickable((By.XPATH, '//*[@id="Blog1"]/div[1]')))
    print(chrome.find_element_by_xpath('//*[@id="Blog1"]/div[1]/div[3]/div/div/div/h3').text)
except TimeoutException:
    print('等待逾時!')

chrome.quit()
s
Line 5-7 & Line 23-24:搜尋後直到內容出來後再打印出第一篇文章標題
Line 16-17:切換到上方iframe,否則會報錯
NoSuchElementException: Message: no such element: Unable to locate element
Line 16、18、19:可以使用find_element_by_name、find_element_by_id、find_element_by_xpath選擇DOM

如何快速寫出XPATH?

chrome 開發者工具DOM上右鍵 =》Copy=》 Copy XPath
剪貼簿中得到:
//*[@id="b-query-icon"]

如何驗證XPath?

開發者工具Console中使用 $x ,如:
$x('//*[@id="b-query-icon"]')

使用BeautifulSoup抓取所有文章標題

需安裝beautifulsoup4
 from selenium.webdriver.support import expected_conditions as EC
 from selenium.webdriver.common.by import By

+from bs4 import BeautifulSoup
+
 options = Options()
 options.add_argument("--disable-notifications")

@@ -21,6 +23,11 @@ chrome.find_element_by_xpath('//*[@id="b-query-icon"]').click()
 try:
     WebDriverWait(chrome, 3).until(EC.element_to_be_clickable((By.XPATH, '//*[@id="Blog1"]/div[1]')))
     print(chrome.find_element_by_xpath('//*[@id="Blog1"]/div[1]/div[3]/div/div/div/h3').text)
+    soup = BeautifulSoup(chrome.page_source, 'html.parser')
+    titles = soup.find_all('h3', {
+        'class': 'post-title'})
+    for title in titles:
+        print(title.getText())
 except TimeoutException:
     print('等待逾時!')

輸出:


2021年1月17日 星期日

fiddler心得

起因

如果你的wireshark抓不到包,可以嘗試使用fiddler抓包備用
我遇過windows 10 使用wireshark抓hyper-v上的laradock http服務抓不到包,估計是hyper-v被map了外網IP造成的,因為其他內網實體機器可以抓到包

安裝版本

Fiddler Everywhere 1.4.1

chrome抓不到包

https://stackoverflow.com/a/19905099  Fiddler not capturing traffic from browsers
如果你的chrome裝了 Proxy SwitchySharp 擴充功能,必須選擇【系統代理】而不是【直接連線】,才能抓到包


抓HTTPS的包

點擊這個驚歎號
信任和啟用HTTPS
安裝DO_NOT_TRUST_FiddlerRoot憑證


設定過濾器

只能對HTTP Header 過濾(沒有wireshark 強大)
瀏覽器打開頁面即可抓到包


Replay請求

在請求上【右鍵】=》【Replay】=》【Reissue Requests】

查看請求封包和返回結果

Request =》 Raw: HTTP 封包
Response =》 Body(JSON): 返回結果


2020年12月24日 星期四

golang心得

環境

作業系統:Windows 10
golang版本:go version go1.15.6 windows/amd64
編輯器:GoLand 2019.3.4

Go 命令行

windows 10可直接在 git bash執行

檢查版本

$ go version
go version go1.15.6 windows/amd64

檢查GOPATH

$ echo $GOPATH
C:\Users\user\go

build命令

http://c.biancheng.net/view/120.html  go build命令(go语言编译命令)完全攻略
$ ls
hello.go
$ go build hello.go
$ ls
hello.exe*  hello.go
$ ./hello.exe
Hello, 世界
30


GoLand

熱鍵(使用sublime基礎的Keymap)

走到下一個斷點:(Resume Program) => F9  (需自定義)
快速複製檔案名字 :ctrl+shift+p => Rename File 


第一個golang程式

hello.go

package main

import "fmt"

func main() {
fmt.Println("Hello, 世界")
fmt.Println(test(3))
}

func test(n int) int {
return n * 10
}

使用GoLand斷點

https://studygolang.com/articles/20746  使用 GoLand 进行调试的要点
https://opensource.com/article/20/6/debug-go-delve  Stop debugging Go with Println and use Delve instead - 純CLI調試

ctrl + shift + p => Debug
go build hello.go => Debug
然後就會自動執行,停在你之前設定斷點的地方(或是直接 Debug 'go build hello.go' )

計算表達式

ctrl+shift+p => Evaluate Expression
但是不支持調用函數,如這邊直接調用test(4)方法(test(4)=4*10=40)
報錯
could not recover call injection state for goroutine x

原因

https://github.com/go-delve/delve/issues/1710#issuecomment-604395056  Version of Delve is too old for this version of Go (maximum supported version 1.12, suppress this error with --check-go-version=false)


GoLand 2019.3.4 內置的 Delve Debugger 版本(1.4.0)太舊
位置:C:\Program Files\JetBrains\GoLand 2019.3.4\plugins\go\lib\dlv\windows\dlv.exe

解法1

升級GoLand

解法2 

手動安裝最新版dlv
$ go get -u github.com/go-delve/delve/cmd/dlv
檢查dlv版本
$ dlv version
Delve Debugger
Version: 1.5.1
Build: $Id: bca418ea7ae2a4dcda985e623625da727d4525b5 $

檢查是否安裝dlv
$ go list ... | grep dlv
github.com/go-delve/delve/cmd/dlv
github.com/go-delve/delve/cmd/dlv/cmds

查dlv位置
$ which dlv
/c/Users/user/go/bin/dlv

把 C:\Users\user\go\bin\dlv.exe 複製到 C:\Program Files\JetBrains\GoLand 2019.3.4\plugins\go\lib\dlv\windows\  下(記得把GoLand 原本舊版本的dlv先備份)

然後就可以在斷點時成功調用函數

手動命令行安裝完dlv後,會安裝到 C:\Users\user\go 下(有bin和src目錄)。GoLand就會自動抓到GOPATH


總結

GoLand的dlv斷點配置起來比PHPstorm的XDebug 簡單,但是用起來沒有那麼順手。


2020年12月15日 星期二

同時跑兩個PHP版本(5.6+7.3)的laradock

 參考資料

實作

拉兩個目錄的laradock,到時候跑同一個目錄的 info.php ( php_info(); ),相同的 nginx/sites/ 配置
/var/www/html/laradock/ - 跑PHP 7.3
/var/www/html/laradock5/ - 跑PHP 5.6

/var/www/html/laradock5/.env

使用不同的project name,最後會build出的容器名字會是:laradock5_docker-in-docker_1、laradock5_nginx_1、laradock5_php-fpm_1、laradock5_workspace_1
#   COMPOSE_PROJECT_NAME=laradock
COMPOSE_PROJECT_NAME=laradock5

使用PHP 5.6
#   PHP_VERSION=7.3
PHP_VERSION=5.6

如果你的網路不好,一直裝不成node,可以這樣跳過安裝node
#   WORKSPACE_INSTALL_NODE=true
WORKSPACE_INSTALL_NODE=false

如果你的網路不好,一直裝不成yarn,可以這樣跳過安裝yarn
#   WORKSPACE_INSTALL_YARN=true
WORKSPACE_INSTALL_YARN=false

避免端口和 /var/www/html/laradock/ (PHP 7.3 )的容器衝突
#   WORKSPACE_SSH_PORT=2222
WORKSPACE_SSH_PORT=2226
...
#   WORKSPACE_BROWSERSYNC_HOST_PORT=3000
WORKSPACE_BROWSERSYNC_HOST_PORT=3004
#   WORKSPACE_BROWSERSYNC_UI_HOST_PORT=3001
WORKSPACE_BROWSERSYNC_UI_HOST_PORT=3005
#   WORKSPACE_VUE_CLI_SERVE_HOST_PORT=8080
WORKSPACE_VUE_CLI_SERVE_HOST_PORT=8084
#   WORKSPACE_VUE_CLI_UI_HOST_PORT=8001
WORKSPACE_VUE_CLI_UI_HOST_PORT=8005

使用5567端口訪問PHP 5.6容器(PHP 7.3 端口5566)
#   NGINX_HOST_HTTP_PORT=80
NGINX_HOST_HTTP_PORT=5567
#   NGINX_HOST_HTTPS_PORT=443
NGINX_HOST_HTTPS_PORT=444

#   VARNISH_BACKEND_PORT=81
VARNISH_BACKEND_PORT=82

/var/www/html/laradock/ 和 /var/www/html/laradock5/ 都執行
[user@localhost laradock5 ]$ docker-compose up -d nginx workspace
Starting laradock5_docker-in-docker_1 ... done
Starting laradock5_workspace_1        ... done
Starting laradock5_php-fpm_1          ... done
Starting laradock5_nginx_1            ... done

[user@localhost laradock ]$ docker-compose up -d nginx workspace
Starting laradock_docker-in-docker_1 ... done
Recreating laradock_workspace_1      ... done
Recreating laradock_php-fpm_1        ... done
Recreating laradock_nginx_1          ... done

檢查

打開 http://app3.test:5566/info.php (php 7.3) 和 http://app3.test:5567/info.php (php 5.6) 


2020年12月14日 星期一

PHP 使用‌‌preg_match()的named subpattern

參考資料


Example #4 Using named subpattern

$str = 'foobar: 2008';

preg_match('/(?P<name>\w+): (?P<digit>\d+)/', $str, $matches);

/* 下面例子在php 5.2.2(pcre 7.0)或更新版本下工作, 然而, 为了后向兼容, 上面的方式是推荐写法. */
// preg_match('/(?<name>\w+): (?<digit>\d+)/', $str, $matches);

print_r($matches);


s

輸出

Array
(
    [0] => foobar: 2008
    [name] => foobar
    [1] => foobar
    [digit] => 2008
    [2] => 2008
)

使用 (?P<name>\w+) 可讓  preg_match() 的 $matches 結果帶有指定的key


2020年12月4日 星期五

windows 10 docker心得

前言

到了2020年才知道docker也在windows 能執行了,之前一直都是在hyper-v的虛擬機上面跑
https://docs.docker.com/docker-for-windows/release-notes/  Docker Desktop for Windows Stable Release notes

安裝

https://docs.docker.com/docker-for-windows/install/  Install Docker Desktop on Windows
安裝成功後開機會自動執行Docker Desktop


開始使用

安裝成功Docker Desktop後無containers和images的畫面


安裝第一個container

直接使用git bash可以呼叫到docker 和docker-compose命令,直接在git bash上執行
(使用90端口,避免和XAMPP的80端口衝突)
$ docker run -d -p 90:80 docker/getting-started
Unable to find image 'docker/getting-started:latest' locally
latest: Pulling from docker/getting-started
188c0c94c7c5: Pull complete
61c2c0635c35: Pull complete
378d0a9d4d5f: Pull complete
2fe865f77305: Pull complete
b92535839843: Pull complete
ebe280ac36f4: Pull complete
b7beeb601852: Pull complete
Digest: sha256:7434aacfacb3c2d7d49f013e8a8092fde022c8b9f058b7fae7077e9cad1edc99
Status: Downloaded newer image for docker/getting-started:latest
661e2d85e8b11aad23994a53d869fd476a18e5524ebc442c2884ba0825cb9f59

然後就可以在 Docker Desktop 看到新的containers和images


在 Containers / Apps 中對執行中的container 點擊【open  in browser 】可以直接在瀏覽器打開docker/getting-started 容器的頁面


laradock

build容器時因為網路不好報錯:
Step 146/294 : RUN if [ ${INSTALL_NODE} = true ]; then     mkdir -p $NVM_DIR &&     curl -o- https://raw.githubusercontent.com/creationix/nvm/v0.33.11/install.sh | bash         && . $NVM_DIR/nvm.sh         && nvm install ${NODE_VERSION}         && nvm use ${NODE_VERSION}         && nvm alias ${NODE_VERSION}         && if [ ${NPM_REGISTRY} ]; then         npm config set registry ${NPM_REGISTRY}         ;fi         && if [ ${INSTALL_NPM_GULP} = true ]; then         npm install -g gulp         ;fi         && if [ ${INSTALL_NPM_BOWER} = true ]; then         npm install -g bower         ;fi         && if [ ${INSTALL_NPM_VUE_CLI} = true ]; then         npm install -g @vue/cli         ;fi         && if [ ${INSTALL_NPM_ANGULAR_CLI} = true ]; then         npm install -g @angular/cli         ;fi
     && ln -s `npm bin --global` /home/laradock/.node-bin ;fi
...
npm ERR! code ECONNRESET
npm ERR! network aborted
npm ERR! network This is a problem related to network connectivity.
npm ERR! network In most cases you are behind a proxy or have bad network settings.
npm ERR! network
npm ERR! network If you are behind a proxy, please make sure that the
npm ERR! network 'proxy' config is set properly.  See: 'npm help config'

解法

Windows 打開proxy和shadowsocks,換一個IP重新build就可以了

XDebug

放棄,搞不定。還是用hyper-v中的laradock斷點(HTTP+CLI都可以)


2020年11月30日 星期一

Windows 10 同時啟用hyper-v和安卓模擬器

前言

在【hyper-v 安裝CentOS 7.6】中hyper-v和安卓的夜神模擬器nox、BlueStacks無法同時開啟
ps. 我的電腦是Intel CPU

安裝Visual Studio 的 Android 模擬器

可以和 Android Studio 搭配
預設會安裝 KitKat Android 4.4(API Level 19)


Android Studio配置硬件加速

https://developer.android.com/studio/run/emulator-acceleration#choose-windows-hypervisor  Configure hardware acceleration for the Android Emulator - Choose a hypervisor on Windows  
Criteria(標準)Hypervisor
You have an Intel processor and do not need to run Hyper-V at the same time as the Android Emulator.
Use Intel HAXM.
You have an Intel processor and do need to run Hyper-V at the same time as the Android Emulator.
- 如果你是Intel處理器且需要同時執行hyper-v作為安卓模擬器
Use WHPX.
-使用 WHPX
You have an AMD processor and do not need to run Hyper-V at the same time as the Android Emulator.
Use Android Emulator Hypervisor Driver for AMD Processors.
You have an AMD processor and do need to run Hyper-V at the same time as the Android Emulator.
Use WHPX.

使用Windows Hypervisor Platform配置VM加速

在你啟用 WHPX前,你的電腦必須準備:
  • Intel處理器:支持虛擬化技術(VT-x)、Extended Page Tables (EPT)和Unrestricted Guest (UG)功能。VT-x必須在你電腦的BIOS中啟用(參考閱讀:【virtualbox心得】)
  • Android Studio 3.2 Beta 1 以上IDE
  • 安卓模擬器27.3.8以上版本
  • windows 10更新到最新(需要2018年4月之後的更新)
使用以下步驟安裝WHPX :
  1. 設定 =》 應用程式=》程式和功能(相關設定下面)
  2. 開啟或關閉Windows功能
  3. 勾選Windows Hypervisor平台

  4. OK
  5. 安裝完成後,重啟Windows

讓Android Studio找到 Visual Studio安卓模擬器

https://stackoverflow.com/a/31763471  Android Studio cannot find the Visual Studio emulator
https://stackoverflow.com/a/39857938  “Visual Studio Android Emulator” for “Android Studio”
  1. 搜尋regedit =》 瀏覽 HKEY_LOCAL_MACHINE\SOFTWARE\Wow6432Node 
  2. 新增【機碼(K)】:Android SDK Tools
  3. 點選那個新增的機碼(key)
  4. 新增【字串值(S)】。數值名稱:path。數值資料:C:\Users\username\AppData\Local\Android\Sdk

成功用Android Studio執行Visual Studio安卓模擬器
ps. Adb.exe not found報錯的原因也是沒有設 Android SDK Tools的path
https://stackoverflow.com/a/51189354  VS Emulator: Adb.exe not found

解決Android Studio的Hardcoded string警告

https://stackoverflow.com/a/34130992  How to solve this issue of Hardcoded string?
  • 把光標放在Hard coded字串上
  • 按 alt+enter
  • 輸入你資源的名字
  • OK

安裝apk包時報錯

WARNING: linker: libdvm.so has text relocations. This is wasting memory and is a security risk. Please fix.
        pkg: /data/local/tmp/app-debug.apk
Failure [INSTALL_FAILED_OLDER_SDK]
https://blog.csdn.net/u012822634/article/details/45072747  android studio Failure [INSTALL_FAILED_OLDER_SDK]错误
有可能是最低版本號大於設備的版本
cordova 因為package.json不同的cordova-android,其platforms/android/build.gradle的defaultMinSdkVersion不同
"cordova-android": "^9.0.0" =》defaultMinSdkVersion=22 //Integer - Minimum requirement is Android 5.1
"cordova-android": "^8.1.0" =》 defaultMinSdkVersion=19 //Integer - Minimum requirement is Android 4.4

解法

Visual Studio Emulator for Android 下載 Marshmallow Android 6.0.0 API Level 23,用高一點的版本去執行

安裝更高版本的安卓模擬器

現在BlueStacks 4支援hyper-v的Windows 10電腦了
直接打開【BlueStacks官網】,安裝程序會依據你的電腦是否開啟hyper-v,自動安裝正確版本的BlueStacks(真厲害)
安裝完應用程式名字是:BlueStacks(Hyper-v) Beta

加快BlueStacks 4的秘訣

  1. 確認你的虛擬化已啟動
  2. 在BlueStacks設定裡分配更多的RAM和CPU

  3. 改變你的電源計劃成【最高效能】
    設定=》系統=》電源與睡眠=》其他電源設定(相關設定下面)

  4. 更新顯卡驅動(我沒特別去做)
  5. 關閉其他高消耗RAM的程式(如:chrome)
  6. 設置你的防毒(我沒特別去做)

檢查安卓(模擬器)版本

https://stackoverflow.com/a/36496770  How to check Android OS version of bluestacks Emulator


456