顯示具有 centos 標籤的文章。 顯示所有文章

2022年5月11日 星期三

低版本PHP的XDebug

PHP 5.6

Windows

php_xdebug-2.5.5-5.6-vc11-nts-x86_64.dll

Windows 10 + 寶塔php 5.6 + 【PHP 5.6 VC11 (64 bit)】 + PHPStorm 2021.2.2

C:\BtSoft\php\56\php.ini
[XDebug]
zend_extension="C:\BtSoft\php\56\ext\php_xdebug-2.5.5-5.6-vc11-nts-x86_64.dll"
xdebug.remote_enable=1
xdebug.remote_host=127.0.0.1
xdebug.remote_log="C:\BtSoft\php\56\xdebug_log"

可斷點

Linux

CentOS 7.9 + 寶塔php 5.6 + XDebug 2.5.5 + PHPStorm 2021.2.2

/www/server/php/56/etc/php.ini
[xdebug]
zend_extension=/www/server/php/56/lib/php/extensions/no-debug-non-zts-20131226/xdebug.so
xdebug.remote_enable=1
xdebug.remote_host=192.168.1.x
xdebug.remote_log=/tmp/xdebug_log

可斷點

PHP 5.5

Windows

php_xdebug-2.5.5-5.5-vc11-nts-x86_64.dll

Windows 10 + 寶塔php 5.5 + 【PHP 5.5 VC11 (64 bit)】 + PHPStorm 2021.2.2

C:\BtSoft\php\55\php.ini
[XDebug]
zend_extension="C:\BtSoft\php\55\ext\php_xdebug-2.5.5-5.5-vc11-nts-x86_64.dll"
xdebug.remote_enable=1
xdebug.remote_host=127.0.0.1

可斷點

Linux

CentOS 7.9 + 寶塔php 5.5 + XDebug 2.5.5 + PHPStorm 2021.2.2

/www/server/php/55/etc/php.ini
[xdebug]
zend_extension="/www/server/php/55/lib/php/extensions/no-debug-non-zts-20121212/xdebug.so"
xdebug.remote_enable=1
xdebug.remote_host=192.168.1.x

可斷點

安裝xdebug時不要在用過裝PHP 5.6的 xdebug-2.5.5/ 目錄下編譯安裝,重新解壓縮新的 xdebug-2.5.5/ 目錄安裝。否則重啟PHP 5.5時會報錯:Xdebug requires Zend Engine API version 220131226.
The Zend Engine API version 220121212 which is installed, is outdated.

PHP 5.4

Windows

php_xdebug-2.4.1-5.4-vc9-nts-x86_64.dll

Windows 10 + 寶塔php 5.4 + 【PHP 5.4 VC9 (64 bit)】 + PHPStorm 2021.2.2
phpinfo() 吃不到XDebug擴展

不能斷點


php_xdebug-2.4.1-5.4-vc9-nts.dll

Windows 10 + 寶塔php 5.4 + 【PHP 5.4 VC9 (32 bit)】 + PHPStorm 2021.2.2
phpinfo() 吃得到XDebug擴展,但是xdebug_log 報錯
<- eval -i 10 -- aXNzZXQoJF9TRVJWRVJbJ1BIUF9JREVfQ09ORklHJ10p
-> <response xmlns="urn:debugger_protocol_v1" xmlns:xdebug="http://xdebug.org/dbgp/xdebug" command="eval" transaction_id="10"><error code="5"><message><![CDATA[command is not available]]></message></error></response>

不能斷點

Linux

CentOS 7.9 + 寶塔php 5.4 + XDebug 2.4.1 + PHPStorm 2021.2.2

/www/server/php/54/etc/php.ini
[xdebug]
zend_extension="/www/server/php/54/lib/php/extensions/no-debug-non-zts-20100525/xdebug.so"
xdebug.remote_enable=1
xdebug.remote_host=192.168.1.x

可斷點

PHP 5.4 在Windows 10 斷點不了,只能在CentOS上斷。
結論:不要接手Windows的PHP 5.4以下專案


2021年6月2日 星期三

frp 心得

 概覽

frp是內網穿透的反向代理工具,支持多種服務(HTTP、SSH、RDP),需要準備一台VPS

相關連接

文檔

下載


服務器

查CPU型號(AMD、Intel、ARM)

# grep -i core /proc/cpuinfo
model name      : AMD EPYC 7601 32-Core Processor

下載、解壓縮、進入目錄

# wget https://github.com/fatedier/frp/releases/download/v0.36.2/frp_0.36.2_linux_amd64.tar.gz
# tar zxvf frp_0.36.2_linux_amd64.tar.gz
# cd frp_0.36.2_linux_amd64/

編輯 frps.ini


[common]
# frp监听的端口,默认是7000,可以改成其他的
bind_port = 7000
# 授权码,请改成更复杂的
token = 12345678
# HTTP 类型代理监听的端口
vhost_http_port = 8080
# frpc 設置 tls_enable = true 才能連,連線做tls加密
tls_only = true
# tls_trusted_ca_file 内容是有效的话,客戶端要配置tls_cert_file和tls_key_file 才能連
tls_trusted_ca_file = /frp_tls_files/ca.crt

# frp管理后台端口,请按自己需求更改
dashboard_port = 7500
# frp管理后台用户名和密码,请改成自己的
dashboard_user = admin
dashboard_pwd = admin
enable_prometheus = true
# 二级域名后缀
subdomain_host = yourdomain.com

# frp日志配置
log_file = /var/log/frps.log
log_level = info
log_max_days = 3
s

設置和啟動frp服務

在frp目錄下執行
mkdir -p /etc/frp
cp frps.ini /etc/frp
cp frps /usr/bin
cp systemd/frps.service /usr/lib/systemd/system/
systemctl enable frps
systemctl start frps
s

防火墻放行端口

# 添加监听端口
firewall-cmd --permanent --add-port=7000/tcp
# 添加管理后台端口
firewall-cmd --permanent --add-port=7500/tcp
firewall-cmd --reload
s

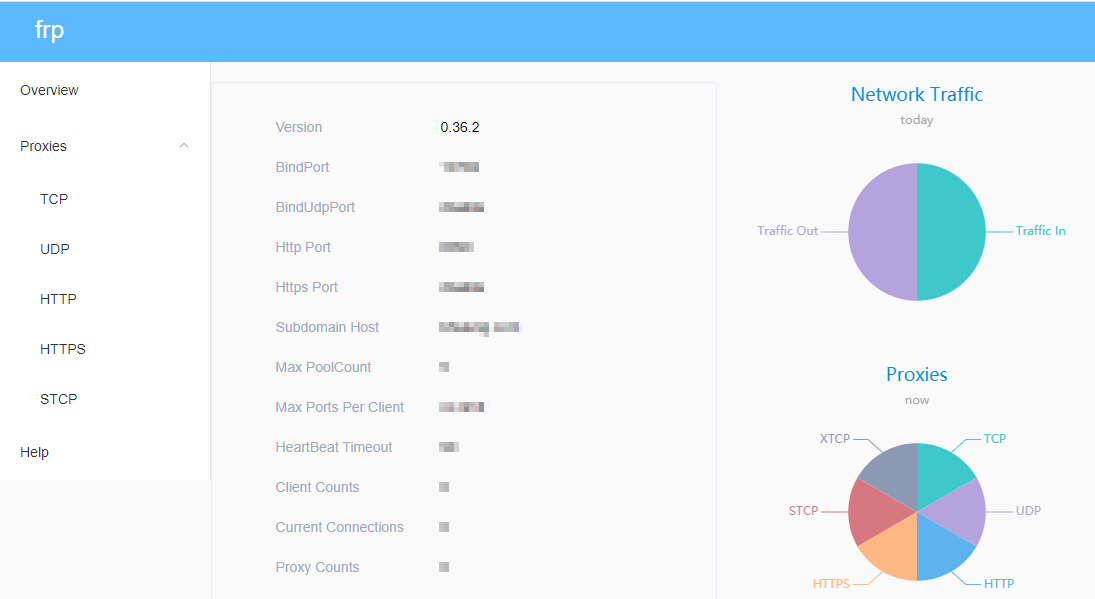
訪問frp後台

瀏覽器打開"http://服務器IP:後台管理端口" ,輸入用戶名和密碼可以查看連接狀態:


客戶端

下載frp

到  https://github.com/fatedier/frp/releases ,下載最新版客戶端
windows:32位系統 frp_0.36.2_windows_386.zip ,64位系統  frp_0.36.2_windows_amd64.zip  ,不知道系統多少下載32位

解壓縮下載的壓縮包,進入文件夾內

編輯 frpc.ini 

(提供服務的遠程電腦)
# 服务端配置
[common]
server_addr = 服务器ip
# 请换成设置的服务器端口
server_port = 7000
token = 12345678
# 自定义 TLS 协议加密
tls_enable = true
tls_cert_file = C:\frp_tls_files\client.crt
tls_key_file = C:\frp_tls_files\client.key

# 配置http服务,可用于小程序开发、远程调试等
[web]
type = http
local_ip = 127.0.0.1
local_port = 80
subdomain = win
# 将 frpc 与 frps 之间的通信内容加密传输,将会有效防止传输内容被截取。
use_encryption = true
# 对传输内容进行压缩,可以有效减小 frpc 与 frps 之间的网络流量,加快流量转发速度,但是会额外消耗一些 CPU 资源。
use_compression = true
# 设置 BasicAuth 鉴权
http_user = abc
http_pwd = abc

# 配置遠程桌面服務
[secret_rdp]
# stcp(secret tcp) 类型的代理可以避免让任何人都能访问到要穿透的服务,但是访问者也需要运行另外一个 frpc 客户端。
type = stcp
# 只有 sk 一致的用户才能访问到此服务
sk = abcdefg
local_ip = 127.0.0.1
local_port = 3389
use_encryption = true
use_compression = true
s
ps.
1. 一個服務端可以同時給多個客戶端使用
2. [ssh]這樣的名稱必須全局唯一,即就算有多個客戶端,也只能使用一次,其他的可以用[ssh2]、[ssh3]等;
3. 除了type為http/https,端口只能被一個服務使用

客戶端連上服務端

git bash 進入frp目錄,然後執行
$ ./frpc.exe -c frpc.ini

後台查狀態

登錄frp管理後台,應該可以看到客戶端已經連上來了

firewalld

firewalld 啟動失敗

原本用iptables,要改用firewalld,但是 firewalld 啟動失敗
# systemctl start firewalld
Failed to start firewalld.service: Unit is masked.

解法

# systemctl unmask --now firewalld
Removed symlink /etc/systemd/system/firewalld.service.
# systemctl enable firewalld
Created symlink from /etc/systemd/system/dbus-org.fedoraproject.FirewallD1.service to /usr/lib/systemd/system/firewalld.service.
Created symlink from /etc/systemd/system/basic.target.wants/firewalld.service to /usr/lib/systemd/system/firewalld.service.
# systemctl start firewalld


檢查 firewalld 設定

使用 --list-all 檢查
# firewall-cmd --list-all
查可用的zones
# firewall-cmd  --get-zones
查預設的zone
# firewall-cmd --get-default-zone
public
查當前zone開放的端口
# firewall-cmd --list-ports
新增可用的端口
# firewall-cmd --add-port=port-number/port-type
如:
# firewall-cmd --add-port=8080/tcp
讓新的設定永久生效
# firewall-cmd --runtime-to-permanent


openssl升級

因為使用到證書登錄,證書登錄用到了openssl,但是openssl舊版有 Heartbleed bug 如果你的openssl太舊,需要升級openssl,到 https://www.openssl.org/source/ 下載最新的openssl

安裝

# wget https://www.openssl.org/source/openssl-1.1.1k.tar.gz
# tar zxf openssl-1.1.1k.tar.gz
# cd openssl-1.1.1k/
# ./config
# make
# make test
# make install

測試新裝的openssl

# /usr/local/bin/openssl version
/usr/local/bin/openssl: error while loading shared libraries: libssl.so.1.1: cannot open shared object file: No such file or directory

解法

# ln -s /usr/local/lib64/libssl.so.1.1 /usr/lib64/
# ln -s /usr/local/lib64/libcrypto.so.1.1 /usr/lib64/

再次測試

# /usr/local/bin/openssl version
OpenSSL 1.1.1k  25 Mar 2021

替換新舊版本

# mv /usr/bin/openssl  /usr/bin/openssl-old
# ln -s /usr/local/bin/openssl /usr/bin/openssl
# openssl version
OpenSSL 1.1.1k  25 Mar 2021

自定義 TLS 協議加密

生成服務器私鑰

# openssl genrsa -out ca.key 1024
Generating RSA private key, 1024 bit long modulus (2 primes)
.....+++++
.......+++++
e is 65537 (0x010001)

# ls
ca.key

根據私鑰生成證書申請文件csr

# openssl req -new -key ca.key -out ca.csr
You are about to be asked to enter information that will be incorporated
into your certificate request.
What you are about to enter is what is called a Distinguished Name or a DN.
There are quite a few fields but you can leave some blank
For some fields there will be a default value,
If you enter '.', the field will be left blank.
-----
Country Name (2 letter code) [AU]:CN
State or Province Name (full name) [Some-State]:Shanghai
Locality Name (eg, city) []:Shanghai
Organization Name (eg, company) [Internet Widgits Pty Ltd]:JY
Organizational Unit Name (eg, section) []:JY
Common Name (e.g. server FQDN or YOUR name) []:*.yourdomain.com   # 這裡輸入你的域名,*.yourdomain.com生成通配符域名證書
Email Address []:yourname@email.com

Please enter the following 'extra' attributes
to be sent with your certificate request
A challenge password []:  # 這裡輸入密碼,沒有密碼可以空
An optional company name []:JY

# ls
ca.csr  ca.key

私鑰對證書申請進行簽名從而生成證書

# openssl x509 -req -in ca.csr -out ca.crt -signkey ca.key -days 3650
Signature ok
subject=C = CN, ST = Shanghai, L = Shanghai, O = JY, OU = JY, CN = *.yourdomain.com, emailAddress = yourname@email.com
Getting Private key

# ls
ca.crt  ca.csr  ca.key

生成 frpc 的私鑰

# openssl genrsa -out client.key 2048
Generating RSA private key, 2048 bit long modulus (2 primes)
..........+++++
................................................+++++
e is 65537 (0x010001)

# ls
ca.crt  ca.csr  ca.key  client.key

準備默認 OpenSSL 配置文件於當前目錄

# cp /etc/pki/tls/openssl.cnf ./my-openssl.cnf
# ls
ca.crt  ca.csr  ca.key  client.key  my-openssl.cnf

根據frpc的私鑰生成frpc的證書申請文件csr

# openssl req -new -sha256 -key client.key \
>     -subj "/C=XX/ST=DEFAULT/L=DEFAULT/O=DEFAULT/CN=client.com" \
>     -reqexts SAN \
>     -config <(cat my-openssl.cnf <(printf "\n[SAN]\nsubjectAltName=DNS:client.com,DNS:example.client.com")) \
>     -out client.csr
# ls
ca.crt  ca.csr  ca.key  client.csr  client.key  my-openssl.cnf

ps. 使用 client.com 沒事,即使這是無效的域名,不影響使用

生成 frpc 的證書(用到ca.crt和ca.key)

# openssl x509 -req -days 365 \
>     -in client.csr -CA ca.crt -CAkey ca.key -CAcreateserial \
> -extfile <(printf "subjectAltName=DNS:client.com,DNS:example.client.com") \
> -out client.crt
Signature ok
subject=C = XX, ST = DEFAULT, L = DEFAULT, O = DEFAULT, CN = client.com
Getting CA Private Key
# ls
ca.crt  ca.csr  ca.key  ca.srl  client.crt  client.csr  client.key  my-openssl.cnf


當 服務器的frps.ini 配置的 tls_trusted_ca_file 是有效的 ca.crt 時,客戶端frpc.ini 的 tls_cert_file 和 tls_key_file 必須是有效的 client.crt 和 client.key 。完成frps 單向驗證 frpc 的身份

nginx反向代理frp後台

因為cloudflare免費的只能代理80端口,想要用cloudflare的https訪問frp後台,可以這樣做
nginx新增配置:
  
server
{
    server_name  frp.yourdomain.com;

    location / {
        proxy_pass         http://127.0.0.1:7500;
        proxy_set_header   Host             $host;
        proxy_set_header   X-Real-IP        $remote_addr;
        proxy_set_header   X-Forwarded-For  $proxy_add_x_forwarded_for;
    }
}
  
s

在想要訪問內網服務的機器上也部署 frpc

frpc.ini配置如下:
  
# 服务端配置
[common]
(同提供服務的遠程電腦的frpc.ini)

[secret_ssh_visitor]
type = stcp
# stcp 的访问者
role = visitor
# 要访问的 stcp 代理的名字
server_name = secret_rdp
sk = abcdefg
# 绑定本地端口用于访问 SSH 服务
bind_addr = 127.0.0.1
bind_port = 13389
  
s

訪問內網穿透服務

web

提供服務的遠程電腦打開web服務,外網任意一台電腦可直接訪問 https://win.yourdomain.com/ ,即使遠程電腦的web服務

secret_rdp

外網電腦打開Windows 遠端桌面連線,輸入  127.0.0.1:13389 就可以連接到本地Windows
注意一定要開啟windows電腦的【啟用遠端桌面】

將 frp 封裝成 windows 後台服務

使用 NSSM 將 frp 封裝成 windows 服務,可以在後台運行,並且開機自啟動

安裝nssm且新增frpc服務

下載 nssm 2.24  後解壓縮,(打開git bash)進入 nssm-2.24 目錄
/path/nssm-2.24/win64
$ ./nssm.exe install frpc
Administrator access is needed to install a service.


在彈出的對話框中填寫
Path: C:\path\frp_0.36.2_windows_386\frpc.exe
Startup directory: C:\path\frp_0.36.2_windows_386
Arguments: -c C:\path\frp_0.36.2_windows_386\frpc.ini

Details頁簽可以設定是否開機(Startup type)自動啟動:automatic / manual 

編輯服務配置

$ ./nssm.exe edit frpc

啟動和停止

用命令【啟動】和【停止】實際測試無效
$ ./nssm.exe start frpc
Can't open service!
OpenService(): 存取被拒。
$ ./nssm.exe stop frpc
Can't open service!
OpenService(): 存取被拒。

要用這方式停止
運行 services.msc ,可以打開 windows 的服務管理器。在這裡面手動停用/啟動

刪除服務

$ ./nssm.exe remove frpc
Administrator access is needed to remove a service.


參考資料

https://www.vpsjxw.com/vps_use/vps_frp_intro/  vps+frp内网穿透,外网远程访问局域网内主机的ssh、远程桌面、网站服务
https://tlanyan.me/frp-tunnel-tutorial/  frp内网穿透教程(主要)
https://bobcares.com/blog/failed-to-start-firewalld-service-unit-is-masked/  Failed to start firewalld service unit is masked – How we fix it!
https://www.4spaces.org/how-to-upgrade-openssl-on-centos-7/  CentOS如何升级openssl到最新版本
https://ningyu1.github.io/site/post/51-ssl-cert/  Openssl生成自签名证书,简单步骤
https://www.sohu.com/a/416379503_610671  教你用FRP做内网穿透 使用远程桌面连接家里的windows电脑


2020年12月15日 星期二

同時跑兩個PHP版本(5.6+7.3)的laradock

 參考資料

實作

拉兩個目錄的laradock,到時候跑同一個目錄的 info.php ( php_info(); ),相同的 nginx/sites/ 配置
/var/www/html/laradock/ - 跑PHP 7.3
/var/www/html/laradock5/ - 跑PHP 5.6

/var/www/html/laradock5/.env

使用不同的project name,最後會build出的容器名字會是:laradock5_docker-in-docker_1、laradock5_nginx_1、laradock5_php-fpm_1、laradock5_workspace_1
#   COMPOSE_PROJECT_NAME=laradock
COMPOSE_PROJECT_NAME=laradock5

使用PHP 5.6
#   PHP_VERSION=7.3
PHP_VERSION=5.6

如果你的網路不好,一直裝不成node,可以這樣跳過安裝node
#   WORKSPACE_INSTALL_NODE=true
WORKSPACE_INSTALL_NODE=false

如果你的網路不好,一直裝不成yarn,可以這樣跳過安裝yarn
#   WORKSPACE_INSTALL_YARN=true
WORKSPACE_INSTALL_YARN=false

避免端口和 /var/www/html/laradock/ (PHP 7.3 )的容器衝突
#   WORKSPACE_SSH_PORT=2222
WORKSPACE_SSH_PORT=2226
...
#   WORKSPACE_BROWSERSYNC_HOST_PORT=3000
WORKSPACE_BROWSERSYNC_HOST_PORT=3004
#   WORKSPACE_BROWSERSYNC_UI_HOST_PORT=3001
WORKSPACE_BROWSERSYNC_UI_HOST_PORT=3005
#   WORKSPACE_VUE_CLI_SERVE_HOST_PORT=8080
WORKSPACE_VUE_CLI_SERVE_HOST_PORT=8084
#   WORKSPACE_VUE_CLI_UI_HOST_PORT=8001
WORKSPACE_VUE_CLI_UI_HOST_PORT=8005

使用5567端口訪問PHP 5.6容器(PHP 7.3 端口5566)
#   NGINX_HOST_HTTP_PORT=80
NGINX_HOST_HTTP_PORT=5567
#   NGINX_HOST_HTTPS_PORT=443
NGINX_HOST_HTTPS_PORT=444

#   VARNISH_BACKEND_PORT=81
VARNISH_BACKEND_PORT=82

/var/www/html/laradock/ 和 /var/www/html/laradock5/ 都執行
[user@localhost laradock5 ]$ docker-compose up -d nginx workspace
Starting laradock5_docker-in-docker_1 ... done
Starting laradock5_workspace_1        ... done
Starting laradock5_php-fpm_1          ... done
Starting laradock5_nginx_1            ... done

[user@localhost laradock ]$ docker-compose up -d nginx workspace
Starting laradock_docker-in-docker_1 ... done
Recreating laradock_workspace_1      ... done
Recreating laradock_php-fpm_1        ... done
Recreating laradock_nginx_1          ... done

檢查

打開 http://app3.test:5566/info.php (php 7.3) 和 http://app3.test:5567/info.php (php 5.6) 


2020年4月2日 星期四

mongoDB 安裝和使用


安裝

新增repo檔案並加入

# vim /etc/yum.repos.d/mongodb.repo
[MongoDB]
name=MongoDB Repository
baseurl=http://repo.mongodb.org/yum/redhat/$releasever/mongodb-org/4.2/$basearch/
gpgcheck=1
enabled=1
gpgkey=https://www.mongodb.org/static/pgp/server-4.2.asc

安裝

# yum install mongodb-org

啟動  - For CentOS 8/7

# systemctl start mongod.service

開機自動啟動 - For CentOS 8/7

# systemctl enable mongod.service

查版本

# mongod --version
db version v4.2.5
git version: 2261279b51ea13df08ae708ff278f0679c59dc32
OpenSSL version: OpenSSL 1.0.1e-fips 11 Feb 2013
allocator: tcmalloc
modules: none
build environment:
    distmod: rhel70
    distarch: x86_64
    target_arch: x86_64

使用

# mongo
MongoDB shell version v4.2.5
connecting to: mongodb://127.0.0.1:27017/?compressors=disabled&gssapiServiceName=mongodb
Implicit session: session { "id" : UUID("317a2efd-8d1e-4781-abcf-38d8a0907eb4") }
MongoDB server version: 4.2.5
Welcome to the MongoDB shell.
...
> use mydb;
switched to db mydb
> db.test.save( { a: 1 } )
WriteResult({ "nInserted" : 1 })
>  db.test.find()
{ "_id" : ObjectId("5e84098b7cf1f4aa0558d5e6"), "a" : 1 }


使用

客戶端使用PHPStorm的Plugins: Mongo Plugin

配置連線

因為 IP+端口不通,可使用SSH通道,URL: IP(不需指定port) 


參考資料

https://tecadmin.net/install-mongodb-on-centos/  How to Install MongoDB 4.2 on CentOS/RHEL 8/7/6


2019年10月7日 星期一

docker 心得2019

系統:CentOS 7.6

安裝docker CE

由於 Docker 後來分為 Docker EE(Enterprise Edition)與 Docker CE(Community Edition)兩種版本,新的套件名稱與舊的不同,所以在安裝 Docker 之前,要先移除 CentOS Linux 系統上舊版的 Docker 套件:(新系統可略)
# yum remove docker docker-common container-selinux docker-selinux docker-engine docker-engine-selinux

安裝一些必要套件:
# yum install -y yum-utils device-mapper-persistent-data lvm2

新增 Docker 官方的 stable 套件庫(repository):
# yum-config-manager --add-repo https://download.docker.com/linux/centos/docker-ce.repo

安裝 Docker CE 版:
# yum install docker-ce

將你的用戶加入docker group (實測該用戶還是不能執行docker  重啟機器打開新的screen才生效)
$ sudo usermod -aG docker $(whoami)
執行後可檢查 /etc/gshadow 和 /etc/group

docker 開機自動啟動
# systemctl enable docker.service

開啟docker 服務
# systemctl start docker.service

測試
# docker run hello-world
Unable to find image 'hello-world:latest' locally
latest: Pulling from library/hello-world
1b930d010525: Pull complete
Digest: sha256:b8ba256769a0ac28dd126d584e0a2011cd2877f3f76e093a7ae560f2a5301c00
Status: Downloaded newer image for hello-world:latest
之後docker images 會多一個 hello-world:latest 的鏡像

安裝Docker Compose

安裝 epel
# yum install epel-release

查裝什麼package才能用pip
# yum provides */pip

安裝pip
# yum install python34-pip

安裝docker compose
# pip3.4 install docker-compose
...
You are using pip version 8.1.2, however version 19.2.3 is available.
You should consider upgrading via the 'pip install --upgrade pip' command.

升級pip
# pip3.4 install --upgrade pip
...
Successfully installed pip-19.2.3


檢測pip版本(升級後pip可以直接用了)
# pip --version
pip 19.2.3 from /usr/lib/python3.4/site-packages/pip (python 3.4)


升級Python packages,讓docker-compose 正確執行(我沒做)
# yum upgrade python*

查 docker-compose 版本
# docker-compose version
docker-compose version 1.24.1, build 4667896
docker-py version: 3.7.3
CPython version: 3.4.10

安裝Docker Compose - 方法2

如果pip安裝遇到 RuntimeError: Python 3.5 or later is required 錯誤,可使用這個方法。更無腦
https://phoenixnap.com/kb/install-docker-compose-centos-7  How To Install Docker Compose On CentOS 7
# curl -L "https://github.com/docker/compose/releases/download/1.24.1/docker-compose-$(uname -s)-$(uname -m)" -o /usr/local/bin/docker-compose
# chmod +x /usr/local/bin/docker-compose

如果報錯:
curl: (35) Peer reports incompatible or unsupported protocol version.
https://blog.csdn.net/feinifi/article/details/79629904  git clone 报错:Peer reports incompatible or unsupported protocol version解决办法
原因是curl,nss的版本低

解法:

# yum update nss curl


docker-compose 自動完成

# curl -L https://raw.githubusercontent.com/docker/compose/1.25.4/contrib/completion/bash/docker-compose -o /etc/bash_completion.d/docker-compose
讓安裝前的tty  docker-compose可以自動完成
# . /etc/bash_completion.d/docker-compose

開啟ipv4 ip_forward

啟動時如果報錯
# docker run -d --name my-running-app -p 5656:80 -v /root/php5.6-apache/src:/var/www/html my-php-app:latest
WARNING: IPv4 forwarding is disabled. Networking will not work.
b44f4990a94025f7d03329dfb32c64b2677dc595d937a309582150b409c0404a

https://stackoverflow.com/questions/41453263/docker-networking-disabled-warning-ipv4-forwarding-is-disabled-networking-wil Docker Networking Disabled: WARNING: IPv4 forwarding is disabled. Networking will not work
https://blog.csdn.net/weiguang1017/article/details/76212203 centos 7 Docker容器启动报WARNING: IPv4 forwarding is disabled. Networking will not work
https://carlislebear.blogspot.com/2014/11/arch-linux-internet-sharing.html  Arch Internet sharing(透過另一台電腦上網)
Windows是無法訪問容器的web服務的(hyper-v上可以),要開啟以下設定
/etc/sysctl.conf
net.ipv4.ip_forward=1
重啟網路
# systemctl restart network
這樣windows才能訪問容器的web服務
如果打不開,要注意有沒有因為被XDebug斷住了所以打不開

laradock

重啟Exited 的 laradock container

# docker ps -a
CONTAINER ID        IMAGE                COMMAND                  CREATED             STATUS                      PORTS                                        NAMES
cc866de06b61        laradock_nginx       "/bin/bash /opt/star…"   2 months ago        Exited (255) 11 days ago    0.0.0.0:443->443/tcp, 0.0.0.0:5566->80/tcp   laradock_ngin
x_1
ce974cde40bf        laradock_php-fpm     "docker-php-entrypoi…"   3 months ago        Exited (255) 11 days ago    9000/tcp                                     laradock_php-
fpm_1
cb36fbf53996        laradock_workspace   "/sbin/my_init"          3 months ago        Exited (255) 11 days ago    0.0.0.0:2222->22/tcp                         laradock_work
space_1
d475c0f6d18f        docker:dind          "dockerd-entrypoint.…"   3 months ago        Exited (255) 11 days ago    2375-2376/tcp                                laradock_dock
er-in-docker_1
64c1a5ed1659        laradock_mysql       "docker-entrypoint.s…"   3 months ago        Exited (255) 2 months ago   0.0.0.0:3306->3306/tcp, 33060/tcp            laradock_mysq
l_1

啟動單一容器

# docker start laradock_workspace_1
laradock_workspace_1

但因為laradock 是很多容器組合而成的

正確的重啟laradock

# docker-compose up -d workspace nginx
laradock_docker-in-docker_1 is up-to-date
laradock_workspace_1 is up-to-date
Starting laradock_php-fpm_1 ... done
Starting laradock_nginx_1   ... done

如果報錯:
Creating network "laradock_frontend" with driver "bridge"
ERROR: Failed to Setup IP tables: Unable to enable SKIP DNAT rule:  (iptables failed: iptables --wait -t nat -I DOCKER -i br-7d0b53dc35e0 -j RETURN: iptables: No chain/target/match by that name.
 (exit status 1))
原因:
應該是改過防火墻iptables造成的
https://stackoverflow.com/a/53766860  iptables: No chain/target/match error (with docker network create)
https://github.com/wodby/docker4drupal/issues/211#issuecomment-351016274  Unable to enable SKIP DNAT rule (未使用)
解法:
重啟docker
# systemctl restart docker
再重啟laradock
# docker-compose up -d workspace nginx

進入workspace容器

# docker exec -it laradock_workspace_1 bash
上面是以root身份進入,跑composer 會有警告。如何進入容器跑composer不報警告?
以laradock身份進入容器
# docker-compose exec --user=laradock workspace bash
laradock@daa4f318e534:/var/www$ composer --version
Composer version 1.9.0 2019-08-02 20:55:32


關閉laradock

# docker-compose down

多人開發

配置.env

#   APP_CODE_PATH_HOST=../  
# APP_CODE_PATH_HOST=../project-z/coolapp/   # 使用 laradock/nginx/sites/default.conf 不需特別設定
APP_CODE_PATH_HOST=../project-z/  # 多個專案,複製 laradock/nginx/sites/app.conf.example 成 coolapp.conf 和 coolapp2.conf
#   WORKSPACE_INSTALL_XDEBUG=false
WORKSPACE_INSTALL_XDEBUG=true
#   PHP_FPM_INSTALL_XDEBUG=false
PHP_FPM_INSTALL_XDEBUG=true  # workspace 和 php-fpm容器都裝XDebug
#   NGINX_HOST_HTTP_PORT=80
NGINX_HOST_HTTP_PORT=5566


coolapp.conf

root /var/www/app;  => root /var/www/coolapp/public;

coolapp2.conf

server_name app.test; => server_name app2.test;
root /var/www/app;  => root /var/www/coolapp2/public;

windows設hosts,重啟laradock(down 和 up),然後 http://app.test:5566/ 訪問coolapp,http://app2.test:5566/ 訪問 coolapp2

更新laradock

git pull 更新laradock後重新build會報錯,因為env-example 已經被改過了,加了一些配置
先備份自己的.env(要記得你改了什麼),然後cp env-example .env 然後再把你原本在.env改的配置改到新的.env。這樣build才會成功

php安裝memcache

修改.env
#   PHP_FPM_INSTALL_MEMCACHED=false
PHP_FPM_INSTALL_MEMCACHED=true

需重新build php-fpm容器出錯

# docker-compose build php-fpm
...
E: Failed to fetch http://deb.debian.org/debian/pool/main/c/cups/libcupsimage2_2.2.10-6+deb10u1_amd64.deb  404  Not Found [IP: 151.101.10.133 80]
E: Unable to fetch some archives, maybe run apt-get update or try with --fix-missing?
ERROR: Service 'php-fpm' failed to build: The command '/bin/sh -c if [ ${INSTALL_IMAGEMAGICK} = true ]; then     apt-get install -y libmagickwand-dev imagemagick &&     pecl install imagick &&     docker-php-ext-enable imagick ;fi' returned a non-zero code: 100
build 失敗
https://github.com/laradock/laradock/issues/2434
https://blog.51cto.com/beijing0414/1633956 
原來是hyper-v 系統的時間錯誤(當天應為4/8)
[root@localhost laradock]# date
Mon Apr  6 00:06:11 -02 2020
解法:
先安裝ntpdate
# yum install ntpdate
[root@localhost laradock]# date
Mon Apr  6 00:36:28 -02 2020
[root@localhost laradock]# ntpdate cn.pool.ntp.org
 8 Apr 13:07:13 ntpdate[14154]: step time server 119.28.206.193 offset 217834.861195 sec
[root@localhost laradock]# date
Wed Apr  8 13:07:15 -02 2020

重新build php-fpm(不吃緩存,比較慢)
# docker-compose build --no-cache php-fpm
# docker-compose up --build  // 不要不指定service,否則會全部build

這樣phpinfo()和命令行php -m 才有memcached

安裝docker-machine (無使用)

# base=https://github.com/docker/machine/releases/download/v0.16.0 &&
  curl -L $base/docker-machine-$(uname -s)-$(uname -m) >/tmp/docker-machine &&
  sudo mv /tmp/docker-machine /usr/local/bin/docker-machine &&
  chmod +x /usr/local/bin/docker-machine

檢視配置檔案位於哪裡

https://codertw.com/%E4%BC%BA%E6%9C%8D%E5%99%A8/160314/
$ systemctl show --property=FragmentPath docker
FragmentPath=/usr/lib/systemd/system/docker.service

開啟docker API

https://gist.github.com/styblope/dc55e0ad2a9848f2cc3307d4819d819f
新增文件:/etc/docker/daemon.json
{"hosts": ["tcp://0.0.0.0:2375", "unix:///var/run/docker.sock"]}
新增文件:/etc/systemd/system/docker.service.d/override.conf
[Service]
ExecStart=
ExecStart=/usr/bin/dockerd
重新加載 systemd daemon
# systemctl daemon-reload
重啟docker
# systemctl restart docker.service
在機器上測試
$ curl http://localhost:2375
{"message":"page not found"}
但是windows上打不開 => server要打開 2375 端口
# firewall-cmd --zone=public --add-port=2375/tcp --permanent
# firewall-cmd --reload
然後在Windows 瀏覽器上直接打開 http://192.168.1.9:2375/info 顯示json即成功

忽然進不了XDebug斷點

commit ab4e06f270ae83d6e41702b2b652a980b12816ce
Author: Jordy Schreuders <3071062+99linesofcode@users.noreply.github.com>
Date:   Fri Feb 14 15:15:04 2020 +0100

    Default to host.docker.internal

因為更新重新build php-fpm後這個commit把 xdebug.remote_connect_back 改成0了
修改 php-fpm/xdebug.ini 、 workspace/xdebug.ini 將 xdebug.remote_connect_back 改回1,然後重新build
# docker-compose build php-fpm
ps. 重新build 時間比較久,改 xdebug.ini 後沒法像  nginx/sites/default.conf 只需要重啟laradock就能生效,必須build

進不了XDebug斷點-2

新hyper-v虛擬機上裝的laradock,在windows本機不要用同一個PHPStorm 專案改deployment去連,會一直進不了斷點,開一個新project後重新設deployment,請求接口和cli時會自動匹配,PHP CLI無需設docker。不要在同一個PHPStorm projcet上折騰。
實體開發機裝了兩個PHP(php 5.5 + 7.3),上面的laradock http能進xdebug,但是cli不行 => php7.3改用hyper-v的laradock去斷點

進不了XDebug斷點-3

如果laradock中 http請求可以斷點,但是CLI不能斷點。別折騰了,直接在hyper-v上面裝PHP去做CLI斷點,不一定要在laradock中斷點。
檢查:
使用-d 自定義INI條目
$ php -dxdebug.remote_enable=1 -dxdebug.remote_mode=req -dxdebug.remote_port=9000 -dxdebug.remote_host=192.168.1.7 -dxdebug.remote_connect_back=0 -dxdebug.idekey=PHPSTORM public/index.php

要注意 xdebug.remote_enable=1 是否開啟

其實是 laradock 的 workspace 容器的xdebug 版本是3.0.0這個原因造成的,workspace和php-fpm容器裝的是不同的xdebug,workspace負責cli,php-fpm負責網頁,所以網頁上的phpinfo()查到的是是php-fpm的xdebug版本,而workspace的xdebug版本要在容器裡cli執行,如:
root@e7aa5f3bd006:/var/www# php -r 'phpinfo();' | grep Xdebug
    with Xdebug v2.5.5, Copyright (c) 2002-2017, by Derick Rethans
需要改 workspace/Dockerfile 的 xDebug 部分,讓workspcace 容器安裝低版本的xdebug

laradock中websocket 端口對外

https://github.com/laradock/laradock/issues/2002#issuecomment-468884705
編輯 docker-compose.yml 加入
services:
  workspace:
    port:
      - 2346:2346
然後重啟laradock


和gitlab端口衝突

目前已知 8080 和3000端口會和gitlab衝突(gitlab已開啟)

解法:

https://github.com/laradock/laradock/issues/2512#issuecomment-589719158  Bind for 0.0.0.0:8080 failed: port is already allocated

換一個端口,修改.env
WORKSPACE_VUE_CLI_SERVE_HOST_PORT=8080 => 8084
...
WORKSPACE_BROWSERSYNC_HOST_PORT=3000 => 3002

安裝特定版本的xdebug

如果你的專案和xdebug最新版本(3.0.0+)有衝突
https://bugs.xdebug.org/view.php?id=1883  0001883: Function xdebug_is_enabled has been removed
XDebug 3.0.0beta1版本把 xdebug_is_enabled() 移除了
可以這樣做
diff --git a/php-fpm/Dockerfile b/php-fpm/Dockerfile
index 1837b45..a64bf63 100644
--- a/php-fpm/Dockerfile
+++ b/php-fpm/Dockerfile
@@ -193,7 +193,7 @@ RUN if [ ${INSTALL_XDEBUG} = true ]; then \
     if [ $(php -r "echo PHP_MINOR_VERSION;") = "0" ]; then \
       pecl install xdebug-2.9.0; \
     else \
-      pecl install xdebug; \
+      pecl install xdebug-2.9.8; \
     fi \
   fi && \
   docker-php-ext-enable xdebug \
ps. PHP_MINOR_VERSION就是PHP的中版本號,ex. php 7.3,PHP_MINOR_VERSION就是3

因為改了Dockerfile,所以要重新build,雖然有緩存,但還是有點久
$ docker-compose build php-fpm
...
Step 29/159 : RUN if [ ${INSTALL_XDEBUG} = true ]; then   if [ $(php -r "echo PHP_MAJOR_VERSION;") = "5" ]; then     pecl install xdebug-2.5.5;   else     if [ $(php -r "echo PHP_MINOR_VERSION;") = "0" ]; then       pecl install xdebug-2.9.0;     else       pecl install xdebug-2.9.8;     fi   fi &&   docker-php-ext-enable xdebug ;fi
 ---> Running in 999878a0db51
downloading xdebug-2.9.8.tgz ...
Starting to download xdebug-2.9.8.tgz (245,293 bytes)
...................................................done: 245,293 bytes
91 source files, building
running: phpize
Configuring for:
PHP Api Version:         20180731
Zend Module Api No:      20180731
Zend Extension Api No:   320180731
building in /tmp/pear/temp/pear-build-defaultusergNFJEA/xdebug-2.9.8
running: /tmp/pear/temp/xdebug/configure --with-php-config=/usr/local/bin/php-config
checking for grep that handles long lines and -e... /bin/grep

自定義workspace中的.bashrc

由 workspace/Dockerfile 
COPY ./aliases.sh /home/laradock/aliases.sh
...
USER laradock
RUN echo "" >> ~/.bashrc && \
    echo "# Load Custom Aliases" >> ~/.bashrc && \
    echo "source ~/aliases.sh" >> ~/.bashrc && \
      echo "" >> ~/.bashrc

修改 workspace/aliases.sh 可以客製化容器中laradock用戶的.bashrc
然後需重新build workspace容器
# docker-compose build workspace

Dockerfile

以安裝 php:5.6-apache 為例
https://hub.docker.com/_/php

新建 Dockerfile 

內容為
FROM php:5.6-apache
COPY src/ /var/www/html/
新增目錄src 和 文件src/index.php

build Docker image

# docker build -t my-php-app .
Step 1/2 : FROM php:5.6-apache
5.6-apache: Pulling from library/php
...
他會從線上把 php:5.6-apache 拉下來,用下面方法查看
# docker images
REPOSITORY              TAG                 IMAGE ID            CREATED             SIZE
my-php-app              latest              10cc9a5aa0c2        25 seconds ago      355MB
...
php                     5.6-apache          24c791995c1e        14 months ago       355MB

刪除dangling的images(部份<none>TAG的image)

https://stackoverflow.com/a/33913711
因為每次都build同一個image名字時,前一個同名的image的REPOSITORY和TAG會變成<none>
# docker rmi $(docker images --filter "dangling=true" -q --no-trunc)


啟動容器

# docker run -d --name my-running-app -p 5656:80 -v /root/php5.6-apache/src:/var/www/html my-php-app:latest

--name my-running-app => 指定容器的名字
-p 5656:80 => 容器中的80端口對應到host的5656端口,http://192.168.1.9:5656/ 可訪問容器中的web伺服器
-v /root/php5.6-apache/src:/var/www/html => host的/root/php5.6-apache/src對應到容器中的/var/www/html,直接改host目錄的文件容器中文件就會改動

進入容器

# docker exec -it my-running-app bash
用 -d 啟動後再用此目錄進容器,否則容器內的apache不會啟動

停止容器

# docker stop my-running-app

刪除 Exited 的容器

# docker rm my-running-app

進階使用

Dockerfile
FROM php:5.6-apache
COPY src/ /var/www/html/
RUN docker-php-ext-install mysqli \
    && apt-get update \
    && apt-get install -y libfreetype6-dev libjpeg62-turbo-dev \
    && docker-php-ext-configure gd --with-freetype-dir=/usr/include/ --with-jpeg-dir=/usr/include/ \
    && docker-php-ext-install gd \
    && pecl install xdebug-2.5.5 && docker-php-ext-enable xdebug \
    && echo "zend_extension=$(find /usr/local/lib/php/extensions/ -name xdebug.so)" >> /usr/local/etc/php/php.ini  \
    && echo "xdebug.remote_enable=1" >> /usr/local/etc/php/php.ini \
    && echo "xdebug.remote_connect_back=1" >> /usr/local/etc/php/php.ini \
    && echo "xdebug.idekey=PHPSTORM" >> /usr/local/etc/php/php.ini \
    && echo "xdebug.remote_log=/tmp/xdebug.log" >> /usr/local/etc/php/php.ini

註:
安裝mysqli
安裝gd函式庫
安裝xdebug並配置


使用docker安裝beanstalk console

github上推薦用composer安裝,但是如果你的機器沒有php和composer,你可以這樣做。直接拉取github上專案
$ git clone https://github.com/ptrofimov/beanstalk_console.git
$ cd beanstalk_console/
$ docker build --rm -t beanstalk_console .
$ docker run -d -p "8899:80" --name beanstalk_console beanstalk_console

然後瀏覽器打開 http://x.x.x.x:8899  即可顯示 Beanstalk console

在容器內測端口

https://stackoverflow.com/a/2226759  Test if port open and forwarded using PHP
php-fpm容器內可能沒有telnet,可以用PHP去測端口通不通
$host = 'stackoverflow.com';
$ports = array(21, 25, 80, 81, 110, 443, 3306);

foreach ($ports as $port)
{
    $connection = @fsockopen($host, $port);

    if (is_resource($connection))
    {
        echo '<h2>' . $host . ':' . $port . ' ' . '(' . getservbyport($port, 'tcp') . ') is open.</h2>' . "\n";

        fclose($connection);
    }

    else
    {
        echo '<h2>' . $host . ':' . $port . ' is not responding.</h2>' . "\n";
    }
}
輸出:
stackoverflow.com:21 is not responding.
stackoverflow.com:25 is not responding.
stackoverflow.com:80 (http) is open.
stackoverflow.com:81 is not responding.
stackoverflow.com:110 is not responding.
stackoverflow.com:443 is not responding.
stackoverflow.com:3306 is not responding.

如果端口忽然不通可以嘗試重啟docker

參考資料:

https://blog.gtwang.org/linux/centos-linux-7-install-docker-tutorial/  CentOS Linux 7 安裝 Docker 步驟與使用教學
https://github.com/NaturalHistoryMuseum/scratchpads2/wiki/Install-Docker-and-Docker-Compose-(Centos-7)   Install Docker and Docker Compose (Centos 7)


2019年3月13日 星期三

hyper-v 安裝CentOS 7.6

Windows 10 Pro 內建 Hyper-v
安裝 CentOS 7.6 + PHP 7.3 + nginx + laravel 5.8

安裝Hyper-v 和 WSL( Windows Subsystem for Linux ) - 略
ps. WSL可以在Microsoft Store 搜尋Linux 下載不同版本Linux(Kali、ubuntu、Debian...)等Subsystem
ps. Hyper-v 和安卓的夜神模擬器nox無法同時執行,Windows會報錯SYSTEM_SERVICE_EXCEPTION 藍色畫面
https://www.reddit.com/r/windows/comments/9wdmcc/help_bsod_when_i_start_nox_player_hyperv_enabled/
NOX cannot run when Hyper-V is enabled.
ps. BlueStacks 和 Hyper-v 也無法同時執行


該使用WSL還是Hyper-v?
結論:你不應該使用WSL
1. Microsoft did not design or build WSL for production workloads.
微軟設計WSL不是為了生產環境
2. Running a virtual machine (VM) can be more efficient.
虛擬機更高效
3. 4. 5. 略

Windows 10 啟用hyper-v

https://www.itread01.com/content/1550134651.html  WIN10 Hyper-V 安裝 CentOS 7
https://dotblogs.com.tw/gelis/2010/07/30/16892  開啟Hyper-V的內部虛擬網路

下載Minimal版本

開啟hyper-v 功能

設定 =》 應用程式 =》 應用程式與功能 =》 選用功能 =》 更多Windows功能 =》 開啟hyper-v
(開啟後需重開機)

新增虛擬交換器

hyper-v 管理員 =》 虛擬交換器管理員 =》 新虛擬網路交換器 =》 新增【外部網路】,選擇有線網卡


虛擬機器 =》 設定 =》 網路界面卡 =》 選擇剛剛新增的【外部網路】虛擬交換器

新裝的機器要有網路

開機自動啟動eth0網路
# vi /etc/sysconfig/network-scripts/ifcfg-eth0
ONBOOT=no
ONBOOT=yes


hyper-v 虛擬交換器 使用「外部網路」,(ThinkPad T460)不要使用無線網卡,使用網路線連接區域連線,不然虛擬機和win 10 hosts會同一個內網ip,win 10 SSH連不上虛擬機

Hyper-v 儲存後即使重開Windows 10 ,再重開虛擬機器,工作狀態還在,等於沒有重開虛擬機

安裝完CentOS 7.6後


安裝一些常用package
# yum install vim epel-release screen git bash-completion telnet
裝完bash-completion後讓root可以正常使用
# source /etc/profile.d/bash_completion.sh
查裝什麼package才能用netstat
# yum provides */netstat
安裝net-tools以使用netstat
# yum install net-tools

升級git

因為yum安裝的git版本是1.8.3.1 ,用以下方法安裝2.x 最新版本的git

移除git

# yum -y remove git

新增 End Point 倉庫

# yum -y install https://packages.endpoint.com/rhel/7/os/x86_64/endpoint-repo-1.9-1.x86_64.rpm
然後安裝2.x版本的git
# yum install git

檢查

# git --version
git version 2.30.1

End Point 倉庫過期造成yum無法更新

# yum update
...
https://packages.endpoint.com/rhel/7/os/x86_64/repodata/repomd.xml: [Errno 14] curl#6 - "Could not resolve host: packages.endp
oint.com; Unknown error"

解法

# yum-config-manager --disable endpoint

安裝php、php-fpm、nginx

安裝remi
# yum install http://rpms.remirepo.net/enterprise/remi-release-7.rpm
如果你要最新的php 7.3.x,必須這樣做
# yum --enablerepo=remi,remi-php73 update -y
查remi的版本
# yum info remi-release
開啟remi-php73
# yum-config-manager --enable remi-php73
安裝php7.3
# yum install php73-php
使php能夠呼叫到php 7.3 bash ( 直接加到.bashrc 可以自動enable )
# source /opt/remi/php73/enable
查php版本
# php -v
PHP 7.3.3 (cli) (built: Mar  5 2019 13:50:38) ( NTS )
Copyright (c) 1997-2018 The PHP Group
Zend Engine v3.3.3, Copyright (c) 1998-2018 Zend Technologies
安裝 php 7.3的php-fpm
# yum install php73-php-fpm
安裝nginx
# yum install nginx
啟動php-fpm
# systemctl start php73-php-fpm
查php-fpm狀態
# systemctl status php73-php-fpm
啟動nginx
# systemctl start nginx
查nginx 開機是否自動啟動
# systemctl is-enabled nginx
disabled
開機自動啟動nginx、php-fpm
# systemctl enable nginx
# systemctl enable php73-php-fpm.service

訪問網頁不通時,打開80 port
# firewall-cmd --zone=public --add-port=80/tcp --permanent
success
# firewall-cmd --reload
success
檢查配置是否生效
# iptables-save | grep 80
-A IN_public_allow -p tcp -m tcp --dport 80 -m conntrack --ctstate NEW -j ACCEPT

關閉端口

https://docs.fedoraproject.org/en-US/quick-docs/firewalld/  Using firewalld
# firewall-cmd --remove-port=port-number/port-type
# firewall-cmd --runtime-to-permanent
如:
# firewall-cmd --remove-port=80/tcp
# firewall-cmd --runtime-to-permanent

查當前zone開放的端口

# firewall-cmd --list-ports


下載composer-steup.php
# php -r "copy('https://getcomposer.org/installer', 'composer-setup.php');"
# ls
anaconda-ks.cfg  composer-setup.php
# php -r "if (hash_file('sha384', 'composer-setup.php') === '48e3236262b34d30969dca3c37281b3b4bbe3221bda826ac6a9a62d6444cdb0dcd0615698a5cbe587c3f0fe57a54d8f5') { echo 'Installer verified'; } else { echo 'Installer corrupt'; unlink('composer-setup.php'); } echo PHP_EOL;"
Installer verified
安裝composer
# php composer-setup.php
All settings correct for using Composer
Downloading...

Composer (version 1.8.4) successfully installed to: /root/composer.phar
Use it: php composer.phar
# ls
anaconda-ks.cfg  composer.phar  composer-setup.php
刪除 composer-setup.php
# php -r "unlink('composer-setup.php');"
讓composer方便呼叫
# mv composer.phar /usr/local/bin/composer
# which composer
/usr/local/bin/composer

更新composer

$ composer --version
Composer version 1.7.2
$ composer self-update
Updating to version 1.8.5 (stable channel).
   Downloading (100%)
Use composer self-update --rollback to return to version 1.7.2

加速composer

$ composer global require hirak/prestissimo
...
    Failed to download hirak/prestissimo from dist: The zip extension and unzip command are both missing, skipping.
Your command-line PHP is using multiple ini files. Run `php --ini` to show them.
    Now trying to download from source
解決上面黃底的錯誤
# yum install zip unzip php73-php-pecl-zip

安裝 https://laravel.com/docs/5.8/installation  上laravel 5.8 必裝的php extension
檢查php extension有無安裝
# php -m | grep mbstring

安裝laravel 5.8需要的php extension

# yum install php73-php-pdo
# yum install php73-php-mbstring
# yum install php73-php-xml
# yum install php73-php-bcmath

安裝Xdebug

# yum install php73-php-pecl-xdebug

xdebug.ini報 invalid ELF header 錯誤

$ php --ini | grep xdebug
Failed loading /etc/opt/remi/php73/php.d/15-xdebug.ini:  /etc/opt/remi/php73/php.d/15-xdebug.ini: invalid ELF header
Additional .ini files parsed:      /etc/opt/remi/php73/php.d/15-xdebug.ini,
解法:
重新安裝php73-php-common
# yum remove php73-php-common
# yum install php73-php php73-php-fpm php73-php-pdo php73-php-mbstring php73-php-xml php73-php-bcmath php73-php-pecl-xdebug 
當然 php73-php-fpm 需重啟和重新enable
# systemctl start php73-php-fpm
# systemctl enable php73-php-fpm.service

讓XDebug  CLI 生效

.bashrc 加入
export XDEBUG_CONFIG="remote_host=192.168.1.7 idekey=PHPSTORM"
export PHP_IDE_CONFIG="serverName=localhost"
/etc/opt/remi/php73/php.d/15-xdebug.ini 修改:
xdebug.remote_enable = true


安裝 php-process

如果你要用workerman需要安裝php-process,否則啟動時會報錯
Uncaught Error: Call to undefined function posix_getpid()
# yum install php73-php-process

安裝memcached擴展

# yum install php73-php-pecl-memcached

安裝pdo_mysql擴展

# yum install php73-php-pecl-mysql

yum安裝時404報錯

# yum install php73-php-pecl-memcached
...
http://repo.mongodb.org/yum/redhat/7/mongodb-org/4.2/x86_64/repodata/repomd.xml: [Errno -1] Error importing repomd.xml for MongoDB: Damaged repomd.xml file
Trying other mirror.
http://mirror.pregi.net/centos/7.7.1908/os/x86_64/repodata/repomd.xml: [Errno 14] HTTP Error 404 - Not Found
Trying other mirror.
...

解法

# yum clean all --enablerepo=*
Loaded plugins: fastestmirror
Cleaning repos: C7.0.1406-base C7.0.1406-centosplus C7.0.1406-extras ...
...
Cleaning up list of fastest mirrors
必須清除yum緩存。這邊和IP無關,使用 proxychains4 掛代理IP執行無效

避免出現Memcached::get(): could not unserialize value, no igbinary support的錯誤

memcached有個memcached.serializer,預設採用igbinary。但是,當主機上沒有安裝igbinary時,則會改用php模式(standard PHP serializer)。如果有台主機沒有安裝Igbinary,且該主機的程式由memcache取回資料時為Igbinary格式,因無法使用Igbinary而發生錯誤。所以統一改為使用php模式。

檢查當前PHP CLI的memcached.serializer是什麼值:

# php -r "echo ini_get('memcached.serializer');"
igbinary
或
# php -i | grep memcached.serializer
memcached.serializer => igbinary => igbinary

查配置文件路徑

# php --ini | grep memcached
/etc/opt/remi/php73/php.d/50-memcached.ini,

修改 /etc/opt/remi/php73/php.d/50-memcached.ini 的 memcached.serializer配置為php

memcached.serializer = "php"

檢查修改後的結果(直接生效)

# php -r "echo ini_get('memcached.serializer');"
php
# php -i | grep memcached.serializer
memcached.serializer => php => php


安裝 laravel 5.8

$ composer create-project --prefer-dist laravel/laravel blog

配置nginx

nginx.conf 將server 改成以下
server {
    listen       80;
    server_name  localhost;
    root /var/www/html/blog/public;
    index index.php index.html index.htm;
    location / {
    #   autoindex on; // 如果想要開啟顯示資夾目錄的話加入這條
    #                  // 建議只在debug階段開啟
        try_files $uri $uri/ /index.php?$query_string;
    }
    #error_page  404              /404.html;
    # redirect server error pages to the static page /50x.html
    #
    error_page   500 502 503 504  /50x.html;
    location = /50x.html {
        root   /usr/share/nginx/html;
    }
    location ~ \.php$ {
        root /var/www/html/blog/public;
        fastcgi_pass   127.0.0.1:9000;
        fastcgi_index  index.php;
        include        fastcgi_params;
        fastcgi_param  SCRIPT_FILENAME  $document_root$fastcgi_script_name;
    }
}
如果前一步驟沒配好,訪問網頁會直接下載index.php 文件
https://stackoverflow.com/questions/25591040/nginx-serves-php-files-as-downloads-instead-of-executing-them/41838767#41838767
I had similar problem which was resolved by emptying the browser cache (also worked fine with different browser).
調好後要清空瀏覽器緩存


當storage 為777時,仍然報錯 storage/logs/laravel.log Permission denied
這個是 selinux 的問題
關掉selinux以證明這個問題
# setenforce 0
(可正常訪問)
這解法不好,因為你把被添加的服務器安全,所以把它改回去
# setenforce 1
應使用 SELinux 所允許的寫檔命令
blog ]$ sudo chcon -R -t httpd_sys_rw_content_t storage

laravel連不同(實體)機器DB時報錯

SQLSTATE[HY000] [2002] Permission denied
但是用mysql 命令或Navicat ssh通道卻能連,只有laravel不能連
https://stackoverflow.com/a/56381932  SQLSTATE[HY000] [2002] Permission denied Laravel PDO Driver (credentials working via artisan migrate)
解法:
# setsebool httpd_can_network_connect_db 1

beanstalk也不通 - 
Socket error 13: Permission denied  
https://stackoverflow.com/a/44092808 SQLSTATE[HY000] [2002] Permission denied
# setsebool httpd_can_network_connect 1


安裝workerman/gateway-worker

$ composer require workerman/gateway-worker
https://learnku.com/articles/13151/using-laravel-to-carry-out-socket-communication-in-workerman

新增 Workerman 啟動文件

用命令 php artisan make:command WorkermanCommand 新增 Workerman 啟動文件 app/Console/Commands/WorkermanCommand.php
  namespace App\Console\Commands;

use GatewayWorker\BusinessWorker;
use GatewayWorker\Gateway;
use GatewayWorker\Register;
use Illuminate\Console\Command;
use Workerman\Worker;

class WorkermanCommand extends Command
{

    protected $signature = 'workman {action} {--d}';

    protected $description = 'Start a Workerman server.';

    public function handle()
    {
        global $argv;
        $action = $this->argument('action');

        $argv[0] = 'wk';
        $argv[1] = $action;
        $argv[2] = $this->option('d') ? '-d' : '';

        $this->start();
    }

    private function start()
    {
        $this->startGateWay();
        $this->startBusinessWorker();
        $this->startRegister();
        Worker::runAll();
    }

    private function startBusinessWorker()
    {
        $worker                  = new BusinessWorker();
        $worker->name            = 'BusinessWorker';
        $worker->count           = 1;
        $worker->registerAddress = '127.0.0.1:1236';
        $worker->eventHandler    = \App\Workerman\Events::class;
    }

    private function startGateWay()
    {
        $gateway = new Gateway("websocket://0.0.0.0:2346");
        $gateway->name                 = 'Gateway';
        $gateway->count                = 1;
        $gateway->lanIp                = '127.0.0.1';
        $gateway->startPort            = 2300;
        $gateway->pingInterval         = 30;
        $gateway->pingNotResponseLimit = 0;
        $gateway->pingData             = '{"type":"@heart@"}';
        $gateway->registerAddress      = '127.0.0.1:1236';
    }

    private function startRegister()
    {
        new Register('text://0.0.0.0:1236');
    }
}

創建事件監聽文件

namespace App\Workerman;

class Events
{

    public static function onWorkerStart($businessWorker)
    {
    }

    public static function onConnect($client_id)
    {
    }

    public static function onWebSocketConnect($client_id, $data)
    {
    }

    public static function onMessage($client_id, $message)
    {
    }

    public static function onClose($client_id)
    {
    }
}
s

啟動Workerman 服務端

$ php artisan workman start --d

檢查是否啟動成功

瀏覽器打開看到這個畫面就是啟動成功
在hyper-v上(不在容器內)竟然也能啟動成功...

設定固定IP

https://www.cyberciti.biz/faq/howto-setting-rhel7-centos-7-static-ip-configuration/

使用 Network Manager 文字GUI,比較無腦
# nmtui edit eth0
IPv4 CONFIGURATION:<Manual>
Addresses:192.168.1.x
Gateway:192.168.1.1
DNS servers:192.168.1.1   (使用host的DNS,沒配置ping 不到域名)

點擊<OK>後即是自動修改了 /etc/sysconfig/network-scripts/ifcfg-eth0
BOOTPROTO="dhcp"
BOOTPROTO=none
IPADDR=192.168.1.x
PREFIX=24
GATEWAY=192.168.1.1

重啟網路服務
# systemctl restart network
機器ip即固定 192.168.1.x ,原本的ssh會斷掉重連 192.168.1.x 即可

如果常常有時候連不上 hyper-v  192.168.1.9 (ping不通,但是瀏覽器打得開的詭異現象),重啟網卡(hyper-v CentOS + Windows) 無效
解法:
Bear-WAN先改【內部網路】再改【外部網路】,再重啟hyper-v 虛擬機

調整pagefile.sys到D碟後ssh無法登陸

http://www.xiaobaixitong.com/win10jiaocheng/31951.html  win10的pagefile.sys是什么文件?文件太大如何移动到其它盘
因為C碟只有100G,使用TreeSizeFreePortable發現pagefile.sys就佔了16G,要把他移動到D碟。
設置完需重啟電腦,移動完發現hyper-v重啟,gitlab更新不了,而且ssh也登陸不上了。以後需要注意此操作

2018年3月28日 星期三

VirtualBox 安裝CentOS-6.9

使用VirtualBox(5.2.8 -> 4.3.10) 安裝CentOS 6.9
PHP 5.5 Redis Memcache Supervisor Beanstalk
MySQL 5.6(略,裝在Windows7 host機上 )

開機自動啟動eth0網路
# vi /etc/sysconfig/network-scripts/ifcfg-eth0
ONBOOT=no
ONBOOT=yes

6.9 yum預設安裝的php是5.3.3版本
因為CentOS通常提供7-10年的生命週期,所以這很難讓php(和其他packages)維持在最新的版本,你能這麼做:
1. 裝5.3.3版
2. 使用源碼(source)去編譯安裝(build)
3. 使用有提供可選擇的三方源( 3rd party repository )

我選擇#3

使用webtatic.com源
https://webtatic.com/packages/php55/
Webtatic has now ended support for PHP 5.5
Webtatic 已終止PHP 5.5的支持

使用remirepo源
https://blog.remirepo.net/post/2016/09/10/PHP-5.5-is-dead
安裝remirepo源
# wget http://rpms.famillecollet.com/enterprise/remi-release-6.rpm
# rpm -Uvh remi-release-6*.rpm
warning: remi-release-6.rpm: Header V4 DSA/SHA1 Signature, key ID 00f97f56: NOKEY
Preparing...                ########################################### [100%]
   1:remi-release           ########################################### [100%]
查remirepo源版本
# yum info remi-release
...
Name        : remi-release
Version     : 6.9
如果你要最新的php 5.5.x,必須這樣做
# yum --enablerepo=remi,remi-php55 update -y
安裝PHP 5.5
# yum install php55-php

因為安裝的是remi源的php 5.5,所以命令行直接輸入php會找不到指令,要輸入php55
解法
# source /opt/remi/php55/enable

安裝php-fpm(yum預設的php-fpm是5.3.3的,所以要照下面這樣裝)
# yum install php55-php-fpm

安裝nginx
# yum install nginx

安裝memcached
# yum install memcached

安裝redis
# yum install redis

安裝supervisor
# yum install supervisor
啟動supervisor
# supervisord -c /etc/supervisord.conf
只有supervisor比較特殊,如果用service supervisor start的話,只會執行php artisan queue:listen tube-name 但不會生成 php artisan queue:work tube-name

安裝beanstalk
# yum install beanstalkd

配置nignx
/etc/nginx/conf.d/default.conf
server {
    ...

    location / {
        index index.php  index.html index.htm;
    }
    ...
    # pass the PHP scripts to FastCGI server listening on 127.0.0.1:9000
    #
    location ~ \.php$ {
        root           /usr/share/nginx/html;
        fastcgi_pass   127.0.0.1:9000;
        fastcgi_index  index.php;
        fastcgi_param  SCRIPT_FILENAME   $document_root$fastcgi_script_name;
        include        fastcgi_params;
    }
}
s

啟動php-fpm、nginx、memcached、redis、beanstalkd
# service php55-php-fpm start
# service nginx start
# service memcached start
# service redis start
# service beanstalkd start

開啟80 port
# iptables -I INPUT 5 -i eth0 -p tcp --dport 80 -m state --state NEW,ESTABLISHED -j ACCEPT
# service iptables save
如不開啟 Windows chrome訪問 VM會報錯 ERR_CONNECTION_TIMED_OUT
telnet 會不通,但是在VM上 curl http://localhost 能訪問
配置後,記得換瀏覽器試試,不然chrome配置前訪問過,配置後仍然會卡住
看iptables有哪些規則
# iptables -S
# iptables --line -vnL

開機自動啟動php-fpm、nginx、memcached、redis、beanstalkd
# chkconfig nginx on
# chkconfig php55-php-fpm on
# chkconfig memcached on
# chkconfig redis on
# chkconfig beanstalkd on
檢查
#  chkconfig  --list nginx
nginx           0:off   1:off   2:on    3:on    4:on    5:on    6:off
0~6是linux的runlevel

Virtualbox降版本
原本使用最新版Virtualbox 5.2.8
因為重裝一台Virtualbox也會遇到開機卡在creating process for virtual machine (gui/qt) ... (1/2) 的問題
https://www.youtube.com/watch?v=20p-r5WzYXg
這邊說要降版本到4.3.10
降到4.3.10後打開虛擬機會有連不上網路的問題
# ifup eth0
Determining IP information for eth0... failed; no link present. Check cable?
解法
Virtualbox選你的虛擬機 => 設置 => 網路 => 選你的網卡 => 高級 => 勾選"接入網線"
降版本後開機報錯HostAudioNotResponding
解法(因為當虛擬機當web server用不需要聲音)
Virtualbox選你的虛擬機 => 設置 =>聲音 => 取消勾選"啟用聲音"

安裝php所需擴展
# yum install php55-php-mcrypt
# yum install php55-php-pdo
# yum install php55-php-pecl-memcached
# yum install php55-php-gd  //防止圖片驗證碼報錯:Call to undefined function Johntaa\Captcha\imagecreatefrompng()
# yum install php55-php-pecl-xdebug
# service php55-php-fpm restart


laravel 連不上redis
網頁報錯 Permission denied [tcp://127.0.0.1:6379]
但是 telnet 127.0.0.1 6379 和 redis-cli 可以通
因為
# getsebool httpd_can_network_connect
httpd_can_network_connect --> off
解法
# /usr/sbin/setsebool httpd_can_network_connect=1
Use -P option makes the change permanent. Without this option, the boolean would be reset to 0 at reboot.
使用-P選項使其永久更改,否則重開機設定會被重置
# /usr/sbin/setsebool -P httpd_can_network_connect=1  => VM下實測跑不過
解法2
把它寫到 /etc/rc.d/rc.local 下 => 解決

laravel虛擬域名千萬不能配置有底線(_) 否則會被轉跳到
http://x_web.centos/http://x_web.centos/auth/signin

讓php能在command line使用
因為用remi裝的php55,所以命令行輸入php會找不到,只能用php55
解法:
# source /opt/remi/php55/enable
因為supervisor執行時吃不到這句,所以command路徑要寫完全
command = /opt/remi/php55/root/usr/bin/php /path/artisan queue:listen ga2-xxx

查remi裝的php.ini在哪
# php -i | grep "Loaded Configuration File"
Loaded Configuration File => /opt/remi/php55/root/etc/php.ini

解決 could not find driver 錯誤
# php -m | grep pdo
pdo_sqlite  // 只有這個,沒有pdo_mysql所以出錯
安裝php55-php-mysqlnd(其實我安裝的是php55-php-pecl-mysqlnd-qc,但是會一起裝php55-php-mysqlnd)
# yum install php55-php-pecl-mysqlnd-qc
為什麼會裝php55-php-pecl-mysqlnd-qc?
因為
# yum search pdo_mysql
...
php55-php-pecl-mysqlnd-qc.x86_64 : A query cache plugin for mysqlnd


參考資料:
https://unix.stackexchange.com/questions/138019/php-5-5-13-on-centos-6-5-with-yum  PHP 5.5.13 on CentOS 6.5 with yum
https://webtatic.com/packages/php55/  PHP 5.5 on CentOS/RHEL 7.2, 6.8 and 5.11 via Yum
https://www.binarytides.com/open-http-port-iptables-centos/  Open http port ( 80 ) in iptables on CentOS
https://zh.wikipedia.org/wiki/%E8%BF%90%E8%A1%8C%E7%BA%A7%E5%88%AB  執行級別
https://www.shellhacks.com/ubuntu-centos-enable-disable-service-autostart-linux/  Ubuntu, CentOS – Enable or Disable Service Autostart in Linux
https://stackoverflow.com/questions/27982024/php-command-not-found-after-yum-install-php55-php-cli  php command not found after yum install php55-php-cli
https://stackoverflow.com/questions/8765848/troubleshooting-permission-denied-when-attempting-to-connect-to-redis-from-php  Troubleshooting “Permission denied” when attempting to connect to Redis from PHP script
https://stackoverflow.com/questions/27982024/php-command-not-found-after-yum-install-php55-php-cli  php command not found after yum install php55-php-cli
https://stackoverflow.com/questions/2852748/pdoexception-could-not-find-driver  PDOException “could not find driver”
https://stackoverflow.com/questions/17850787/where-is-the-php-ini-file-on-a-linux-centos-pc  Where is the php.ini file on a Linux/CentOS PC? [duplicate]
https://stackoverflow.com/questions/36019111/pdo-mysql-is-not-available-on-centos-6-7  pdo_mysql is not available on centos 6.7
https://serverfault.com/questions/240015/how-do-i-allow-mysql-connections-through-selinux  how do I allow mysql connections through selinux