2016年10月7日 星期五

PHP找出至少出現N個X

假設一串數字,如何找出是否匹配出現N個 X 數字的方法

ex. 找出一個字串剛好有21個逗號(, commas)的方法

/^([^,]*,){21}[^,]*$/

^Start of string
(Start of group
[^,]*Any character except comma, zero or more times
,A comma
){21}End and repeat the group 21 times
[^,]*Any character except comma, zero or more times again
$End of string

所以找出131353,是否至少出現兩個1
mysql> SELECT '131353' REGEXP "^([^1]*1){2}";
1
是否至少出現一個4
mysql> SELECT '131353' REGEXP "^([^4]*4){1}";
0

找出連續出現N次的X數字

ex. 找出任何字元連續重複超過10次

/(.)\1{9,}/

131353,是否連續出現三個3
$ perl -e 'print "131353" =~ /(3)\1{2,}/;'
(false)
133351,是否連續出現三個3
$ perl -e 'print "133351" =~ /(3)\1{2,}/;'
3 => 匹配

什麼是正則的 \1 ?
Here the \1 is called a backreference. It references what is captured by the dot . between the brackets (.) and then the {9,} asks for nine or more of the same character. Thus this matches ten or more of any single character.
\1 是 反向引用,它引用括號 (.) 內的 . ,然後{9,} 要求9次以上相同的字元,因此這個正則匹配10個以上相同的字元

PHP匹配字串中所有重複的字元
$string = "14433";
preg_match_all('/(.)\1+/', $string, $matches);
$result = array_combine($matches[0], array_map('strlen', $matches[0]));
arsort($result);

$result:Array
(
    [33] => 2
    [44] => 2
)
如果只是要算哪個數字重複了幾次
$string = "14433";
$result = array_count_values(str_split($string));
arsort($result);

$result:Array
(
    [3] => 2
    [4] => 2
    [1] => 1
)

3重複了2次、4重複了2次、1重複了1次

找至少出現兩次以上的
$count = 2;
$filteredArray = array_filter($result, function($a) use($count) { return ($a >= $count);});

$filteredArray:Array
(
    [3] => 2
    [4] => 2
)

這邊array_filter()的callback使用匿名函數(anonymous functions),PHP 5.3.0以上才支援匿名函數寫法
使用 use($count) 將參數傳進匿名函數裡,PHP 5.3以上才支持

將array的key implode()
$filtered_string = implode(", ", array_keys($filteredArray));
$filtered_string = "3, 4"

參考資料:
http://stackoverflow.com/questions/863125/regular-expression-to-count-number-of-commas-in-a-string  Regular expression to count number of commas in a string
http://stackoverflow.com/questions/1660694/regular-expression-to-match-any-character-being-repeated-more-than-10-times  Regular expression to match any character being repeated more than 10 times
http://stackoverflow.com/questions/25773605/determine-repeat-characters-in-a-php-string  Determine repeat characters in a php string
http://stackoverflow.com/questions/1503579/how-to-filter-an-array-by-a-condition/1503595  How to filter an array by a condition
http://stackoverflow.com/questions/3635945/remove-empty-array-elements-with-array-filter-with-a-callback-function  Remove empty array elements with array_filter with a callback function
http://stackoverflow.com/questions/5482989/php-array-filter-with-arguments  PHP array_filter with arguments
http://www.codesynthesis.co.uk/code-snippets/how-to-implode-array-keys-in-php  HOW TO IMPLODE ARRAY KEYS IN PHP


2016年10月4日 星期二

Sublime Text 使用cTags

因為在使用Sublime 3 + Xdebug Client常常會有跑不進斷點console報錯UnicodeEncodeError的問題
使用start debugging(launch browser) 後網頁轉不出來

改使用Sublime 2發現 Xdebug Client運作良好,但是Sublime又不能直接按F12 去go to definition
只好安裝cTags

我的Sublime 2 用 Sublime Text 2.0.2 x64 portable版本

下載 CTags binary ,解壓縮到 D:\portable_software\Sublime2 下並改名ctags58資料夾為CTags

Sublime 用Package Control安裝cTags後

打開Sublime2 => Preferences => Package Settings => CTags => Settings - Default
CTags.sublime-settings修改command,
"command": "D:\\portable_software\\Sublime2\\CTags\\ctags.exe",

我把"Sublime Text 2.0.2 x64"資料夾改成Sublime2 避免這邊空白造成路徑錯誤的問題

左側專案資料夾上右鍵 => CTags: Rebuild Tags => 會自動產生.tags.tags_sorted_by_file

這時候在function上按ctrl+t 兩次,就能go to definition

ps. SideBarEnhancements 已經不支援ST2了,這邊純粹是為了能用Xdebug Client所產生的臨時方案

參考資料:
https://github.com/SublimeText/CTags


2016年9月29日 星期四

在Windows的XAMPP上使用XDebug和Sublime調試PHP

如何在PHP上使用斷點除錯?
xdebug + remote debugging + one of the supported clients
這邊我的clients選sublime的XDebug Client 插件

Windows 7 上裝的 XAMPP 要怎麼開啟XDebug?
其實在你的D:\xampp資料夾下有文檔activate-use-xdebug.pdf
或直接開啟
http://localhost/dashboard/docs/activate-use-xdebug.html

文檔中有要你安裝 WinCacheGrind 去調試,裝了後不會用+介面太醜。放棄

打開D:/xampp/php/php.ini ,加入以下配置
[XDebug]
zend_extension = "D:\xampp\php\ext\php_xdebug.dll" => 使用xampp的xdebug時要這樣寫,配置 extension=php_xdebug.dll 無效
xdebug.profiler_append = 0
xdebug.profiler_enable = 1
xdebug.profiler_enable_trigger = 0
xdebug.profiler_output_dir = "D:\xampp\tmp"
xdebug.profiler_output_name = "cachegrind.out.%t-%s"
xdebug.remote_enable = 1
xdebug.remote_handler = "dbgp"
xdebug.remote_connect_back  = 1
xdebug.remote_port = 9000
xdebug.remote_log="D:\xampp\xdebug_log"

重啟Apache

打開phpinfo()後會看到

表示PHP的XDebug配置成功

安裝sublime XDebug Client
直接Package Control 搜尋XDebug Client 安裝

配置Sublime
要調試某一個項目,首先得把這個項目在sublime下保存成一個project (一直都有這習慣)
sublime->project->save project as ...

接下來配置專案
sublime->project->edit poject

設定檔類似以下內容:
{
    "folders":
    [
        {
            "path": "."
        }
    ],
    "settings": {
        "xdebug": {
             "url": "http://test.localhost/",
        }
    }
}

其中url是專案所在url,記得在hosts裡頭將這個url指向127.0.0.1,還有在apache的virtualhost裡將其指向專案根目錄
這樣就OK了,準備開啟調試吧
開啟調試
開啟調試方式也比較簡單,在想要加中斷點的地方右鍵
xdebug->Add/Remove breakpoint
這樣專案在運行到本行的時候就會停止下來
然後開始調試,在功能表列選擇
tools->xdebug->start debugging(launch browser)
sublime會自動打開瀏覽器,進入配置時寫的網站連結,進行調試

可能問題
無法跟蹤中斷點
這可能是xdebug埠被佔用,按Ctrl+`或者功能表列View->show Console查看錯誤資訊,有可能是xdebug埠已經被佔用的緣故。

我遇到的狀況是
FileNotFoundError: [Errno 2] No such file or directory: 'C:\\Users\\Bear\\AppData\\Roaming\\Sublime Text 3\\Packages\\Xdebug Client\\Xdebug.sublime-settings'
error: CodeFormatter
原來 C:\Users\Bear\AppData\Roaming\Sublime Text 3\Packages\Xdebug Client 沒這個目錄,手動新建目錄後, Preferences => Package settings => Xdebug => Setting - Default 儲存才能看到Xdebug.sublime-settings 被存到正確的位置。Xdebug.sublime-settings我用預設值,沒特別配置

Ethan 的XDebug
http://blog.xuite.net/ahdaa/blog1/42909643-%5BPHP%5DXdebug
Ethan配置的XDebug有像這篇一樣,在畫面上顯示堆疊,不過我覺得Sublime XDebug Client更好用,就不研究這篇了

在command line ( CLI )上調試XDebug + Sublime
https://github.com/martomo/SublimeTextXdebug/issues/3
Xdebug.sublime-settings 和 *.sublime-project 不用動
打開xampp的console,輸入
Windows
set XDEBUG_CONFIG="idekey=sublime.xdebug"
php myscript.php
UNIX
export XDEBUG_CONFIG="idekey=sublime.xdebug"
php myscript.php

下面這行沒設斷點,但也會跑進去,連跑兩次,第二次XDebug會crash掉
$this->oDB = &A::singleton( 'db', $aDBO );
&拿掉,改成
$this->oDB = A::singleton( 'db', $aDBO );
正常

注意:不能打開cygwin,因為cygwin的php沒有配置XDebug,可用php -m 檢查
注意: ubuntu的cli和fpm的php.ini是分開的,要在CLI除錯記得cli的php.ini也要加入xdebug的配置

Debug時觀察變數
所有的變數都在Xdebug Context 面板中
如何像chrome開發者工具的console一樣,觀察現在的變數?
右鍵 => XDebug => Set Watch Expression 或 Edit Watch Expression
然後在 XDebug Watch 面板中看結果

Debug時運算變數
如何像chrome開發者工具的console一樣,在斷點時運算變數(更改變數的值)?
(進入斷點)ctrl+shift+p  => 執行 XDebug: Session - Evaluate => 輸入框輸入PHP代碼。ex. $test= "123"; => ctrl + shift + F5 ( XDebug: Breakpoint - Run ) 
這樣子就會將$test的值改為"123"後往下跑

防止在Notice、Strict standards、Deprecated時被中斷(break)
Xdebug.sublime-settings ( Setting - Default ) break_on_exception 註解掉 "Notice"、"Strict standards"、"Deprecated"

使用start debugging(launch browser) 後網頁轉不出來
這是目前比較無解的一個情況,在使用CLI debug或要切專案debug時,常常發生start debugging(launch browser) 打開瀏覽器後,網頁疑似被斷點轉不出來,但sublime卻沒進斷點,無法繼續往下跑的現象
Sublime console ( Ctrl+` ) 報錯:
File "xdebug.helper.helper in C:\Users\User\AppData\Roaming\Sublime Text 3\Installed Packages\Xdebug Client.sublime-package", line 45, in base64_encode
UnicodeEncodeError: 'ascii' codec can't encode characters in position 381-384: ordinal not in range(128)
目前只能重開機去解這個問題。(一旦要換專案或cli時,就很容易發生這個問題)
改用sublime text 2的Xdebug Client
這個老外也有同樣的問題
https://github.com/martomo/SublimeTextXdebug/issues/98

參考資料:
http://stackoverflow.com/questions/3717136/php-debugging-with-breakpoints-case-studies-examples   PHP Debugging with Breakpoints - case studies, examples..?
http://yansu.org/2014/03/20/php-debug-with-xdebug.html  用Xdebug和Sublime调试PHP代码(主要
https://github.com/martomo/SublimeTextXdebug  SublimeTextXdebug


2016年9月16日 星期五

使用SSH通道翻牆

原本我都是用shadowsocks來走代理的,但是要訪問不對外的網站時,ss的DNS不知道如何設定成機器上的private DNS,設定hosts也無效,最後發現用ssh通道效果出奇的好,只需要設機器上的hosts即可

雖然我電腦是windows,但是cygwin安裝openssh後搭配chrome SwitchySharp依然能使用ssh代理

打開SSH通道
$ ssh -i your.key -D 1234 user@x.x.x.x

然後在瀏覽器上設定代理,如圖


參考資料:
http://www.pchou.info/linux/2015/11/01/ssh-tunnel.html  SSH隧道翻墙的原理和实现


使用nginx限制連線IP

目的
為了只讓VPN連線進來的連線能訪問網站

編輯nginx設定檔
# vim /etc/nginx/sites-available/test.yourdomain.com.conf
在 location / { } 區塊中新增
location / {
    ...
    allow 10.12.0.0/24; # Openconnect / iPhone,你VPN後的IP區段
    deny all;
}
要注意 location ~ \.php$ { }區塊中沒設的話, 訪問php頁面不會受影響

最後重啟nginx


參考資料:
http://www.cyberciti.biz/faq/linux-unix-nginx-access-control-howto/  Nginx Block And Deny IP Address OR Network Subnets


設定Private DNS


有些網址不想讓外面人訪問,所以設定了Private DNS,讓使用VPN連線進來的設備可以直接打開網址訪問私有站。這篇的情況是iPhone 使用AnyConnect 連線openconnect,server系統為 CentOS 7

安裝bind9
# yum install bind bind-utils
編輯 /etc/named.conf 設定檔
# /etc/named.conf
新增 ACL "trusted"區段
acl "trusted" {
        10.12.0.1;    # ns1 - DNS server
        ...
        10.12.0.190;  # iPhone LAN IP
        ...
        10.12.0.254;
};
因為VPN連進來,會自動分配虛擬IP,所以只好窮舉
編輯 options 區段
options {
    listen-on port 53 { 127.0.0.1; 10.12.0.1; };
    # listen-on-v6 port 53 { ::1; };
    ...
    allow-query     { trusted; };  # allows queries from "trusted" clients
    ...
}
10.12.0.1為我連上VPN後的主要DNS IP
在最底下加入
include "/etc/named/named.conf.local";

設定 local file
# vim /etc/named/named.conf.local
zone "test2.yourdomain.com" {
    type master;
    file "/etc/named/zones/db.test2.yourdomain.com";
};
zone "test3.yourdomain.com" {
    type master;
    file "/etc/named/zones/db.test3.yourdomain.com";
};
zone "12.10.in-addr.arpa" {
    type master;
    file "/etc/named/zones/db.10.12";
};

因為我的 test.yourdomain.com DNS解析是設在CloudFlare 公開的,如果這邊zone只設 yourdomain.com ,然後在正解和反解檔案分別設 test2.yourdomain.com 、test3.yourdomain.com,這樣子連vpn後使用私有VPN 雖然查得到 test2.yourdomain.comtest3.yourdomain.com 但設在代管上的test.yourdomain.com會查詢不到

產生Forward Zone File
# chmod 755 /etc/named
# mkdir /etc/named/zones
編輯 test2.yourdomain.com 正解設定
# vim /etc/named/zones/db.test2.yourdomain.com
$TTL    604800
@       IN      SOA     ns1.test2.yourdomain.com. admin.test2.yourdomain.com. (
                  3       ; Serial
             604800     ; Refresh
              86400     ; Retry
            2419200     ; Expire
             604800 )   ; Negative Cache TTL
;
; name servers - NS records
     IN      NS      ns1.test2.yourdomain.com.

; name servers - A records
ns1.test2.yourdomain.com.          IN      A       10.12.0.1

; 10.12.0.0/16 - A records
test2.yourdomain.com.        IN      A      10.12.0.1 # 因為我web server和DNS在同一台

編輯 test3.yourdomain.com 正解設定
# vim /etc/named/zones/db.test3.yourdomain.com
$TTL    604800
@       IN      SOA     ns1.test3.yourdomain.com. admin.test3.yourdomain.com. (
                  3       ; Serial
             604800     ; Refresh
              86400     ; Retry
            2419200     ; Expire
             604800 )   ; Negative Cache TTL
;
; name servers - NS records
     IN      NS      ns1.test3.yourdomain.com.

; name servers - A records
ns1.test3.yourdomain.com.          IN      A       10.12.0.1

; 10.12.0.0/16 - A records
test3.yourdomain.com.        IN      A      10.12.0.1

編輯反解設定
# vim /etc/named/zones/db.10.12
$TTL    604800
@       IN      SOA     test2.yourdomain.com. test3.yourdomain.com. (
                              3         ; Serial
                         604800         ; Refresh
                          86400         ; Retry
                        2419200         ; Expire
                         604800 )       ; Negative Cache TTL
; name servers
      IN      NS      ns1.test2.yourdomain.com.
      IN      NS      ns1.test3.yourdomain.com.

; PTR Records
0.1   IN      PTR     ns1.test2.yourdomain.com.    ; 10.12.0.1
0.1   IN      PTR     ns1.test3.yourdomain.com.    ; 10.12.0.1
0.1   IN      PTR       test2.yourdomain.com.  ; 10.12.0.1

0.1   IN      PTR       test3.yourdomain.com.  ; 10.12.0.1

檢查bind 設定檔語法
# named-checkconf
檢查zone file
# named-checkzone test2.yourdomain.com /etc/named/zones/db.test2.yourdomain.com
zone test2.yourdomain.com/IN: loaded serial 3
OK
這邊 檢查時需特別注意,named-checkzone後的test2.yourdomain.com需換成你正確的域名,否則會報 ignoring out-of-zone data 的警告
# named-checkzone  12.10.in-addr.arpa /etc/named/zones/db.10.12
zone 12.10.in-addr.arpa/IN: loaded serial 3
OK

啟動bind9
# service named start

最後用nslookup檢查是否設定成功
# nslookup
> server 10.12.0.1
Default server: 10.12.0.1
Address: 10.12.0.1#53
> test2.yourdomain.com
Server:         10.12.0.1
Address:        10.12.0.1#53

編輯 /etc/ocserv/ocserv.conf ,讓手機連上VPN後優先選擇內網的DNS
dns = 10.12.0.1
dns = 8.8.8.8
dns = 8.8.4.4
然後重啟oscerv

最後手機連上VPN後訪問 test2.yourdomain.com,成功


參考資料:
https://www.digitalocean.com/community/tutorials/how-to-configure-bind-as-a-private-network-dns-server-on-centos-7  How To Configure BIND as a Private Network DNS Server on CentOS 7
http://blog.ltns.info/linux/openwrt_ocserv_vpn_client_smart_proxy/  OpenWrt路由器搭建和配置ocserv实现VPN客户端智能代理


2016年9月15日 星期四

Letsencrypt 使用心得

前言

想把網站升級到https,避免被gateway的MIS監控
雖然他要看到 https 網站上的內容是可以的,但是如果是要把  client-> server 中間的封包擷取出來分析出內容,以目前技術很難做,他看到的只會是加密的一串不知道什麼東西。除非他用類似 man in the middle attack 的技術,植入一些木馬程式在你的 client 電腦上,讓 client <-> server 中間的加解密失效
但如果是http,那gateway可以看到明文,連cookie也行
所以才說不要隨便亂上一些沒有 https 加密的網站
你如果不信任公司網路的話,一些 http 網站,建議你跳到自己的 server 上

SSH代理

1. Windows 打開 cygwin (需安裝openssh)
# ssh -D 3128 your.server.ip
2. 然後 browser 打開 proxy
底下 localhost 直接連線的設定都要清空,然後在 socket server 那邊填上  127.0.0.1  port 3128,這樣就會透過 ssh tunnel 到你的 server 再連上網站
如圖:
與用shadowsocks方法類似


Letsencrypt 使用限制

Registrations/IP 限制就是每個 IP 只能在 3 小時內發送 10 次請求,如果超過 10 次就會被阻擋,所以申請成功的 Domain,不要隨便砍掉 /etc/letsencrypt/accounts 目錄,否則你就不能重複申請了 => 不是說你的 client -> https server 的連線,是要註冊幾次
Certificates/Domain 限制就是在七天內你的主 Domain 跟 sub Domain 夾起來只能申請五個,所以當你申請五個 domain 時,Letsencrypt 就會阻擋你申請下一個 domain 了,最後要注意的是,Letsencrypt 申請憑證使用期限是 90 天,官方建議如果使用在正式網站,請 60 天重新 renew 一次。

如果某個網站 a.bear.com 沒設dns,直接寫hosts, 這樣還能上http?
這樣也可以上,dns 是 dns

使用lukas2511 的letsencrypt.sh產生證書

Let's Encrypt的腳本不只lukas2511 ,還有其他的。如:
https://github.com/Neilpang/acme.sh
https://github.com/certbot/certbot
這邊以lukas2511 的版本為例
github lukas2511的 letsencrypt.sh 專案後來改名成dehydrated ,需注意
下載最新版本
$ cd ~; git clone https://github.com/lukas2511/letsencrypt.sh.git
$ cd letsencrypt.sh/
把程式安裝到 /etc/letsencrypt.sh/ 下
# mkdir /etc/letsencrypt.sh/
# cp ~/letsencrypt.sh/dehydrated /etc/letsencrypt.sh/
設定config
# echo "WELLKNOWN=/var/www/letsencrypt" > /etc/letsencrypt.sh/config
# mkdir -p /var/www/letsencrypt/
設定/etc/nginx/nginx.conf  ,主要網址 yourdomain.com 設定的server{}中加入
location /.well-known/acme-challenge/ {
    alias /var/www/letsencrypt/;
}
我有把 /var/www/letsencrypt/ 權限改成apache
產生SSL certificate
# /etc/letsencrypt.sh/dehydrated -c -d yourdomain.com
(成功訊息)
# INFO: Using main config file /etc/letsencrypt.sh/config
Processing yourdomain.com
 + Signing domains...
 + Generating private key...
 + Generating signing request...
 + Requesting challenge for yourdomain.com...
 + Responding to challenge for yourdomain.com...
 + Challenge is valid!
 + Requesting certificate...
 + Checking certificate...
 + Done!
 + Creating fullchain.pem...
 + Done!

成功後產生的檔案都在 /etc/letsencrypt.sh/certs/yourdomain.com/
# ls /etc/letsencrypt.sh/certs/yourdomain.com/ -l
-rw------- 1 root root 1643 Sep 15 03:22 cert-14739097xx.csr
-rw------- 1 root root    0 Sep 15 03:22 cert-14739097xx.pem
-rw------- 1 root root 1643 Sep 15 03:38 cert-14739106xx.csr
-rw------- 1 root root    0 Sep 15 03:38 cert-14739106xx.pem
-rw------- 1 root root 1643 Sep 15 03:49 cert-14739113xx.csr
-rw------- 1 root root    0 Sep 15 03:49 cert-14739113xx.pem
-rw------- 1 root root 1643 Sep 15 03:54 cert-14739116xx.csr
-rw------- 1 root root 2134 Sep 15 03:55 cert-14739116xx.pem
lrwxrwxrwx 1 root root   19 Sep 15 03:55 cert.csr -> cert-14739116xx.csr
lrwxrwxrwx 1 root root   19 Sep 15 03:55 cert.pem -> cert-14739116xx.pem
-rw------- 1 root root 1647 Sep 15 03:55 chain-14739116xx.pem
lrwxrwxrwx 1 root root   20 Sep 15 03:55 chain.pem -> chain-14739116xx.pem
-rw------- 1 root root 3781 Sep 15 03:55 fullchain-14739116xx.pem
lrwxrwxrwx 1 root root   24 Sep 15 03:55 fullchain.pem -> fullchain-14739116xx.pem
-rw------- 1 root root 3243 Sep 15 03:22 privkey-14739097xx.pem
-rw------- 1 root root 3243 Sep 15 03:38 privkey-14739106xx.pem
-rw------- 1 root root 3243 Sep 15 03:49 privkey-14739113xx.pem
-rw------- 1 root root 3243 Sep 15 03:54 privkey-14739116xx.pem
lrwxrwxrwx 1 root root   22 Sep 15 03:55 privkey.pem -> privkey-14739116xx.pem

接著就可以修改 nginx 的 SSL 設定
server {
    listen       80 default_server;
    listen       [::]:80 default_server;
    listen 443 default_server ssl;
    
    # other configs
    ...

    location /.well-known/acme-challenge/ {
        alias /var/www/letsencrypt/;
    }
    ssl_certificate /etc/letsencrypt.sh/certs/yourdomain.com/fullchain.pem;
    ssl_certificate_key /etc/letsencrypt.sh/certs/yourdomain.com/privkey.pem;
}

listen 443 default_server ssl; 要記得設,不然訪問https 報ERR_CONNECTION_REFUSED 錯誤。
可以檢查443 port有沒有開
# netstat -ant | grep 443
tcp        0      0 0.0.0.0:4433            0.0.0.0:*               LISTEN
tcp        0      0 0.0.0.0:443             0.0.0.0:*               LISTEN  # 設 listen 後才有
tcp6       0      0 :::4433                 :::*                    LISTEN

重啟nginx
# service nginx restart

配置subdomain 上SSL
server {
    listen  80;
    listen 443 ssl;
    server_name test.yourdomain.com;

    # other configs
    ...

    location /.well-known/acme-challenge/ {
        alias /var/www/letsencrypt/;
    }
    ssl_certificate /etc/letsencrypt.sh/certs/yourdomain.com/fullchain.pem;
    ssl_certificate_key /etc/letsencrypt.sh/certs/yourdomain.com/privkey.pem;
}
用同一張證書即可

讓不同port的gitlab也掛上SSL
因為我的gitlab走的是不同的port,
在多次修改 /etc/gitlab/gitlab.rb 
external_url 'http://yourdomain.com:1234'
nginx['redirect_http_to_https'] = true
nginx['ssl_certificate'] = "/etc/gitlab/ssl/fullchain.pem"
nginx['ssl_certificate_key'] = "/etc/gitlab/ssl/privkey.pem"
nginx['custom_gitlab_server_config']="location /.well-known/acme-challenge/ {\n alias /var/www/letsencrypt/;\n}\n"
和重啟gitlab後
# gitlab-ctl reconfigure

仍無法實現 https://yourdomain.com:1234 訪問gitlab,但是關閉系統nginx,只啟動gitlab的nginx時可以

讓cron每天自動檢查並更新
設定 /etc/cron.d/letsencrypt-yourdomain_com (因為 /etc/cron.d/ 裡面的檔名不能有 . 這個符號,用 _ 取代)
0 0 * * * root sleep $(expr $(printf "%d" "0x$(hostname | md5sum | cut -c 1-8)") % 86400); ( /etc/letsencrypt.sh/dehydrated -c -d yourdomain.com; /sbin/service nginx reload ) > /tmp/dehydrated-yourdomain.com.log 2>&1
在cron job 中 $(expr $(printf "%d" "0x$(hostname | md5sum | cut -c 1-8)") % 86400) 
設計是利用機器名稱產生出十六進位 hash 值,抓一部分轉成十進位後除以一天的秒數,得到餘數後先停這個秒數再跑 dehydrated ,這樣可以避免同時間有太多機器到 Let's Encrypt 的伺服器,造成類似 DDoS 的攻擊。

使用wireshark 查封包
選擇網卡後篩選出傳到自己主機的封包
HTTP:
http && ip.addr == x.x.x.x
HTTPS:
ssl && ip.addr == x.x.x.x
刷網頁時記得用ctrl+f5清緩存,否則封包304緩存去看是不準確的
可以發現 ssl 的封包被加密過,http的封包可以看到明文(HTML)
Linux可以用tcpdump

參考資料:
Rellik
https://letsencrypt.tw/   (主要)
https://github.com/lukas2511/dehydrated (主要)
https://blog.wu-boy.com/2015/12/letsencrypt-entering-public-beta-free-ssl/  Letsencrypt 開放申請免費 SSL 憑證
https://www.digitalocean.com/community/tutorials/how-to-create-an-ssl-certificate-on-nginx-for-ubuntu-14-04  How To Create an SSL Certificate on Nginx for Ubuntu 14.04
https://www.foolegg.com/how-to-secure-your-websites-with-lets-encrypt-certificate/  [教學] 如何使用 Let’s Encrypt 加密網站的連線
http://stackoverflow.com/questions/34189199/how-do-i-use-let-s-encrypt-with-gitlab  How do I use let’s encrypt with gitlab?
https://gitlab.com/gitlab-org/omnibus-gitlab/blob/master/doc/settings/nginx.md  NGINX settings
https://www.digitalocean.com/community/tutorials/how-to-secure-gitlab-with-let-s-encrypt-on-ubuntu-16-04  How To Secure GitLab with Let's Encrypt on Ubuntu 16.04


2016年8月16日 星期二

MySQL SSH Tunnel

聽Jethro和Ike討論 Naticat的強大,如:SSH Tunnel、structure sync 

因為我常用的是phpmyadmin,所以找一下SSH Tunnel + phpmyadmin的解決方法

我有一台VPS機器,ssh需要私鑰登入,MySQL port沒有對外,如何使用phpmyadmin連線?

打開ssh通道
$ ssh -N <username>@<Bastian server IP> -L 3307:<internal ip of mysql server>:3306
-N 你不執行任何命令,僅端口轉發( port forward )
3307 本地要轉發的port
Bastian server IP 必須能連到MySQL 伺服器
3306 遠端機器的MySQL端口

因為我電腦使用Windows 7 ,所以這道命令在虛擬機上下的
ex. 
$ ssh -i vps.key -N user@vps.ip -L 3307:localhost:3306
3307:localhost:3306 是指虛擬機的3307端口 轉發到 vps.ip上的localhost 3306端口

檢測
$ telnet localhost 3307
...
5.6.28-76.1-log ... mysql_native_password
VPS上的mysql版本是5.6.28 沒錯

連線
$ mysql -u root -p  -h localhost -P 3307
經過幾次測試後, -P 是無效的,因為虛擬機和VPS的MySQL密碼和版本不一樣,但是都要輸入虛擬機的密碼,只能連到虛擬機的MySQL
原因:
當使用 localhost 參數時, MySQL使用sockets。請改用127.0.0.1
$ mysql -u root -p  -h 127.0.0.1 -P 3307

後記,因為虛擬機上沒裝phpmyadmin,所以Windows 7 在 config.inc.php 設不了 127.0.0.1:3307,只能設 192.168.x.x:3307 (虛擬機IP) ,去連VPS的MySQL。但是VPS的MySQL只允許 localhost或127.0.0.1登入

結論,使用Naticat的SSH Tunnel功能在此場景會比較方便,不過私鑰記得轉成ppk去連線


2016年7月29日 星期五

小心AdBlock

標題不知道怎麼下比較好,這是昨天遇到的問題
是這樣的,我的chrome有安裝AdBlock ,要訪問我放在linode上的項目時,發現網頁上有一張 ad_medium_01.jpg 的圖沒有顯示,但是單獨打開那張圖又可以,檢查chrome的console發現報錯
net::ERR_BLOCKED_BY_CLIENT

查了這一篇
原來是AdBlock把那張圖認為是廣告圖擋掉了

解法:
點AdBlock圖示 => 點擊 不要在這個頁面使用


2016年7月27日 星期三

正規表示式的 lookahead 和 lookbehind

起因:
要將email除了前三和後三字元屏蔽
ex.
TestEmail@google.com => Tes**************com

打開sublime,把 TestEmail@google.com 貼上去,用Find功能開始嘗試正則去匹配,只要用正則選取到除了前三和後三中間的字後,再用 preg_replace( '/regex/u', '*', $email )  去取代掉

先選取第三個字以後的字串
先說結論:
(?<=\S{3}).
如何實現的?
http://stackoverflow.com/questions/2973436/regex-lookahead-lookbehind-and-atomic-groups
使用了 positive lookbehind
Look ahead positive (?=)
Find expression A where expression B follows:
找有B接在後面的A
A(?=B)
ex.
TestEmail@google.com  // 正則搜尋 g(?=o)

Look ahead negative (?!)
Find expression A where expression B does not follow:
找沒有B接在後面的A
A(?!B)
ex.
TestEmail@google.com // 正則搜尋 g(?!o)

Look behind positive (?<=)
Find expression A where expression B precedes:
找有B接在前面的A
(?<=B)A
ex.
TestEmail@google.com // 正則搜尋 (?<=g)o

Look behind negative (?<!)
Find expression A where expression B precedes:
找沒有B接在前面的A
(?<=B)A
ex.
TestEmail@google.com // 正則搜尋 (?<!g)o

所以 (?<=\S{3}). 是 找三個( {3} )非空字元( \S )接在前面的任意字元( . ),就會選到
TestEmail@google.com

選取倒數地三個字以前的字串
先說結論:
.(?=.*\S{3})

使用了 Look ahead positive 
.(?=.*\S{3}) 是 找有 三個( {3} )非空字元( \S ) 接在後面的任意字元

把兩個合起來
(?<=\S{3}).(?=.*\S{3})

所以PHP 這樣寫
preg_replace('/(?<=\S{3}).(?=.*\S{3})/u','*','TestEmail@Google.com')  // Tes**************com

/u 是什麼意思?
http://stackoverflow.com/questions/12896985/regex-modifier-u-in-javascript
The /u modifier in PHP is for unicode support. This modifier is not supported in JavaScript.
/u 修飾符( modifier )是PHP的 unicode支持,javascript不支持

vim搜尋時如何做到 Look ahead negative

找沒有B接在後面的A
A(?!B)
在vim中是不作用的
https://stackoverflow.com/questions/21148467/is-there-a-way-to-do-negative-lookahead-in-vim-regex
https://stackoverflow.com/questions/34548988/match-a-pattern-not-followed-by-a-sub-pattern-in-vim
/\vA(B)@!
\v -  啟動very magic 解析模式
@! -  inverts the atom (B), so that the pattern matches when B is absent
@! -  倒轉原子(B),所以將會匹配沒有B的情況

:h \@! 可直接看vim解釋


2016年7月14日 星期四

xz壓縮

亞馬遜機器上有一個12G的純文字檔,現在因為亞馬遜的流出是按量收費的
所以把它壓縮後再下載,以節省流量

推薦使用 xz,壓縮比例很高(tar 不壓縮)
$ mysqldump -Aa -u root -pxxx   | xz > xxx.sql.xz

https://blog.gtwang.org/linux/linux-why-are-tar-archive-formats-switching-to-xz-compression-to-replace-bzip2-and-what-about-gzip/
$ tar -J => xz壓縮,tar 要新版才有 -J
$ tar -j => bz2壓縮
$ tar -z => gz壓縮
壓縮單檔直接用 xz

# time xz xxx.txt -T 4 --lzma2
--lzma2 => lzma2的算法
-T => muti threads,用top看 有幾棵CPU,想加快壓縮時間吃滿的話就指定線程數量
real    35m0.091s
user    134m59.372s
sys     0m6.908s
花了35分, 12G-> 746MB


解壓縮,速度比壓縮快很多,不能指定-T,只有單線程
$ time xz -d xxx.txt.xz
real    2m40.746s
user    1m12.542s
sys     0m9.335s


2016年6月30日 星期四

Linux tarball使用心得


壓縮時忽略.git資料夾和.gitignore檔案
http://stackoverflow.com/questions/984204/shell-command-to-tar-directory-excluding-certain-files-folders
$ tar zcvf project.tar.gz project/ --exclude='.git' --exclude='.gitignore'
注意:
--exclude='xxx' 要放到最後


2016年6月2日 星期四

使用sysbench 對MySQL進行壓力測試


安裝


https://launchpad.net/sysbench
trunk的版本是 0.4

虛擬機為ubuntu 14.04,檢查apt-get可以安裝的sysbench版本
# apt-cache madison sysbench
  sysbench | 0.4.12-1.1 | http://tw.archive.ubuntu.com/ubuntu/ trusty/universe amd64 Packages
或由 http://tw.archive.ubuntu.com/ubuntu/pool/universe/s/sysbench/ 得知我設的倉庫只提供到sysbench 0.4.12
Universe - Community-maintained, i.e. not officially supported software.
universe是社群維護的套件. 如:非官方支援的軟體
註:CentOS 7 用yum裝的可以直接裝0.5
# yum info sysbench
...
Version     : 0.5

在網上的一些範例中,sysbench的 --test會設為 /usr/share/doc/sysbench/tests/db/select.lua ,但是我的  /usr/share/doc/sysbench/ 下沒有tests/db/select.lua
原因,我用apt-get安裝了 0.4.12版,在 github上
https://github.com/akopytov/sysbench/tree/0.4/sysbench/tests
0.4版本沒有db 資料夾
https://github.com/akopytov/sysbench/tree/0.5/sysbench/tests/db
0.5版本有db資料夾


安裝 0.4.12 版
# apt-get install sysbench
移除 0.4.12 版
# aptitude purge sysbench

安裝 0.5版

# cd ~
# git clone https://github.com/akopytov/sysbench.git
# cd sysbench/
這時候如果想直接安裝,通常會失敗
# ./autogen.sh
automake 1.10.x (aclocal) wasn't found, exiting
1. 先安裝一些相依套件
# apt-get install -y gcc autoconf automake make libtool libssl-dev libcrypto++9

2. 安裝mysql_config(在 Percona repository 中可用)

安裝 Percona apt repository

# wget https://repo.percona.com/apt/percona-release_0.1-3.$(lsb_release -sc)_all.deb
安裝percona庫
# dpkg -i percona-release_0.1-3.$(lsb_release -sc)_all.deb
檢查 /etc/apt/sources.list.d/percona-release.list ,有多這隻檔案代表安裝成功
記得更新本地緩存
# apt-get update

最後安裝mysql_config
# apt-get install -y libperconaserverclient18-dev
3. 編譯和安裝sysbench
# ./autogen.sh
# ./configure
# make
安裝
# make install
4. 產生LUA資料夾(當初就是因為0.4版本沒有這個,直接拿0.5的LUA跑0.4的sysbench怕有問題,才手動編譯安裝)
# mkdir /usr/share/sysbench/tests/db -p
# cp sysbench/tests/db/* /usr/share/sysbench/tests/db
5. 檢查sysbench 0.5是否安裝成功
# sysbench --version
sysbench 0.5
移除sysbench
先看  Makefile 怎麼寫的,有看到 uninstall: uninstall-recursive ,所以嘗試移除sysbench
# make uninstall
檢查... 移除成功
# sysbench --version
-su: /usr/local/bin/sysbench: No such file or directory

 vim /usr/local/bin/sysbench 是二進位檔,應該是c寫的,或用 file  /usr/local/bin/sysbench去看,有些會告訴你那是什麼檔案。ex. python, shell... etc.

Benchmark

測試的benchmark是:你每次調試my.cnf後,重啟mysql,然後用sysbench測,看qps


參考資料:
http://askubuntu.com/questions/447/how-can-i-see-all-versions-of-a-package-that-are-available-in-the-archive  How can I see all versions of a package that are available in the archive?
http://blog.secaserver.com/2014/07/sysbench-0-5-ubuntu-14-04-trusty-percona-server-xtradb-cluster/  SYSBENCH 0.5 + UBUNTU 14.04 (TRUSTY) + PERCONA SERVER OR XTRADB CLUSTER
https://www.percona.com/doc/percona-server/5.5/installation/apt_repo.html  Installing Percona Server on Debian and Ubuntu
Rellik


2016年5月20日 星期五

CentOS 7 安裝 proxychains

因為yum沒有proxychains 可以直接安裝,然後又需要透過server去連ss代理

安裝 proxychains
# cd ~
# git clone https://github.com/rofl0r/proxychains-ng.git 
# cd proxychains-ng 
# ./configure && make && make install  
# make install-config

配置
# vim /usr/local/etc/proxychains.conf
更改
socks4 127.0.0.1 9050

socks5 127.0.0.1 xxxx
xxxx為你shadowsocks本地代理的port

開啟shadowsocks
$ sslocal -s <server_ip> -p <server_port> -l <local_port> -k <password> -m <method>
配合nohup和&可以使之后台运行,关闭终端也不影响:
#nohup sslocal -s 服务器地址 -p 服务器端口 -l 本地端端口 -k 密码 -m 加密方法 &

檢查是否代理成功
# proxychains4 curl https://api.ipify.org/?format=json

參考資料:
https://www.netroby.com/view/3653  Install proxychains on centos 6
https://wiki.archlinux.org/index.php/Shadowsocks_(%E7%AE%80%E4%BD%93%E4%B8%AD%E6%96%87)  Shadowsocks (简体中文)


2016年5月17日 星期二

gitlab 自動custom hook佈署到server上

gitlab和web server現在放在同一台機器上,想要本地測試完git push到機器上後自動佈署到web服務上
因為懶得搞另一套 jenkins,所以打算用hook做

方案
git本身的hook
gitlab的 custom hook   http://docs.gitlab.com/ee/hooks/custom_hooks.html
gitlab的 web hook   http://docs.gitlab.com/ee/web_hooks/web_hooks.html

這裡選用gitlab的 custom hook

步驟:
0. 切換到git使用者,因為gitlab文件的使用者權限都是git
# sudo su git
1. 假設root使用者的test專案需要hook
2. 找server上test.git庫的位置,我的放在 /var/opt/gitlab/git-data/repositories/root/test.git ,但也有可能放在 /home/git/repositories/<group>/<project>.git ,依你安裝的方式不同而不同
3. 進入該資料夾後新建 custom_hooks 資料夾
4. 進入 custom_hooks 資料夾,在這邊新增原git hook類型的檔案,ex. pre-receive。這邊新增 post-receive這個鉤子文件,當push完成後這個文件就會被調用
post-receive
#!/bin/sh
git --work-tree=/var/www/test.localhost/html --git-dir=/var/opt/gitlab/git-data/repositories/root/test.git checkout -f
--git-dir git庫所在位置
--work-tree 實際文件被存放的位置
5. 別忘了賦予 post-receive 可執行權限
$ chmod +x post-receive
6. /var/www/test.localhost/html 路徑也必須是git權限
# chown git:git -R /var/www/test.localhost/html

最後在本地端測試push後,機器上web服務也馬上更新了,
如果 /var/www/test.localhost/html 上面原本有內容的檔案不會清空,只會被覆蓋

參考資料:
http://sumyblog.me/2015/11/02/use-git-hooks-for-hexo-automatic-deployment/  使用git hooks进行hexo博客自动化部署


2016年5月10日 星期二

Linode CentOS 7主機搭建Cisco AnyConnect VPN

iPhone的shadowsocks在牆外似乎不作用,所以找了一個除了PPTP以外的代理方式

1. 安裝ocserv ( OpenConnect server )

因為ocserv已經在epel 的庫中提供了,可以直接用yum安裝
ocserv.x86_64 : OpenConnect SSL VPN server
直接用yum裝即可
# yum install epel-release (如果你還沒裝epel的話)
# yum install ocserv

2. 準備證書

# cd ~
# mkdir certificates
# cd certificates
在此目錄下新建一個 ca.tmpl的CA證書模版,內容為:
cn = "xx.xx.xx.xx"
organization = "xx.xx.xx.xx"
serial = 1
expiration_days = 3650
ca
signing_key
cert_signing_key
crl_signing_key

生成CA密鑰
$ certtool --generate-privkey --outfile ca-key.pem
生成CA證書
$ certtool --generate-self-signed --load-privkey ca-key.pem --template ca.tmpl --outfile ca-cert.pem
生成伺服器憑證,這裡注意cn項必須對應你伺服器的功能變數名稱或IP,server.tmpl
cn = "Your hostname or IP"
organization = "xx.xx.xx.xx"
expiration_days = 3650
signing_key
encryption_key
tls_www_server

生成密鑰
$ certtool --generate-privkey --outfile server-key.pem
生成server證書
$ certtool --generate-certificate --load-privkey server-key.pem --load-ca-certificate ca-cert.pem --load-ca-privkey ca-key.pem --template server.tmpl --outfile server-cert.pem
把證書移動到合適的地方
$ cp ca-cert.pem /etc/ocserv
$ cp server-cert.pem /etc/ocserv
$ cp server-key.pem /etc/ocserv

3. 準備配置文件

修改 /etc/ocserv/ocserv.conf
# 登陸方式,目前先用密碼登錄
auth = "plain[/etc/ocserv/ocpasswd]"
 
# 允許同時連接的用戶端數量
max-clients = 4
 
# 限制同一用戶端的並行登陸數量
max-same-clients = 2
 
# 服務監聽的IP(伺服器IP,可不設置)
listen-host = 1.2.3.4
 
# 服務監聽的TCP/UDP埠(選擇你喜歡的數位)
tcp-port = 4433
udp-port = 4434
 
# 自動優化VPN的網路性能
try-mtu-discovery = true
 
# 確保伺服器正確讀取用戶證書(後面會用到用戶證書)
cert-user-oid = 2.5.4.3
 
# 伺服器憑證與金鑰
server-cert = /etc/ssl/private/my-server-cert.pem
server-key = /etc/ssl/private/my-server-key.pem
 
# 用戶端連上vpn後使用的dns
dns = 8.8.8.8
dns = 8.8.4.4
 
# 注釋掉所有的route,讓伺服器成為gateway
#route = 192.168.1.0/255.255.255.0
 
# 啟用cisco用戶端相容性支援
cisco-client-compat = true

這邊要注意tcp-portudp-port不要設9000,以免跟php-fpm的port衝突

4. 測試server

創建測試帳號(test)
$ ocpasswd -c /etc/ocserv/ocpasswd test
Enter password:
Re-enter password:

開啟NAT轉發:(這步我略過,查機器上的設定檔,net.ipv4.ip_forward已開啟)
$ sudo sed -i 's/net.ipv4.ip_forward = 0/net.ipv4.ip_forward = 1/g' /etc/sysctl.conf
$ sudo sysctl -p

啟動ocserv服務
# ocserv -f -d 1
然後打開手機上的Cisco Anyconnect新建一個VPN,添加服務器:
IP:端口
ex.
xx.xx.xx.xx:4433
連線就能輸入密碼運行

4. 創建客戶端證書,省得老輸入密碼

$ cd ~/certificates/
$ vim user.tmpl
cn = "some random name"
unit = "some random unit"
expiration_days = 365
signing_key
tls_www_client

創建user密鑰
$ certtool --generate-privkey --outfile user-key.pem
創建user證書
$ certtool --generate-certificate --load-privkey user-key.pem --load-ca-certificate ca-cert.pem --load-ca-privkey ca-key.pem --template user.tmpl --outfile user-cert.pem
將證書和金鑰轉為PKCS12的格式,好導入Anyconnect,期間會要求你輸入帳號密碼,就輸入用ocpasswd產生的帳號密碼
$ certtool --to-p12 --load-privkey user-key.pem --pkcs-cipher 3des-pkcs12 --load-certificate user-cert.pem --outfile user.p12 --outder
Generating a PKCS #12 structure...
Loading private key list...
Loaded 1 private keys.
Enter a name for the key: test
Enter password:
Confirm password:

然後把user.p12這個證書放到一個可以直接被訪問的地方,用safari打開安裝,導入成功後將對應的VPN => 進階 => 憑證 => 選擇你導入的憑證

為了讓伺服器能夠認得這張證書,我們再來修改一下/etc/ocserv/ocserv.conf配置
$ vim /etc/ocserv/ocserv.conf
# 改為證書登陸,注釋掉原來的登陸模式
auth = "certificate"
 
# 證書認證不支援這個選項,注釋掉這行
#listen-clear-file = /var/run/ocserv-conn.socket
 
# 啟用證書驗證
ca-cert = /etc/ocserv/ca-cert.pem

重啟ocserv
# kill -9 ocserv_pid
# ocserv -f -d 1

使用客戶端證書這方式我只有在公司網路環境才成功走代理,在家裡和3G網路VPN Log只顯示連線成功,但是瀏覽器打開iplocationfinder.com 檢查結果是失敗的 => 查不到原因,所以可能還是改為輸入帳號密碼登入為主  => 20160920已解決

5. 智能分流

因為人在大陸直接全局翻牆會造成大陸國內網站訪問巨慢的問題,所以必須在服務器端設route table推送到客戶端
https://github.com/CNMan/ocserv-cn-no-route
直接將 cn-no-route.txt 之中的 no-route 寫進 /etc/ocserv/ocserv.conf

最後一樣重啟ocserv服務

Windows客戶端下載
https://openconnect.github.io/openconnect-gui/

參考資料:
http://ifreedomlife.com/2015/04/20/Setup-Cisco-AnyConnect-VPN-on-CentOS7/ 在 CentOS 7 上搭建 Cisco AnyConnect VPN
https://www.logcg.com/archives/1343.html  使用ocserv搭建 Cisco Anyconnect 服务器 (主要)


2016年4月28日 星期四

2016年3月30日 星期三

Cloudflare 使用心得

原本在 匯智 http://domain.wis.com.tw/ 買的網址,結果內建的代管只能放6筆記錄
看了這篇 https://sofree.cc/cloudflare-free-cdn/ 後,決定試試 Cloudflare
Cloudflare 優點:
DNS代管服務
減少主機流量與資源消耗
阻擋惡意攻擊
加速網站瀏覽速度
免費不限流量的CDN - 查不到你實際網站IP若是台灣主機,通常就不建議開CDN功能,因為,Cloudflare並沒有台灣的節點,大多數都讀取美國檔案,這樣反而繞路

CDN是什麼呢?
全名是「內容傳遞網路」(Content delivery network或Content distribution network),簡單說就是CDN伺服器會分散於全球各地,而這些伺服器會去抓取你網站的內容快取,而如果你人在美國,讀取了有掛CDN的網站,它就會就近讀取美國節點的網站,儘管網站在台灣,你也會感覺瀏覽速度不差。透過分散式的節點,可以分散網站的資源使用,如果你存取的美國節點失效,它會在就近找一個新的節點存取資料,讓資料不間斷。

先說結論:
因為我的主機用linode,一個月有2 TB Transfer,加上又是自己一個人用。所以只用得到DNS代管服務。

Cloudflare 註冊
前略
最後一步會跟你說把原本的Nameservers 改成 Cloudflare 的Nameservers
然後登入 匯智 後台,把所有DNS記錄刪除,然後點 "A、MX、CNAME紀錄關閉"
再將DNS設成 Cloudflare的DNS
然後開啟Cloudflare後台菜單就可以開始設定DNS了。只是免費版新設定的子網域紀錄反應會比較慢(真的有點慢,我這邊等了20分鐘才ping到)

後台點選DNS菜單後,列表中Status可以切換要不要啟用CDN功能
啟用:
啟用後ping到的ip位址是Cloudflare的ip位址
停用:
會直接ping到你真實ip

使用dnstracer 查你設的 主DNS和次DNS
http://blog.xuite.net/happyman/tips/26266122-dnstracer+%E4%BD%BF%E7%94%A8
$ dnstracer  -c -o -q ns your.domain -s . -4
Tracing to your.domain[ns] via A.ROOT-SERVERS.NET, maximum of 3 retries
A.ROOT-SERVERS.NET [.] (198.41.0.4)
 |\___ a.gtld-servers.net [com] (192.5.6.30)
 |     |\___ alice.ns.cloudflare.com [your.domain] (2400:cb00:2049:0001:0000:0000:adf5:3a3c) Not queried
 |     |\___ alice.ns.cloudflare.com [your.domain] (173.245.58.60) Got authoritative answer
 |     |\___ rob.ns.cloudflare.com [your.domain] (2400:cb00:2049:0001:0000:0000:adf5:3b8c) Not queried
 |      \___ rob.ns.cloudflare.com [your.domain] (173.245.59.140) Got authoritative answer
...
但其實不用這麼麻煩,因為dig也可以,而且dig比較通用
$ dig @168.95.1.1 your.domain -t ns
...
;; ANSWER SECTION:
your.domain.            86400   IN      NS      alice.ns.cloudflare.com.
your.domain.            86400   IN      NS      rob.ns.cloudflare.com.


2016年3月15日 星期二

C槽空間不足

在經歷重灌後把程式都裝在D槽,而且使用 CCleaner 後過一陣子,發現C槽的空間又漸漸不足了。
使用TreeSize 掃描C槽後發現
C:\Windows\SysWOW64\config\systemprofile\AppData\Local\Microsoft\Windows\Temporary Internet Files\Content.IE5 
佔了快 60GB

Content.IE5 可以刪除嗎?
http://answers.microsoft.com/en-us/ie/forum/ie10-windows_7/internet-explorer-10-downloading-massive-number-of/1b51fbf8-9cc2-4ed2-a150-947d7e02bb5f
I would like to inform you that it is perfectly safe to manually delete the contents of the Content.IE5 file.
可以刪除,很安全

Content.IE5 很大,要怎麼刪比較快?
http://www.loganfranken.com/blog/640/how-i-fought-and-won-the-battle-for-disk-space/
> del /f/s/q foldername > nul
ex.
> cd C:\Windows\SysWOW64\config\systemprofile\AppData\Local\Microsoft\Windows
> del /f/s/q "Temporary Internet Files" > nul

重開機使用,目前一切正常

以上其實是中毒造成的,重灌電腦後先裝防毒,才是治本之道


2016年3月11日 星期五

[無用]SecurityError: Error #2060: 安全沙箱冲突:ExternalInterface 调用者... 錯誤

重灌電腦後有時候會跳出這個錯誤:
SecurityError: Error #2060: 安全沙箱冲突:ExternalInterface 调用者 http://a1.itc.cn/pv/js/spv.swf 不能访问 http://tv.sohu.com/20160309/n439899687.shtml?lcode=AAAASXDC_mNYCVI67vM06mKU-H-ufrd6-IyD4Sjx7gm72qB2F-NpCzype_a93WaQUn68BpP-jGArdrIWIQrwuc55H5-oAvg5N1iAM24xk2YSrH0ccf6&lqd=11466。
    at flash.external::ExternalInterface$/_initJS()
    at flash.external::ExternalInterface$/call()
    at Spv()
如圖:

試了 Firefox 安裝flashplayer 後,仍然會報錯
只好試了這篇:
http://superuser.com/questions/966128/how-do-i-stop-skype-from-popping-up-securityerror-error-2060-security-sandbox  How do I stop Skype from popping up SecurityError: Error #2060: Security sandbox violation?
1. 打開 IE => 工具 => 網際網路選項  或 直接搜尋 inetcpl.cpl 執行
2. 點擊  安全性 分頁
3. 選擇 限制的網站
4. 點擊 網站  按鈕
5. 新增 https://apps.skype.com
6. 關閉後重啟Skype

以上無用。

其實是木馬在作怪,安裝Microsoft Security Essentials 微軟免費防毒軟體後,就會把它擋掉了


2016年3月8日 星期二

IE 11 英文版改中文版

因為系統是簡體中文版,我先在Windows Update裝了IE 11後,才將系統語言改成繁體中文版,這時候發現IE 11 的語言變成英文了

曾經試過下載IE11語言包 https://www.microsoft.com/en-us/download/details.aspx?id=40904 ,但是無法更新成功

所以只好移除IE 11

控制台 -> 程式集 -> 檢視已安裝的更新 -> (左邊)檢視安裝的更新 -> 將Internet Explorer 11 解除安裝 
=> 這時候Win 7 會要你重啟 , 重啟後IE會變成IE 8繁體中文版=> 然後打開IE讓他自己更新成IE 11繁體中文版


參考資料:
http://answers.microsoft.com/zh-hant/ie/forum/ie11-windows_7/internet-explorer/d87e33c6-e2ff-46cd-8f49-6b0c8de58f52  Internet Explorer 11更新後變英文版問題(非用此解法)
http://www.cc.nccu.edu.tw/xms/content/show.php?id=7877  如何移除IE 11 (Internet Explorer 11)?


2016年3月7日 星期一

XAMPP 啟動Apache失敗

因為電腦開著skype裝xampp報錯後重裝就發生這個問題

Apache启动提示
10:33:43  [Apache] Problem detected!
10:33:43  [Apache] Port 80 in use by "Unable to open process" with PID 4!
10:33:43  [Apache] Apache WILL NOT start without the configured ports free!
10:33:43  [Apache] You need to uninstall/disable/reconfigure the blocking application
10:33:43  [Apache] or reconfigure Apache and the Control Panel to listen on a different port
10:33:43  [Apache] Problem detected!
10:33:43  [Apache] Port 443 in use by ""C:\Program Files (x86)\VMware\VMware Workstation\vmware-hostd.exe" -u "C:\ProgramData\VMware\hostd\config.xml"" with PID 5728!
10:33:43  [Apache] Apache WILL NOT start without the configured ports free!
10:33:43  [Apache] You need to uninstall/disable/reconfigure the blocking application
10:33:43  [Apache] or reconfigure Apache and the Control Panel to listen on a different port

直接開 http://localhost 可以開xampp下的網頁,但是卻不能Start、Stop

解法:
ctrl+shift+esc 開啟Windows工作管理員 => 處理程序 => 把兩個 httpd.exe 手動 "結束處理程序"

XAMPP介面不能註冊Service 
解法:
使用"系統管理者" 打開XAMPP 控制面板

Windows 10 無法啟動Apache
http://stackoverflow.com/questions/27333203/xampp-couldnt-start-apache-windows-10
1. 搜尋 services.msc
2. 停用 World Wide Web Publishing Service
3. 用管理員打開 XAMPP 面板啟動 Apache

參考資料:
http://stackoverflow.com/questions/20188546/cant-check-services-module-in-xampp  Can't check services module in xampp
http://blog.sina.com.cn/s/blog_542095870101hvq7.html  安装XAMPP时启动Apache失败解决方法 xampp-win32-1.8.3-1-VC11-installer


2016年3月3日 星期四

CCleaner 使用心得

因為電腦C槽空間只被分配60G,東西灌一灌,Windows update更新後,就不小心快用完了

下載了CCleaner 免費版來用,

1. 不要把瀏覽器(chrome、firefox、opera、IE)等的相關檔案清掉,不然重啟瀏覽器的分頁記錄、Firefox的網址記錄、chrome的google帳號登陸、chrome的擴充套件配置... 都會被重置
2. 將安裝的程式放在更大空間的地方 Ex. D槽
註:
- Office 365預設沒辦法選安裝位置,雖然找到這篇 Office2016 如何只安裝需要的程式? ,但是看起來挺麻煩的。
- Skype 沒法選安裝路徑,或許可以用免安裝版解決

重灌切了111G在C槽,且把能裝到D槽的東西都裝到D槽。用了3.4天後發現C槽的空間剩下8.8G了
http://www.mobile01.com/topicdetail.php?f=300&t=3080701  C槽容量一直減少-已解決! 謝謝大家~
關閉了 Windows 7 的系統還原,釋放了7G出來(變16G)。用了一天後又剩下10.8G
http://jay0909.pixnet.net/blog/post/28798873-%5Bwindows-7%E6%8A%80%E5%B7%A7%5D%E9%97%9C%E9%96%89%E7%B3%BB%E7%B5%B1%E9%82%84%E5%8E%9F-%E5%A4%A7%E5%B9%85%E6%8F%90%E5%8D%87windows-7-  [Windows 7技巧]關閉系統還原 大幅提升Windows 7 速度
也可以下載 TreeSizeFreePortable 免安裝程式看究竟是什麼東西佔用了C槽空間(記得使用系統管理員執行)


2016年3月2日 星期三

解壓縮中文檔名亂碼

有一個資料夾,在Linux上用tar壓縮成tar.gz檔放到百度雲上後,
下載回Windows 7 後用Winrar解壓縮,發現中文檔名是亂碼

解法:
使用 7-Zip 解壓縮(tar.gz要解壓縮兩次才行,第一次會解壓縮成xxx.tar然後再解壓縮一次成為原始內容)

參考資料:
https://tw.answers.yahoo.com/question/index?qid=20100811000010KK05376  請問壓縮檔裡面的檔案名都是亂碼,怎麼解決?

Codeigniter 搭配 Nginx + PHP-FPM 設定檔


/etc/nginx/sites-available/xxxx
server {
    listen       80;
    server_name  laravel.wuboy.twbbs.org;
    root         /usr/home/git/laravel/public;
 
    access_log /var/log/nginx/laravel_access.log;
    error_log /var/log/nginx/laravel_error.log;
 
    location / {
        index  index.php index.html index.htm;
    }
 
    if ($request_uri ~* index/?$)
    {
        rewrite ^/(.*)/index/?$ /$1 permanent;
    }
 
    # removes trailing slashes (prevents SEO duplicate content issues)
    if (!-d $request_filename)
    {
        rewrite ^/(.+)/$ /$1 permanent;
    }
 
    # removes access to "system" folder, also allows a "System.php" controller
    if ($request_uri ~* ^/system)
    {
        rewrite ^/(.*)$ /index.php?/$1 last;
        break;
    }
 
    # unless the request is for a valid file (image, js, css, etc.), send to bootstrap
    if (!-e $request_filename)
    {
        rewrite ^/(.*)$ /index.php?/$1 last;
        break;
    }
 
    # catch all
    error_page 404 /index.php;
 
    # use fastcgi for all php files
    location ~ \.php$
    {
        fastcgi_pass unix:/tmp/php-fpm.sock;
        fastcgi_index index.php;
        fastcgi_param SCRIPT_FILENAME $document_root$fastcgi_script_name;
        include /usr/local/etc/nginx/fastcgi_params;
        fastcgi_param HTTPS off;
    }
 
    # deny access to apache .htaccess files
    location ~ /\.ht
    {
        deny all;
    }
}


參考資料:
https://blog.wu-boy.com/2012/10/php-mvc-framework-nginx-php-fpm/  PHP MVC Framework 搭配 Nginx + PHP-FPM 設定檔


2016年2月26日 星期五

nginx 跑CI 產生500錯誤空白頁

環境:Linode
系統:CentOS 7

把在VM上用Apache跑的CI 2.2.1專案搬到新的Linode上,打開後跑500錯誤空白頁,而且nginx error log 沒有報錯

原因:php-mysql沒有安裝
# php -i | grep mysql
PHP Warning:  Unknown: It is not safe to rely on the system's timezone settings. You are *required* to use the date.timezone setting or the date_default_timezone_set() function. In case you used any of those methods and you are still getting this warning, you most likely misspelled the timezone identifier. We selected the timezone 'UTC' for now, but please set date.timezone to select your timezone. in Unknown on line 0
安裝 php-mysql
# yum install php-mysql
重啟php-fpm(只重啟nginx無效)
# service php-fpm restart

參考資料:
http://serverfault.com/questions/412683/configuring-nginx-php5-fpm-to-work-with-codeigniter  Configuring Nginx & php5-fpm to work with Codeigniter


2016年2月24日 星期三

Microsoft Office 2013(2016) 心得

因為公司電腦有買Office 365會導引讓你裝Microsoft Office 2013
所以就不再安裝WPS
WPS心得 的部分技巧搬到Office來用

word


修改英文字型成consolas
http://thinker-evans.blogspot.com/2013/04/office-word-2007-2010.html
設計(頁籤)->字形(下方的小箭頭點一下) -> 自訂字型
PMingLiU 為 新細明體 - 在不能顯示繁體中文字型名稱或預設編碼並非繁體中文的系統(預設簡體中文Win 7),細明體會顯示為MingLiU

單引號和雙引號會變成中文的單雙引號
http://blog.miniasp.com/post/2011/08/22/Microsoft-Office-2010-Word-PowerPoint-Turn-Off-Straight-quotes-with-smart-quotes-option.aspx
檔案 => 選項 => 校訂 => 自動校正選項 => 輸入時自動套用格式 => 取消勾選 "將「一般引號」取代為「智慧引號」"

建立項目符號清單或編號清單(項目符號和編碼)
https://support.office.com/zh-tw/article/%E5%BB%BA%E7%AB%8B%E9%A0%85%E7%9B%AE%E7%AC%A6%E8%99%9F%E6%B8%85%E5%96%AE%E6%88%96%E7%B7%A8%E8%99%9F%E6%B8%85%E5%96%AE-9ff81241-58a8-4d88-8d8c-acab3006a23e
在常用(頁籤)
如圖

新增目錄
https://support.office.com/zh-tw/article/%E5%9C%A8-Word-%E4%B8%AD%E5%BB%BA%E7%AB%8B%E7%9B%AE%E9%8C%84-882e8564-0edb-435e-84b5-1d8552ccf0c0
套用標題樣式
選取您要包含在目錄中的文字,然後在 [常用] 索引標籤上,按一下 [標題 1] 等標題樣式。
=> 在左邊導覽標題那邊就有新標題出現,必須使用上述的方法產生的標題才能升階降階 。而WPS文件生成的目錄,在導覽標題上右鍵 "在之前新增標題" 或 "在之後新增標題" 則不能 升階降階 。

新增編號和設定位置
https://support.office.com/zh-tw/article/%E8%AE%8A%E6%9B%B4%E9%A0%85%E7%9B%AE%E7%AC%A6%E8%99%9F%E6%88%96%E6%95%B8%E5%AD%97%E8%88%87%E6%96%87%E5%AD%97%E4%B9%8B%E9%96%93%E7%9A%84%E7%B8%AE%E6%8E%92-a2b7b2e4-9c74-4ca7-8fc4-52908f8efb22
直接用1. 2. 產生的編號,位置和起始編號怪怪的,調整清單縮排的UI也怪怪的,使用以下方法解決
使用常用頁籤中的編號按鈕產生編號
產生後位置跑掉,右鍵=>調整清單縮排
數字位置改"0"。編號的後置字元選"間距"
新編號修改位置成功
在左側顯示目錄
http://jingyan.baidu.com/article/6525d4b128bd1aac7d2e94af.html
在word左側顯示目錄,這樣可以大大提高閱讀word文檔的速度。但是有時候word是沒有顯示左側目錄或者被不小心關閉了,那麼怎樣才能打開word左側目錄呢?
檢視 => 勾選"功能視窗"


避免自動項目符號、避免第一個英文大寫
https://support.office.com/zh-tw/article/%E5%BE%A9%E5%8E%9F%E6%88%96%E9%97%9C%E9%96%89%E8%87%AA%E5%8B%95%E6%A0%BC%E5%BC%8F%E8%A8%AD%E5%AE%9A-bd8f06c4-c4f9-4293-921f-3a7db9bbd2a1
檔案 => 選項 => 校訂 => 自動校正選項 =>
輸入時自動套用格式 => 取消勾選 "自動項目符號" ( 可避免 => 變成不能複製的"項目符號",如下圖 )
可避免 => 變成不能複製的"項目符號"
自動校正 => 取消勾選 "英文句子第一個字母大寫"


貼上文字多出空格的解決方式
http://blog.xuite.net/skhung/digilife/54210776-Word+%E8%B2%BC%E4%B8%8A%E6%96%87%E5%AD%97%E5%A4%9A%E5%87%BA%E7%A9%BA%E6%A0%BC%E7%9A%84%E8%A7%A3%E6%B1%BA%E6%96%B9%E5%BC%8F+
檔案 => 選項 => 進階 => "使用智慧剪貼"旁的"設定"按鈕 => 取消勾選"自動調整句子與字距"
設定後,->後直接貼上test_user就不會變成"-> test_user",而是"->test_user"

word如何隐藏回车符号和显示回车符号?

https://jingyan.baidu.com/article/7908e85ca52628af481ad203.html  word如何隐藏回车符号和显示回车符号?

隱藏

檔案=》選項=》顯示=》取消勾選【段落標記】


顯示

檔案=》選項=》顯示=》勾選【段落標記】
或是在【隱藏】的情況下點擊:常用=》顯示/隱藏編輯標記

word中的回車符變成了段落音符“¶”

https://jingyan.baidu.com/article/f3e34a1292ed98b4eb6535a1.html  word中的回车符变成了段落音符“¶”

檔案=》選項=》語言=》Office顯示語言=》將慣用語言從英文改成中文
我的word是 2019版本,所以這個問題無法復現

查word版本

檔案=》賬戶

設定標題段落間距

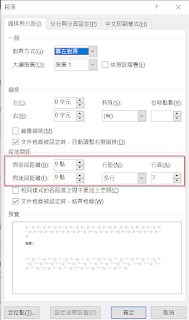
常用=》【樣式】標題n=》右鍵=》修改
格式=》段落
縮排與行距=》段落間距=》修改:【與前段距離】、【與後段距離】、【行距】、【行高】


word的表格中間怎麼插入非表格的空白行

https://zhidao.baidu.com/question/2010674861743136628.html  word的表格中间怎么插入非表格的空白行
版面配置 => 合併 => 分割表哥


Web版面配置BUG

https://zhidao.baidu.com/question/170141751.html  Word 打开默认是web版式视图,怎么变成打开默认是页面视图
保存後一直從整頁模式變成Web版面配置
解法:另存新檔,然後編輯新的檔案


excel

自動調整欄寬

常用=》儲存格=》格式=》自動調整欄寬
調整後

自動換行

常用=》對齊方式=》自動換行
調整後


使用excel畫流程圖

插入=> 圖例 => 圖案/圖示

選取範圍,ctrl+c 複製
貼到小畫家

保存成圖片