2020年11月30日 星期一

Windows 10 同時啟用hyper-v和安卓模擬器

前言

【hyper-v 安裝CentOS 7.6】中hyper-v和安卓的夜神模擬器nox、BlueStacks無法同時開啟
ps. 我的電腦是Intel CPU

安裝Visual Studio 的 Android 模擬器

可以和 Android Studio 搭配
預設會安裝 KitKat Android 4.4(API Level 19)


Android Studio配置硬件加速

https://developer.android.com/studio/run/emulator-acceleration#choose-windows-hypervisor  Configure hardware acceleration for the Android Emulator - Choose a hypervisor on Windows  
Criteria(標準)Hypervisor
You have an Intel processor and do not need to run Hyper-V at the same time as the Android Emulator.
Use Intel HAXM.
You have an Intel processor and do need to run Hyper-V at the same time as the Android Emulator.
- 如果你是Intel處理器且需要同時執行hyper-v作為安卓模擬器
Use WHPX.
-使用 WHPX
You have an AMD processor and do not need to run Hyper-V at the same time as the Android Emulator.
Use Android Emulator Hypervisor Driver for AMD Processors.
You have an AMD processor and do need to run Hyper-V at the same time as the Android Emulator.
Use WHPX.

使用Windows Hypervisor Platform配置VM加速

在你啟用 WHPX前,你的電腦必須準備:
  • Intel處理器:支持虛擬化技術(VT-x)、Extended Page Tables (EPT)和Unrestricted Guest (UG)功能。VT-x必須在你電腦的BIOS中啟用(參考閱讀:【virtualbox心得】
  • Android Studio 3.2 Beta 1 以上IDE
  • 安卓模擬器27.3.8以上版本
  • windows 10更新到最新(需要2018年4月之後的更新)
使用以下步驟安裝WHPX :
  1. 設定 =》 應用程式=》程式和功能相關設定下面)
  2. 開啟或關閉Windows功能
  3. 勾選Windows Hypervisor平台

  4. OK
  5. 安裝完成後,重啟Windows

讓Android Studio找到 Visual Studio安卓模擬器

https://stackoverflow.com/a/31763471  Android Studio cannot find the Visual Studio emulator
https://stackoverflow.com/a/39857938  “Visual Studio Android Emulator” for “Android Studio”
  1. 搜尋regedit =》 瀏覽 HKEY_LOCAL_MACHINE\SOFTWARE\Wow6432Node 
  2. 新增【機碼(K)】:Android SDK Tools
  3. 點選那個新增的機碼(key)
  4. 新增【字串值(S)】。數值名稱:path。數值資料:C:\Users\username\AppData\Local\Android\Sdk

成功用Android Studio執行Visual Studio安卓模擬器
ps. Adb.exe not found報錯的原因也是沒有設 Android SDK Tools的path
https://stackoverflow.com/a/51189354  VS Emulator: Adb.exe not found

解決Android Studio的Hardcoded string警告

https://stackoverflow.com/a/34130992  How to solve this issue of Hardcoded string?
  • 把光標放在Hard coded字串上
  • 按 alt+enter
  • 輸入你資源的名字
  • OK

安裝apk包時報錯

WARNING: linker: libdvm.so has text relocations. This is wasting memory and is a security risk. Please fix.
        pkg: /data/local/tmp/app-debug.apk
Failure [INSTALL_FAILED_OLDER_SDK]
https://blog.csdn.net/u012822634/article/details/45072747  android studio Failure [INSTALL_FAILED_OLDER_SDK]错误
有可能是最低版本號大於設備的版本
cordova 因為package.json不同的cordova-android,其platforms/android/build.gradle的defaultMinSdkVersion不同
"cordova-android": "^9.0.0" =》defaultMinSdkVersion=22 //Integer - Minimum requirement is Android 5.1
"cordova-android": "^8.1.0" =》 defaultMinSdkVersion=19 //Integer - Minimum requirement is Android 4.4

解法

Visual Studio Emulator for Android 下載 Marshmallow Android 6.0.0 API Level 23,用高一點的版本去執行

安裝更高版本的安卓模擬器

現在BlueStacks 4支援hyper-v的Windows 10電腦了
直接打開【BlueStacks官網】,安裝程序會依據你的電腦是否開啟hyper-v,自動安裝正確版本的BlueStacks(真厲害)
安裝完應用程式名字是:BlueStacks(Hyper-v) Beta

加快BlueStacks 4的秘訣

  1. 確認你的虛擬化已啟動
  2. 在BlueStacks設定裡分配更多的RAM和CPU

  3. 改變你的電源計劃成【最高效能】
    設定=》系統=》電源與睡眠=》其他電源設定(相關設定下面)

  4. 更新顯卡驅動(我沒特別去做)
  5. 關閉其他高消耗RAM的程式(如:chrome)
  6. 設置你的防毒(我沒特別去做)

檢查安卓(模擬器)版本

https://stackoverflow.com/a/36496770  How to check Android OS version of bluestacks Emulator


456

2020年11月28日 星期六

使用chrome devtools遠程調試android手機

起因

vue起始靜態頁使用cordova打包出來的安卓apk安裝包打開空白(模擬器+真機)且vue.config.js的publicPath已設置'',使用遠程調試看cordova的APP頁面裡面報什麼錯誤。因為在電腦的瀏覽器打開時沒這問題


解法

https://developers.google.com/web/tools/chrome-devtools/remote-debugging  Get Started with Remote Debugging Android Devices

第一步、發現你的安卓設備

  1. 安卓手機啟用【開發人員選項】
  2. 開啟安卓手機上的【開發人員選項】=》【USB偵錯】
  3. 打開電腦的chrome
  4. 打開網址 chrome://inspect#devices 
  5. 確保你的【Discover USB devices】是勾選的
  6. 安卓手機USB傳輸線連電腦
  7. 如果你的設備離線,在安卓手機上同意【允許USB偵錯】

第二步、在你的電腦上調試安卓設備上的內容

  1. 打開安卓手機上的chrome瀏覽器(cordova APP、三星網際網路、chrome beta都抓得到)
  2. 在你電腦chrome的 chrome://inspect/#devices 分頁,可以看到可用的設備、瀏覽器、分頁
  3. 在【Open tab with url】輸入框輸入網址、點擊Open,可以直接在安卓手機的該瀏覽器上新分頁打開該網址
  4. 點擊【Inspect】,將會打開新的DevTools實例

直接手機瀏覽器,電腦上的DevTools會同步操作

打開DevTools顯示HTTP/1.1 404 Not Found

原因

https://stackoverflow.com/a/56375871  Google Chrome Developer Tools : Android Debugging returns HTTP/1.1 404 Not Found. Why?
我家的PLDT網路在電腦的chrome無法打開 https://chrome-devtools-frontend.appspot.com/  (DNS_PROBE_FINISHED_NXDOMAIN),換一個讓電腦能打開這網址的網路即可(chrome查件Change IP address換到美國IP、使用手機globe 4G網路)
正常打開如下圖


ps. 我的手機沒換網路不受影響
ps2. 只要遠程調試能成功打開devtools一次後,切回原本網路即使 https://chrome-devtools-frontend.appspot.com/ 打不開,也不會404

其他可能原因(非我遇到的)

電腦和手機瀏覽器版本不同

https://blog.csdn.net/qq_27127385/article/details/103271568  已解决:DevTools 调试移动端 弹出 HTTP/1.1 404 Not Found

檢查chrome版本

打開 chrome://version/  
ThinkPad:
Google Chrome 87.0.4280.66 (正式版本) (64 位元) (cohort: 87_66_Win)
Samsung J6:

安卓手機的【Google Chrome】【Chrome Beta】竟然是不同版本,雖然發行者都是Google官方,但是手機的【Chrome Beta】版本才是和電腦chrome版本一樣是 87.0.4280.66 
如果要降級電腦版chrome,可能會用到:
https://www.slimjet.com/chrome/google-chrome-old-version.php  Google Chrome Older Versions Download (Windows, Linux & Mac)
ps. 因為我即使使用【Chrome Beta】和電腦chrome版本一樣,也無法解決404問題,就沒嘗試降級chrome版本了

Google在你的國家限制了該功能

目前已知伊朗、中國大陸會有此問題,可使用VPN解決

WebView實作設置錯誤

https://stackoverflow.com/a/46220364  Chrome DevTools [chrome://inspect] : 404 Not Found The resource could not be found
安卓手機:設定 =》 開發人員選項 =》 WebView實作
沒有選擇 Chrome Stable ,但是android 10 後,chrome不再提供WebView
https://www.xda-developers.com/google-chrome-no-longer-webview-provider-android-10/  Google Chrome app is no longer the WebView provider in Android 10


空白頁可能的原因

https://github.com/m0dch3n/vue-cli-plugin-cordova/issues/85  Vue Cordova Blank screen on W10

m0dch3n:使用 https://developers.google.com/web/tools/chrome-devtools/remote-debugging 查看遠程設備chrome裡報什麼錯誤
RaulGF92:使用了@babel/pollyfill一樣有這個問題
m0dch3n: vue.config.js加入
devServer: {
  https: false
}

https://github.com/m0dch3n/vue-cli-plugin-cordova/issues/78  white blank screen on device emulators and browser: "page not working"

m0dch3n:通常空白頁代表你的javascript沒有啟動vue,通常是因為javascript引擎沒有支持es6或其他新功能,請使用新一點的android系統(7或以上版本),如果還是不能解決,使用chrome devtools遠程調試android手機的cordova webview

https://github.com/m0dch3n/vue-cli-plugin-cordova/issues/68  Android shows white screen and nothing more

m0dch3n:你用什麼版本的android?4.4以下變化很大,webview沒有支持所有的javascript功能(如:es6)。你或許需要polyfill或babelify。或使用android 7或8


我的空白頁的原因

net::ERR_FILE_NOT_FOUND ,js的路徑錯誤。重新打包後就可以了

模擬器遠程調試

以Visual Studio 的 Android 模擬器(hyper-v兼容)為例
開啟 5.7" Marshmallow (6.0.0) XHDPI Phone API Level 23 - Similar to Samsung Galaxy Note4...
在chrome的 chrome://inspect/#devices 可以直接抓到該模擬器,模擬器打開內建瀏覽器後,在電腦chrome直接【Inspect】可以打開devtools,但是devtools無法打開瀏覽器畫面,一打開模擬器的瀏覽器就會崩潰不能繼續使用。無需打開模擬器的開發者選項(其實也打不開)


2020年11月24日 星期二

telegram從不同貼圖庫自製貼圖庫

目標

把telegram不同貼圖庫的部分貼圖自製成自己的貼圖庫

準備png圖片

把你要的圖傳到自己的Saved Messages 
對貼圖 右鍵 =》 Save Image As (另存圖片到電腦)
會是 sticker.webp(webp格式)
然後到 https://ezgif.com/webp-to-png 將 sticker.webp 上傳
轉化為png格式
在png圖片上,右鍵另存圖片到電腦
最後再點網頁上面的 WebP to PNG ,繼續處理下一張圖

開始製作

搜尋 @Stickers
點擊對話,然後START 開始(ps. 可把 @Stickers 和 Saved Messages 置頂,方便處理)
傳送指令 /newpack

傳送「想命名的名稱」

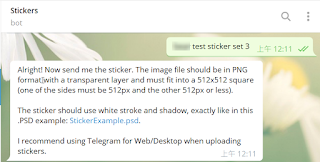
傳送「PNG 圖片」(不要壓縮的,Send as a file)

傳送「對應的表情符號」(我隨便選第一個Emoji,可以重複)

(重複傳送「PNG 圖片」=》傳送「對應的表情符號)
傳送指令 /publish

傳送指令 /skip 或 上傳封面圖檔(我選/skip)

分享您的貼圖包網址(機器人會回傳給您一個貼圖包的網址,這個網址可以拿去分享給其他人,點擊那個網址就會預覽您的貼圖包。)
完成


參考資料

https://tgtw.cc/post-make-sticker-pack  Telegram 製作貼圖包 圖文教學


2020年11月17日 星期二

Windows 10 安裝Discuz X3.4

下載Discuz

Discuz! 官方站 => (Discuz! 产品动态)Discuz! 官方发布 => (置頂)[发布] DiscuzX 3.4 R20191201

https://www.discuz.net/thread-3847642-1-1.html  [发布] DiscuzX 3.4 R20191201

官方 Git 地址:

https://gitee.com/ComsenzDiscuz/DiscuzX

打包文件下载地址:

https://gitee.com/3dming/DiscuzL/attach_files

https://gitee.com/3dming/DiscuzL/attach_files/457751/download   Discuz_X3.4_TC_UTF8【20200818】.zip

安裝

解壓縮 Discuz_X3.4_TC_UTF8【20200818】.zip 

$ ls
qqqun.png  readme/  readme.html  upload/  utility/
解析vhost(discuz.example.com)到 upload/

打開 http://discuz.example.com/install/ 即可看到

安裝嚮導

1. 開始安裝

2. 設置運行環境

3. 安裝數據庫


數據庫服務器:192.168.1.7  
我的windows 10 上的MySQL 8.0.16,只有root@% 是 mysql_native_password (laravel 6 心得)。如果設localhost或127.0.0.1 會遇到以下錯誤:
( ! ) Warning: mysqli::__construct(): The server requested authentication method unknown to the client [caching_sha2_password] in C:\bear\Discuz_X3.4_TC_UTF8【20200818】\upload\install\include\install_function.php on line 66
Call Stack
#   Time    Memory  Function    Location
1   0.0026  518224  {main}( )   ...\index.php:0
2   0.0108  1069952 check_db( ) ...\index.php:270
3   0.0108  1070336 __construct ( ) ...\install_function.php:66

4. 安裝數據庫

安裝完成

前台

右上角可直接登錄管理員賬號(admin)

管理中心

http://discuz.example.com/admin.php  (第一次登錄後台成果會自動刪除 install/index.php 檔案)

論壇主題管理

(後台管理前台主題)
內容 => 論壇主題管理


二次開發

.gitignore

/.idea/
/data/
/uc_server/data/
 /data/ 和 /uc_server/data/ 是緩存目錄,類似laravel的storage/

網上資源

https://open.dismall.com/?ac=document&page=dev  技术文档_Discuz!开放平台 - Discuz!应用中心
https://www.discuz.net/thread-1625972-1-1.html  二次开发 教你识别程序目录和文件列表

修改viewthread視圖

http://discuz.example.com/forum.php?mod=viewthread&tid=1&extra=page%3D1  

修改 template/default/forum/viewthread.htm 
diff --git a/template/default/forum/viewthread.htm b/template/default/forum/viewthread.htm
index 08ddc59..35829f7 100644
--- a/template/default/forum/viewthread.htm
+++ b/template/default/forum/viewthread.htm
@@ -1,5 +1,5 @@
 <!--{template common/header}-->
-
+hello world
 <script type="text/javascript">var fid = parseInt('$_G[fid]'), tid = parseInt('$_G[tid]');</script>
 <!--{if $modmenu['thread'] || $modmenu['post']}-->
     <script type="text/javascript" src="{$_G['setting']['jspath']}forum_moderate.js?{VERHASH}"></script>

s

修改首頁視圖

流程

入口文件

forum.php:67
require DISCUZ_ROOT.'./source/module/forum/forum_'.$mod.'.php';  => 決定控制器(?)

控制器(?)

source/module/forum/forum_index.php:436
include template('diy:forum/discuz:'.$gid);  => 決定view

view

template/default/forum/discuz.htm
+++ b/template/default/forum/discuz.htm
@@ -1,5 +1,5 @@
 <!--{template common/header}-->
-
+hello discuz

 <div id="pt" class="bm cl">
     <!--{if empty($gid) && $announcements}-->

template 緩存

修改subtemplate 引入的模板 template/default/common/header_common.htm 時
template/default/common/header.htm:1
<!--{subtemplate common/header_common}-->

有時候會改了沒反應
解法:
刪除 data/template 下 所有  *.tpl.php 檔案


2020年11月16日 星期一

安裝指定版本的composer

前言

因為composer 2.0 有時候會遇到問題,所以只打算裝1版本的composer

打開composer下載頁

https://getcomposer.org/download/

獲取 1.10.17 版本的下載連接 https://getcomposer.org/download/1.10.17/composer.phar 

安裝

php -r "copy('https://getcomposer.org/download/1.10.17/composer.phar', 'composer-setup.php');"

php -r "if (hash_file('sha256', 'composer-setup.php') === '6fa00eba5103ce6750f94f87af8356e12cc45d5bbb11a140533790cf60725f1c') { echo 'Installer verified'; } else { echo 'Installer corrupt'; unlink('composer-setup.php'); } echo PHP_EOL;"

php composer-setup.php

php -r "unlink('composer-setup.php');"

完成


2020年11月12日 星期四

PHP的非貪婪模式修飾符和‌‌preg_match_all()

前言

正規式搜尋在第一個符合時終止(Regular expression to stop at first match)

非貪婪模式 - (.*?)

PHP Pattern Modifiers的 U (PCRE_UNGREEDY)

https://www.php.net/manual/en/reference.pcre.pattern.modifiers.php  Pattern Modifiers

https://stackoverflow.com/a/37347478  PHP preg_match and preg_match_all functions

找HTML字串tag標籤里的內容:

<b>example: </b><div align=left>this is a test</div>

preg_match_all(
    "|<[^>]+>(.*)</[^>]+>|U",
    "<b>example: </b><div align=left>this is a test</div>",
    $matches
);
‌2 => 會有2個結果

‌‌$matches
‌array (
  0 => 
  array (
    0 => '<b>example: </b>',
    1 => '<div align=left>this is a test</div>',
  ),
  1 => 
  array (
    0 => 'example: ',
    1 => 'this is a test',
  ),
)
U - PHP的非貪婪模式修飾符

$matches[1] is an array of strings matched by the first parenthesized sub-pattern

$matches[1] 是第一個帶刮號括號(())的子模式匹配的陣列 => (.*)

正則用“|”是避免“/”的衝突,或是正則中跳脫“/”

preg_match_all(
    "/<[^>]+>(.*)<\/[^>]+>/U",
    "<b>example: </b><div align=left>this is a test!</div>",
    $matches
);

不使用非貪婪修飾符U

preg_match_all(
    "/<[^>]+>(.*?)<\/[^>]+>/",
    "<b>example: </b><div align=left>this is a test!</div>",
    $matches
);

其他

preg_match_all("/\{([\w\d_]+)\}/", "?new_year={year}&new_month={month}&new_day={day}", $matches)
‌3

‌‌$matches
‌array (
  0 => 
  array (
    0 => '{year}',
    1 => '{month}',
    2 => '{day}',
  ),
  1 => 
  array (
    0 => 'year',
    1 => 'month',
    2 => 'day',
  ),
)