2021年7月11日 星期日

寶塔、phpstudy、phpEnv 使用心得

前言

之前一直使用XAMPP當做windows的測試環境,但是有以下缺點:
1. 不能切換php版本
2. 用的是apache不是nginx
3. 無php擴展安裝
4. 無偽靜態配置
5. 無軟件管理
優點:
netstat 本機端口監聽圖形界面  => 但是可以用 windows 內建功能【資源監視器(resmon)】中的【接聽連接埠】取代

為了能使用低版本的php測試SQL注入,和使用不同版本的php測試不同專案
改使用以下工具

寶塔

優點

支持linux和windows
可安裝php 5.2 - 8.0 多版本的php,並快速切換php版本,安裝php擴展
linux可安裝5.1-8.0 版本的mysql,windows可安裝5.5-8.0 版本的mysql。可安裝mariadb
面板可查到mysql密碼
內建不同php框架的nginx偽靜態模板
linux版本在面板快速切換php cli的版本
面板整合:反向代理、重定向、計劃任務、SSL、防火墻

特點

新項目自動生成.user.ini 、index.html、404.html
面板上安裝PHP後會自動安裝composer


缺點

pecl只支持到php 7.3,不支持php 7.4、php 8.0

CentOS 安裝寶塔

https://www.bt.cn/download/linux.html  宝塔Linux面板 7.7.0
https://www.shopee6.com/web/web-tutorial/remove-bt-panel-forced-login.html  一键解决BT宝塔面板的强制登陆限制要求教程

安裝

# yum install -y wget && wget -O install.sh http://download.bt.cn/install/install_6.0.sh && sh install.sh

去除登錄(windows版本不需要)

# sed -i "s|if (bind_user == 'True') {|if (bind_user == 'REMOVED') {|g" /www/server/panel/BTPanel/static/js/index.js
# rm -rf /www/server/panel/data/bind.pl

查面板登錄信息

# bt 
(然後 prompt輸入14)


CentOS安裝特定版本XDebug

因為寶塔後台php 8 裝的xdebug版本是 v3.0.0
# php -v
PHP 8.0.8 (cli) (built: Jul 13 2021 10:56:23) ( NTS )
Copyright (c) The PHP Group
Zend Engine v4.0.8, Copyright (c) Zend Technologies
    with Xdebug v3.0.0, Copyright (c) 2002-2020, by Derick Rethans

但是 v3.0.0 有bug,在停在斷點時取消斷點,會中止xdebug調試。又寶塔的php 8沒有pecl,所以需要手動安裝 xdebug-3.0.4

下載 xdebug-3.0.4

# wget https://xdebug.org/files/xdebug-3.0.4.tgz

解壓縮

# tar -zxf xdebug-3.0.4.tgz

進入目錄

# cd xdebug-3.0.4/

# phpize

直接configure 會失敗

# ./configure --enable-xdebug
checking for grep that handles long lines and -e... /usr/bin/grep
...
configure: error: Cannot find php-config. Please use --with-php-config=PATH

需指定php 8的php-config 路徑

# ./configure --enable-xdebug --with-php-config=/www/server/php/80/bin/php-config 
# make
# make install

即安裝成功

# php -v
PHP 8.0.8 (cli) (built: Jul 13 2021 10:56:23) ( NTS )
Copyright (c) The PHP Group
Zend Engine v4.0.8, Copyright (c) Zend Technologies
    with Xdebug v3.0.4, Copyright (c) 2002-2021, by Derick Rethans

設定php.ini

/www/server/php/80/etc/php.ini
[xdebug]
zend_extension="/path/xdebug-3.0.4/xdebug.so"
xdebug.mode=debug
xdebug.client_host=192.168.1.x

configure報錯

# ./configure --enable-xdebug --with-php-config=/www/server/php/72/bin/php-config
configure: WARNING: You will need re2c 0.13.4 or later if you want to regenerate PHP parsers.
=> 安裝re2c  # yum install re2c
checking for gawk... gawk
checking whether to enable Xdebug support... yes, shared
checking whether to enable Xdebug developer build flags... no
./configure: line 4483: syntax error near unexpected token `-Wbool-conversion,'
=> 重新安裝PHP 7.2
./configure: line 4483: `    AX_CHECK_COMPILE_FLAG(-Wbool-conversion,                _MAINTAINER_CFLAGS="$_MAINTAINER_CFLAGS -Wbool-conversion")'


wget時https證書過期

# wget https://xdebug.org/files/xdebug-3.1.5.tgz
...
ERROR: cannot verify xdebug.org's certificate, issued by ‘/C=US/O=Let's Encrypt/CN=R3’:
  Issued certificate has expired.
To connect to xdebug.org insecurely, use `--no-check-certificate'.

--no-check-certificate 或 # yum update ca-certificates  

Windows 安裝特定版本的XDebug

https://xdebug.org/download 直接下載 Windows binaries ,如 PHP 8.0 VS16 (64 bit)  
然後直接修改 php.ini
C:\BtSoft\php\80\php.ini
zend_extension="C:\BtSoft\php\80\ext\php_xdebug-3.0.4-8.0-vs16-nts-x86_64.dll"
xdebug.mode = debug
xdebug.client_port = 9003
xdebug.client_host = "192.168.1.x"
xdebug.idekey=PHPSTORM

避免Windows寶塔開機自動啟動服務

Windows服務中將以下的服務的啟動類型改成【手動】
btPanel
btTask
mysql
nginx

安裝不同版本的MySQL

https://www.cnblogs.com/bjlhx/p/10538781.html  007-docker-安装-mysql:5.6
因為寶塔已經安裝了MySQL5.7,一次只能安裝一個MySQL,如果要同時安裝不同版本的MySQL需使用docker
以MySQL 5.6為例
新建目錄 /root/my-mysql-5.6  ,將MySQL資料放在這裡
# docker run -p 23306:3306 --name my-mysql-5.6 -v /root/my-mysql-5.6:/var/lib/mysql -e MYSQL_ROOT_PASSWORD=123456 -d mysql:5.6 --character-set-server=utf8mb4 --collation-server=utf8mb4_unicode_ci
Unable to find image 'mysql:5.6' locally
5.6: Pulling from library/mysql
..
第一次會拉取官方mysql:5.6鏡像

如果你的機器不能訪問MySQL 5.6 服務可以進入容器這樣做
# docker exec -it my-mysql-5.6 bash
root@c5fe23e1a123:/# mysql -u root -p
mysql> GRANT ALL PRIVILEGES ON *.* TO 'root'@'%' ;
Query OK, 0 rows affected (0.00 sec)

就可以以23306端口訪問MySQL 5.6服務

--character-set-server=utf8mb4 => 讓你的 character_set_server 是 utf8mb4 而不是latin1
--collation-server=utf8mb4_unicode_ci => 讓你的 collation_server 是 utf8mb4_unicode_ci 而不是latin1_swedish_ci

安裝beanstalkd 和 beanstalkd-console

如果開發環境選用寶塔而不是laradock,而寶塔軟件管理無beanstalk,可使用docker
# docker run -d -p 11300:11300 --name beanstalkd schickling/beanstalkd
# docker run -d -p 2080:2080 --link beanstalkd:beanstalkd schickling/beanstalkd-console
然後即可透過瀏覽器訪問 beanstalkd-console 


一直提示open_basedir restriction in effect(windows server 2016)

https://www.bt.cn/bbs/thread-6877-1-1.html  一直提示open_basedir restriction in effect
網站目錄 =》 取消勾選【防跨站攻击(open_basedir)

phpstudy

版本  8.1.1.3

優點

可安裝php 5.2 - 8.0 多版本的php,並快速切換php版本,安裝php擴展
可安裝5.1-8.0 版本的mysql
面板可查到mysql密碼
mysql不佔用windows服務,不與XAMPP和寶塔產生服務路徑衝突 => 裝了寶塔的mysql後phpstudy的mysql就起不來了

特點

面板設置nginx偽靜態(編輯=>偽靜態和偽靜態是相同的),設完後在專案目錄下將偽靜態寫入 nginx.htaccess(nginx)或 .htaccess(apache)。
網站自動生成index.html 入口文件
網站自動生成 error 錯誤頁面目錄

缺點

php小版本非最新版
php-fpm 9000端口和phpstorm xdebug 端口衝突,需要更改xdebug端口

phpEnv

版本 8.9.0

優點

可離線安裝(預設只有php 7.4,面板軟件商店下載解壓縮後即完成php多版本安裝)
php-fpm 和phpstorm xdebug 端口不衝突 
可安裝php 5.2 - 8.2 多版本的php,並快速切換php版本
面板可改MySQL密碼
內建不同php框架的nginx URL重寫模板
可安裝redis MySQL
預設裝好composer(phpEnv\tools\Composer\composer.phar)

同時跑多版本MySQL

phpEnv裝 MySQL 5.7
到MySQL官網下載MySQL 8.0
https://dev.mysql.com/downloads/file/?id=516927
下載 mysql-installer-community-8.0.32.0.msi ,雙擊執行安裝
選擇 Server only
(一直下一步)
使用3308端口,避免和MySQL 5.7 3306 衝突
(一直下一步)
設定MySQL密碼
服務名:MySQL80
(一直下一步完成安裝)
在服務中啟動/停用 MySQL 8.0服務


結論

推薦使用寶塔做開發環境
推薦使用phpEnv做開發環境 


2021年6月2日 星期三

frp 心得

 概覽

frp是內網穿透的反向代理工具,支持多種服務(HTTP、SSH、RDP),需要準備一台VPS

相關連接

文檔

下載


服務器

查CPU型號(AMD、Intel、ARM)

# grep -i core /proc/cpuinfo
model name      : AMD EPYC 7601 32-Core Processor

下載、解壓縮、進入目錄

# wget https://github.com/fatedier/frp/releases/download/v0.36.2/frp_0.36.2_linux_amd64.tar.gz
# tar zxvf frp_0.36.2_linux_amd64.tar.gz
# cd frp_0.36.2_linux_amd64/

編輯 frps.ini


[common]
# frp监听的端口,默认是7000,可以改成其他的
bind_port = 7000
# 授权码,请改成更复杂的
token = 12345678
# HTTP 类型代理监听的端口
vhost_http_port = 8080
# frpc 設置 tls_enable = true 才能連,連線做tls加密
tls_only = true
# tls_trusted_ca_file 内容是有效的话,客戶端要配置tls_cert_file和tls_key_file 才能連
tls_trusted_ca_file = /frp_tls_files/ca.crt

# frp管理后台端口,请按自己需求更改
dashboard_port = 7500
# frp管理后台用户名和密码,请改成自己的
dashboard_user = admin
dashboard_pwd = admin
enable_prometheus = true
# 二级域名后缀
subdomain_host = yourdomain.com

# frp日志配置
log_file = /var/log/frps.log
log_level = info
log_max_days = 3
s

設置和啟動frp服務

在frp目錄下執行
mkdir -p /etc/frp
cp frps.ini /etc/frp
cp frps /usr/bin
cp systemd/frps.service /usr/lib/systemd/system/
systemctl enable frps
systemctl start frps
s

防火墻放行端口

# 添加监听端口
firewall-cmd --permanent --add-port=7000/tcp
# 添加管理后台端口
firewall-cmd --permanent --add-port=7500/tcp
firewall-cmd --reload
s

訪問frp後台

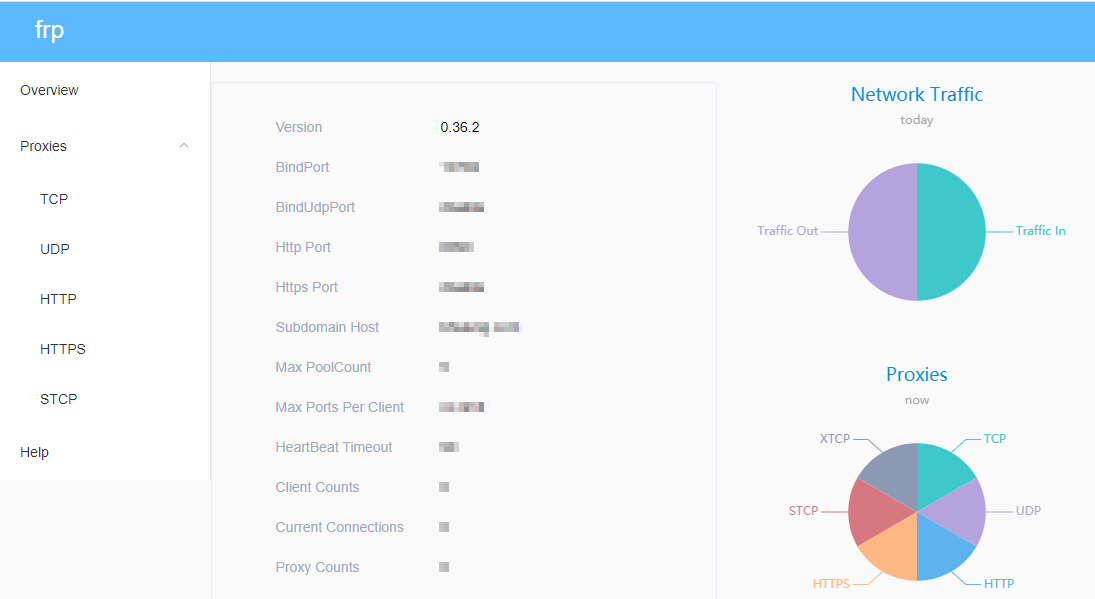
瀏覽器打開"http://服務器IP:後台管理端口" ,輸入用戶名和密碼可以查看連接狀態:


客戶端

下載frp

到  https://github.com/fatedier/frp/releases ,下載最新版客戶端
windows:32位系統 frp_0.36.2_windows_386.zip ,64位系統  frp_0.36.2_windows_amd64.zip  ,不知道系統多少下載32位

解壓縮下載的壓縮包,進入文件夾內

編輯 frpc.ini 

(提供服務的遠程電腦)
# 服务端配置
[common]
server_addr = 服务器ip
# 请换成设置的服务器端口
server_port = 7000
token = 12345678
# 自定义 TLS 协议加密
tls_enable = true
tls_cert_file = C:\frp_tls_files\client.crt
tls_key_file = C:\frp_tls_files\client.key

# 配置http服务,可用于小程序开发、远程调试等
[web]
type = http
local_ip = 127.0.0.1
local_port = 80
subdomain = win
# 将 frpc 与 frps 之间的通信内容加密传输,将会有效防止传输内容被截取。
use_encryption = true
# 对传输内容进行压缩,可以有效减小 frpc 与 frps 之间的网络流量,加快流量转发速度,但是会额外消耗一些 CPU 资源。
use_compression = true
# 设置 BasicAuth 鉴权
http_user = abc
http_pwd = abc

# 配置遠程桌面服務
[secret_rdp]
# stcp(secret tcp) 类型的代理可以避免让任何人都能访问到要穿透的服务,但是访问者也需要运行另外一个 frpc 客户端。
type = stcp
# 只有 sk 一致的用户才能访问到此服务
sk = abcdefg
local_ip = 127.0.0.1
local_port = 3389
use_encryption = true
use_compression = true
s
ps.
1. 一個服務端可以同時給多個客戶端使用
2. [ssh]這樣的名稱必須全局唯一,即就算有多個客戶端,也只能使用一次,其他的可以用[ssh2]、[ssh3]等;
3. 除了type為http/https,端口只能被一個服務使用

客戶端連上服務端

git bash 進入frp目錄,然後執行
$ ./frpc.exe -c frpc.ini

後台查狀態

登錄frp管理後台,應該可以看到客戶端已經連上來了

firewalld

firewalld 啟動失敗

原本用iptables,要改用firewalld,但是 firewalld 啟動失敗
# systemctl start firewalld
Failed to start firewalld.service: Unit is masked.

解法

# systemctl unmask --now firewalld
Removed symlink /etc/systemd/system/firewalld.service.
# systemctl enable firewalld
Created symlink from /etc/systemd/system/dbus-org.fedoraproject.FirewallD1.service to /usr/lib/systemd/system/firewalld.service.
Created symlink from /etc/systemd/system/basic.target.wants/firewalld.service to /usr/lib/systemd/system/firewalld.service.
# systemctl start firewalld


檢查 firewalld 設定

使用 --list-all 檢查
# firewall-cmd --list-all
查可用的zones
# firewall-cmd  --get-zones
查預設的zone
# firewall-cmd --get-default-zone
public
查當前zone開放的端口
# firewall-cmd --list-ports
新增可用的端口
# firewall-cmd --add-port=port-number/port-type
如:
# firewall-cmd --add-port=8080/tcp
讓新的設定永久生效
# firewall-cmd --runtime-to-permanent


openssl升級

因為使用到證書登錄,證書登錄用到了openssl,但是openssl舊版有 Heartbleed bug 如果你的openssl太舊,需要升級openssl,到 https://www.openssl.org/source/ 下載最新的openssl

安裝

# wget https://www.openssl.org/source/openssl-1.1.1k.tar.gz
# tar zxf openssl-1.1.1k.tar.gz
# cd openssl-1.1.1k/
# ./config
# make
# make test
# make install

測試新裝的openssl

# /usr/local/bin/openssl version
/usr/local/bin/openssl: error while loading shared libraries: libssl.so.1.1: cannot open shared object file: No such file or directory

解法

# ln -s /usr/local/lib64/libssl.so.1.1 /usr/lib64/
# ln -s /usr/local/lib64/libcrypto.so.1.1 /usr/lib64/

再次測試

# /usr/local/bin/openssl version
OpenSSL 1.1.1k  25 Mar 2021

替換新舊版本

# mv /usr/bin/openssl  /usr/bin/openssl-old
# ln -s /usr/local/bin/openssl /usr/bin/openssl
# openssl version
OpenSSL 1.1.1k  25 Mar 2021

自定義 TLS 協議加密

生成服務器私鑰

# openssl genrsa -out ca.key 1024
Generating RSA private key, 1024 bit long modulus (2 primes)
.....+++++
.......+++++
e is 65537 (0x010001)

# ls
ca.key

根據私鑰生成證書申請文件csr

# openssl req -new -key ca.key -out ca.csr
You are about to be asked to enter information that will be incorporated
into your certificate request.
What you are about to enter is what is called a Distinguished Name or a DN.
There are quite a few fields but you can leave some blank
For some fields there will be a default value,
If you enter '.', the field will be left blank.
-----
Country Name (2 letter code) [AU]:CN
State or Province Name (full name) [Some-State]:Shanghai
Locality Name (eg, city) []:Shanghai
Organization Name (eg, company) [Internet Widgits Pty Ltd]:JY
Organizational Unit Name (eg, section) []:JY
Common Name (e.g. server FQDN or YOUR name) []:*.yourdomain.com   # 這裡輸入你的域名,*.yourdomain.com生成通配符域名證書
Email Address []:yourname@email.com

Please enter the following 'extra' attributes
to be sent with your certificate request
A challenge password []:  # 這裡輸入密碼,沒有密碼可以空
An optional company name []:JY

# ls
ca.csr  ca.key

私鑰對證書申請進行簽名從而生成證書

# openssl x509 -req -in ca.csr -out ca.crt -signkey ca.key -days 3650
Signature ok
subject=C = CN, ST = Shanghai, L = Shanghai, O = JY, OU = JY, CN = *.yourdomain.com, emailAddress = yourname@email.com
Getting Private key

# ls
ca.crt  ca.csr  ca.key

生成 frpc 的私鑰

# openssl genrsa -out client.key 2048
Generating RSA private key, 2048 bit long modulus (2 primes)
..........+++++
................................................+++++
e is 65537 (0x010001)

# ls
ca.crt  ca.csr  ca.key  client.key

準備默認 OpenSSL 配置文件於當前目錄

# cp /etc/pki/tls/openssl.cnf ./my-openssl.cnf
# ls
ca.crt  ca.csr  ca.key  client.key  my-openssl.cnf

根據frpc的私鑰生成frpc的證書申請文件csr

# openssl req -new -sha256 -key client.key \
>     -subj "/C=XX/ST=DEFAULT/L=DEFAULT/O=DEFAULT/CN=client.com" \
>     -reqexts SAN \
>     -config <(cat my-openssl.cnf <(printf "\n[SAN]\nsubjectAltName=DNS:client.com,DNS:example.client.com")) \
>     -out client.csr
# ls
ca.crt  ca.csr  ca.key  client.csr  client.key  my-openssl.cnf

ps. 使用 client.com 沒事,即使這是無效的域名,不影響使用

生成 frpc 的證書(用到ca.crtca.key

# openssl x509 -req -days 365 \
>     -in client.csr -CA ca.crt -CAkey ca.key -CAcreateserial \
> -extfile <(printf "subjectAltName=DNS:client.com,DNS:example.client.com") \
> -out client.crt
Signature ok
subject=C = XX, ST = DEFAULT, L = DEFAULT, O = DEFAULT, CN = client.com
Getting CA Private Key
# ls
ca.crt  ca.csr  ca.key  ca.srl  client.crt  client.csr  client.key  my-openssl.cnf


當 服務器的frps.ini 配置的 tls_trusted_ca_file 是有效的 ca.crt 時,客戶端frpc.ini 的 tls_cert_file 和 tls_key_file 必須是有效的 client.crt 和 client.key 。完成frps 單向驗證 frpc 的身份

nginx反向代理frp後台

因為cloudflare免費的只能代理80端口,想要用cloudflare的https訪問frp後台,可以這樣做
nginx新增配置:
  
server
{
    server_name  frp.yourdomain.com;

    location / {
        proxy_pass         http://127.0.0.1:7500;
        proxy_set_header   Host             $host;
        proxy_set_header   X-Real-IP        $remote_addr;
        proxy_set_header   X-Forwarded-For  $proxy_add_x_forwarded_for;
    }
}
  
s

在想要訪問內網服務的機器上也部署 frpc

frpc.ini配置如下:
  
# 服务端配置
[common]
(同提供服務的遠程電腦的frpc.ini)

[secret_ssh_visitor]
type = stcp
# stcp 的访问者
role = visitor
# 要访问的 stcp 代理的名字
server_name = secret_rdp
sk = abcdefg
# 绑定本地端口用于访问 SSH 服务
bind_addr = 127.0.0.1
bind_port = 13389
  
s

訪問內網穿透服務

web

提供服務的遠程電腦打開web服務,外網任意一台電腦可直接訪問 https://win.yourdomain.com/ ,即使遠程電腦的web服務

secret_rdp

外網電腦打開Windows 遠端桌面連線,輸入  127.0.0.1:13389 就可以連接到本地Windows
注意一定要開啟windows電腦的【啟用遠端桌面】

將 frp 封裝成 windows 後台服務

使用 NSSM 將 frp 封裝成 windows 服務,可以在後台運行,並且開機自啟動

安裝nssm且新增frpc服務

下載 nssm 2.24  後解壓縮,(打開git bash)進入 nssm-2.24 目錄
/path/nssm-2.24/win64
$ ./nssm.exe install frpc
Administrator access is needed to install a service.


在彈出的對話框中填寫
Path: C:\path\frp_0.36.2_windows_386\frpc.exe
Startup directory: C:\path\frp_0.36.2_windows_386
Arguments: -c C:\path\frp_0.36.2_windows_386\frpc.ini

Details頁簽可以設定是否開機(Startup type)自動啟動:automatic / manual 

編輯服務配置

$ ./nssm.exe edit frpc

啟動和停止

用命令【啟動】和【停止】實際測試無效
$ ./nssm.exe start frpc
Can't open service!
OpenService(): 存取被拒。
$ ./nssm.exe stop frpc
Can't open service!
OpenService(): 存取被拒。

要用這方式停止
運行 services.msc ,可以打開 windows 的服務管理器。在這裡面手動停用/啟動

刪除服務

$ ./nssm.exe remove frpc
Administrator access is needed to remove a service.


參考資料

https://www.vpsjxw.com/vps_use/vps_frp_intro/  vps+frp内网穿透,外网远程访问局域网内主机的ssh、远程桌面、网站服务
https://tlanyan.me/frp-tunnel-tutorial/  frp内网穿透教程(主要)
https://bobcares.com/blog/failed-to-start-firewalld-service-unit-is-masked/  Failed to start firewalld service unit is masked – How we fix it!
https://www.4spaces.org/how-to-upgrade-openssl-on-centos-7/  CentOS如何升级openssl到最新版本
https://ningyu1.github.io/site/post/51-ssl-cert/  Openssl生成自签名证书,简单步骤
https://www.sohu.com/a/416379503_610671  教你用FRP做内网穿透 使用远程桌面连接家里的windows电脑


2021年1月21日 星期四

python心得

環境

windows 10

檢查python版本

(使用git bash)
$ python --version
Python 3.7.7

查pip版本

$ pip --version
pip 19.2.3 from c:\users\user\appdata\local\programs\python\python37-32\lib\site-packages\pip (python 3.7)

看目前系統有安裝哪些套件

$ pip list
Package    Version
---------- -------
pip        19.2.3
setuptools 41.2.0
WARNING: You are using pip version 20.2.3; however, version 20.3.3 is available.
You should consider upgrading via the 'c:\users\bear\appdata\local\programs\python\python39\python.exe -m pip install --upgrade pip' command.

升級pip

$ python -m pip install --upgrade pip
Collecting pip
  Downloading pip-21.0-py3-none-any.whl (1.5 MB)
     |████████████████████████████████| 1.5 MB 469 kB/s
Installing collected packages: pip
  Attempting uninstall: pip
    Found existing installation: pip 20.2.3
    Uninstalling pip-20.2.3:
      Successfully uninstalled pip-20.2.3
Successfully installed pip-21.0

$ pip --version
pip 21.0 from c:\users\user\appdata\local\programs\python\python39\lib\site-packages\pip (python 3.9)


升級python

https://stackoverflow.com/a/57292808  How do I upgrade the Python installation in Windows 10?
直接到python官網下載最新的python安裝檔
如果你是要升級小版本3.x.y 到 3.x.z,可以直接【Upgrade Now】
如果你是要升級中版本3.x 到 3.y,安裝檔會提示你【Install Now】
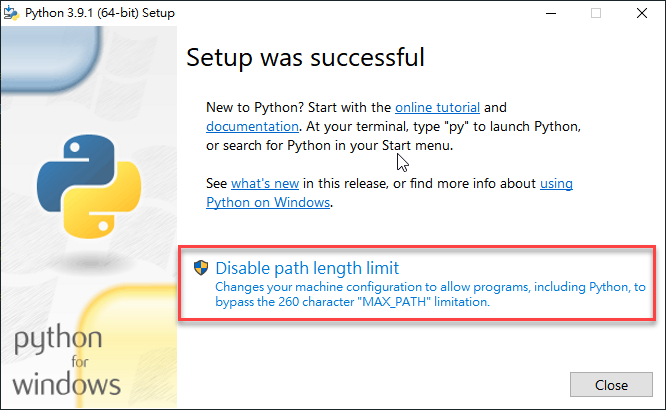
安裝完成(我有禁用path length limit)

In this case, you are not upgrading, but you are installing a new version of Python. You can have more than one version installed on your machine. They will be located in different directories.
這種情況,你不是升級,你是安裝新版本的python。你的系統有多個python版本在不同的目錄。

使用py指定python版本

$ py -3.7
Python 3.7.7 (tags/v3.7.7:d7c567b08f, Mar 10 2020, 09:44:33) [MSC v.1900 32 bit (Intel)] on win32
Type "help", "copyright", "credits" or "license" for more information.
>>>

$ py -3.9
Python 3.9.1 (tags/v3.9.1:1e5d33e, Dec  7 2020, 17:08:21) [MSC v.1927 64 bit (AMD64)] on win32
Type "help", "copyright", "credits" or "license" for more information.
>>>


設定環境變量

設定=》系統=》關於=》進階系統設定
環境變數
編輯Path
將原本python 3.7的路徑改成3.9的
C:\Users\user\AppData\Local\Programs\Python\Python37-32\Scripts\
C:\Users\user\AppData\Local\Programs\Python\Python37-32\
改成
C:\Users\user\AppData\Local\Programs\Python\Python39\Scripts\
C:\Users\user\AppData\Local\Programs\Python\Python39\

然後開新的prompt檢查版本
$ python --version
Python 3.9.1

$ pip --version
pip 20.2.3 from c:\users\user\appdata\local\programs\python\python39\lib\site-packages\pip (python 3.9)

編輯器

PyCharm Professional 2020.3

斷點

File => Open (打開空目錄時,如C:\python\hello),會自動生成 main.py
這個檔案會教你怎麼用PyCharm的斷點,Debug(Shift+F9)即可開始斷點


熱鍵

自定義

Resume Program => F9


正確打開新項目的姿勢

File => New Project 
New environment using(環境使用):【Virtualenv】(venv)
Base interpreter: C:\Users\user\AppData\Local\Programs\Python\Python39\python.exe  (如果你裝了2個python(3.7和3.9),要在這邊選IDE環境的python版本)

這樣項目下才會有venv目錄

.gitignore 忽略掉venv和.idea目錄

.gitignore
venv/
.idea/

爬蟲

https://www.learncodewithmike.com/2020/05/python-selenium-scraper.html  [Python爬蟲教學]整合Python Selenium及BeautifulSoup實現動態網頁爬蟲

在PyCharm 中安裝Selenium

Settings => Project: project_name => Python Interpreter => +
搜尋Selenium =》 Install Package
然後就可以看到成功安裝selenium,和相依賴的package(urllib3
這樣只裝在IDE的環境中,沒安裝在系統上,所以git bash上面pip list還是沒有selenium。直接命令行執行會報錯
$ python crawler.py
Traceback (most recent call last):
  File "C:\bear\python\hello3\crawler.py", line 1, in <module>
    from selenium import webdriver
ModuleNotFoundError: No module named 'selenium'

系統安裝selenium

$ pip install selenium
Collecting selenium
  Using cached selenium-3.141.0-py2.py3-none-any.whl (904 kB)
Collecting urllib3
  Using cached urllib3-1.26.2-py2.py3-none-any.whl (136 kB)
Installing collected packages: urllib3, selenium
Successfully installed selenium-3.141.0 urllib3-1.26.2

命令行執行(需先配置好webdriver)

$ python crawler.py
DevTools listening on ws://127.0.0.1:60865/devtools/browser/c51ba9ea-08d4-45f8-bee0-5780695b15ef
老天尊的死期

安裝Webdriver

前往Python套件儲存庫PyPI(Python Package Index) 查詢Selenium 

點進去後,往下可以看到Drivers的地方,下載chromedriver

下載你chrome瀏覽器相對應的 ChromeDriver  
解壓縮 chromedriver_win32.zip 放到Python網頁爬蟲的專案資料夾中,如下圖:

第一個爬蟲程式


from selenium import webdriver
from selenium.webdriver.chrome.options import Options
import time

options = Options()
options.add_argument("--disable-notifications")

chrome = webdriver.Chrome('./chromedriver', options=options)
chrome.get("https://carlislebear.blogspot.com/")

print(chrome.title)
chrome.quit()
s
Line 5-6:options物件,主要用途為取消網頁中的彈出視窗,避免妨礙網路爬蟲的執行。
Line 8:就是建立webdriver物件,傳入剛剛所下載的「瀏覽器驅動程式路徑(chromedriver)-可略」及「瀏覽器設定(options)-可選」

執行


Line 11:chrome.title打印爬蟲網頁的標題,在Console 中也可以打印變數

第二個爬蟲程式

https://officeguide.cc/windows-python-selenium-automation-scripts-tutorial-examples/  Windows 使用 Python + Selenium 自動控制瀏覽器教學與範例
https://stackoverflow.com/a/39191349  NoSuchElementException - Unable to locate element
https://stackoverflow.com/a/44834542  Switch to an iframe through Selenium and python

目的:打開blog =》 搜尋python =》 取第一篇文章的標題


from selenium import webdriver
from selenium.webdriver.chrome.options import Options

from selenium.common.exceptions import TimeoutException
from selenium.webdriver.support.ui import WebDriverWait
from selenium.webdriver.support import expected_conditions as EC
from selenium.webdriver.common.by import By

options = Options()
options.add_argument("--disable-notifications")

# chrome = webdriver.Chrome('./chromedriver', options=options)
chrome = webdriver.Chrome()
chrome.get("https://carlislebear.blogspot.com/")

iframe = chrome.find_element_by_name('navbar-iframe')
chrome.switch_to.frame(iframe)
b_query = chrome.find_element_by_id('b-query').send_keys('python')
chrome.find_element_by_xpath('//*[@id="b-query-icon"]').click()

try:
    WebDriverWait(chrome, 3).until(EC.element_to_be_clickable((By.XPATH, '//*[@id="Blog1"]/div[1]')))
    print(chrome.find_element_by_xpath('//*[@id="Blog1"]/div[1]/div[3]/div/div/div/h3').text)
except TimeoutException:
    print('等待逾時!')

chrome.quit()
s
Line 5-7 & Line 23-24:搜尋後直到內容出來後再打印出第一篇文章標題
Line 16-17:切換到上方iframe,否則會報錯
NoSuchElementException: Message: no such element: Unable to locate element
Line 16、18、19:可以使用find_element_by_name、find_element_by_id、find_element_by_xpath選擇DOM

如何快速寫出XPATH?

chrome 開發者工具DOM上右鍵 =》Copy=》 Copy XPath
剪貼簿中得到:
//*[@id="b-query-icon"]

如何驗證XPath?

開發者工具Console中使用 $x ,如:
$x('//*[@id="b-query-icon"]')

使用BeautifulSoup抓取所有文章標題

需安裝beautifulsoup4
 from selenium.webdriver.support import expected_conditions as EC
 from selenium.webdriver.common.by import By

+from bs4 import BeautifulSoup
+
 options = Options()
 options.add_argument("--disable-notifications")

@@ -21,6 +23,11 @@ chrome.find_element_by_xpath('//*[@id="b-query-icon"]').click()
 try:
     WebDriverWait(chrome, 3).until(EC.element_to_be_clickable((By.XPATH, '//*[@id="Blog1"]/div[1]')))
     print(chrome.find_element_by_xpath('//*[@id="Blog1"]/div[1]/div[3]/div/div/div/h3').text)
+    soup = BeautifulSoup(chrome.page_source, 'html.parser')
+    titles = soup.find_all('h3', {
+        'class': 'post-title'})
+    for title in titles:
+        print(title.getText())
 except TimeoutException:
     print('等待逾時!')

輸出:


2021年1月17日 星期日

fiddler心得

起因

如果你的wireshark抓不到包,可以嘗試使用fiddler抓包備用
我遇過windows 10 使用wireshark抓hyper-v上的laradock http服務抓不到包,估計是hyper-v被map了外網IP造成的,因為其他內網實體機器可以抓到包

安裝版本

Fiddler Everywhere 1.4.1

chrome抓不到包

https://stackoverflow.com/a/19905099  Fiddler not capturing traffic from browsers
如果你的chrome裝了 Proxy SwitchySharp 擴充功能,必須選擇【系統代理】而不是【直接連線】,才能抓到包


抓HTTPS的包

點擊這個驚歎號
信任和啟用HTTPS
安裝DO_NOT_TRUST_FiddlerRoot憑證


設定過濾器

只能對HTTP Header 過濾(沒有wireshark 強大)
瀏覽器打開頁面即可抓到包


Replay請求

在請求上【右鍵】=》【Replay】=》【Reissue Requests】

查看請求封包和返回結果

Request =》 Raw: HTTP 封包
Response =》 Body(JSON): 返回結果


2020年12月24日 星期四

golang心得

環境

作業系統:Windows 10
golang版本:go version go1.15.6 windows/amd64
編輯器:GoLand 2019.3.4

Go 命令行

windows 10可直接在 git bash執行

檢查版本

$ go version
go version go1.15.6 windows/amd64

檢查GOPATH

$ echo $GOPATH
C:\Users\user\go

build命令

http://c.biancheng.net/view/120.html  go build命令(go语言编译命令)完全攻略
$ ls
hello.go
$ go build hello.go
$ ls
hello.exe*  hello.go
$ ./hello.exe
Hello, 世界
30


GoLand

熱鍵(使用sublime基礎的Keymap)

走到下一個斷點:(Resume Program) => F9  (需自定義)
快速複製檔案名字 :ctrl+shift+p => Rename File 


第一個golang程式

hello.go

package main

import "fmt"

func main() {
fmt.Println("Hello, 世界")
fmt.Println(test(3))
}

func test(n int) int {
return n * 10
}

使用GoLand斷點

https://studygolang.com/articles/20746  使用 GoLand 进行调试的要点
https://opensource.com/article/20/6/debug-go-delve  Stop debugging Go with Println and use Delve instead - 純CLI調試

ctrl + shift + p => Debug
go build hello.go => Debug
然後就會自動執行,停在你之前設定斷點的地方(或是直接 Debug 'go build hello.go'

計算表達式

ctrl+shift+p => Evaluate Expression
但是不支持調用函數,如這邊直接調用test(4)方法(test(4)=4*10=40)
報錯
could not recover call injection state for goroutine x

原因

https://github.com/go-delve/delve/issues/1710#issuecomment-604395056  Version of Delve is too old for this version of Go (maximum supported version 1.12, suppress this error with --check-go-version=false)


GoLand 2019.3.4 內置的 Delve Debugger 版本(1.4.0)太舊
位置:C:\Program Files\JetBrains\GoLand 2019.3.4\plugins\go\lib\dlv\windows\dlv.exe

解法1

升級GoLand

解法2 

手動安裝最新版dlv
$ go get -u github.com/go-delve/delve/cmd/dlv
檢查dlv版本
$ dlv version
Delve Debugger
Version: 1.5.1
Build: $Id: bca418ea7ae2a4dcda985e623625da727d4525b5 $

檢查是否安裝dlv
$ go list ... | grep dlv
github.com/go-delve/delve/cmd/dlv
github.com/go-delve/delve/cmd/dlv/cmds

查dlv位置
$ which dlv
/c/Users/user/go/bin/dlv

把 C:\Users\user\go\bin\dlv.exe 複製到 C:\Program Files\JetBrains\GoLand 2019.3.4\plugins\go\lib\dlv\windows\  下(記得把GoLand 原本舊版本的dlv先備份)

然後就可以在斷點時成功調用函數

手動命令行安裝完dlv後,會安裝到 C:\Users\user\go 下(有bin和src目錄)。GoLand就會自動抓到GOPATH


總結

GoLand的dlv斷點配置起來比PHPstorm的XDebug 簡單,但是用起來沒有那麼順手。


2020年12月15日 星期二

同時跑兩個PHP版本(5.6+7.3)的laradock

 參考資料

實作

拉兩個目錄的laradock,到時候跑同一個目錄的 info.php ( php_info(); ),相同的 nginx/sites/ 配置
/var/www/html/laradock/ - 跑PHP 7.3
/var/www/html/laradock5/ - 跑PHP 5.6

/var/www/html/laradock5/.env

使用不同的project name,最後會build出的容器名字會是:laradock5_docker-in-docker_1、laradock5_nginx_1、laradock5_php-fpm_1、laradock5_workspace_1
#   COMPOSE_PROJECT_NAME=laradock
COMPOSE_PROJECT_NAME=laradock5

使用PHP 5.6
#   PHP_VERSION=7.3
PHP_VERSION=5.6

如果你的網路不好,一直裝不成node,可以這樣跳過安裝node
#   WORKSPACE_INSTALL_NODE=true
WORKSPACE_INSTALL_NODE=false

如果你的網路不好,一直裝不成yarn,可以這樣跳過安裝yarn
#   WORKSPACE_INSTALL_YARN=true
WORKSPACE_INSTALL_YARN=false

避免端口和 /var/www/html/laradock/ (PHP 7.3 )的容器衝突
#   WORKSPACE_SSH_PORT=2222
WORKSPACE_SSH_PORT=2226
...
#   WORKSPACE_BROWSERSYNC_HOST_PORT=3000
WORKSPACE_BROWSERSYNC_HOST_PORT=3004
#   WORKSPACE_BROWSERSYNC_UI_HOST_PORT=3001
WORKSPACE_BROWSERSYNC_UI_HOST_PORT=3005
#   WORKSPACE_VUE_CLI_SERVE_HOST_PORT=8080
WORKSPACE_VUE_CLI_SERVE_HOST_PORT=8084
#   WORKSPACE_VUE_CLI_UI_HOST_PORT=8001
WORKSPACE_VUE_CLI_UI_HOST_PORT=8005

使用5567端口訪問PHP 5.6容器(PHP 7.3 端口5566)
#   NGINX_HOST_HTTP_PORT=80
NGINX_HOST_HTTP_PORT=5567
#   NGINX_HOST_HTTPS_PORT=443
NGINX_HOST_HTTPS_PORT=444

#   VARNISH_BACKEND_PORT=81
VARNISH_BACKEND_PORT=82

/var/www/html/laradock/ 和 /var/www/html/laradock5/ 都執行
[user@localhost laradock5 ]$ docker-compose up -d nginx workspace
Starting laradock5_docker-in-docker_1 ... done
Starting laradock5_workspace_1        ... done
Starting laradock5_php-fpm_1          ... done
Starting laradock5_nginx_1            ... done

[user@localhost laradock ]$ docker-compose up -d nginx workspace
Starting laradock_docker-in-docker_1 ... done
Recreating laradock_workspace_1      ... done
Recreating laradock_php-fpm_1        ... done
Recreating laradock_nginx_1          ... done

檢查

打開 http://app3.test:5566/info.php (php 7.3) 和 http://app3.test:5567/info.php (php 5.6)