安裝
Microsoft Store 直接安裝
使用
打開應用程式後
螢幕錄影

調整大小,開始錄影,停止

編輯
播放,減少影格數(2次),刪除前面所有影格,刪除後面所有影格

圖片
多選影格,效果(像素化),形狀

保存(ctrl+s)
可輸出gif或影片

結果

輸出影片需設定FFmpeg路徑

下載FFmpeg


diff --git a/src/App.vue b/src/App.vue
index 240acf4..2995013 100644
--- a/src/App.vue
+++ b/src/App.vue
@@ -2,7 +2,8 @@
   <div id="app">
     <nav>
       <router-link to="/">Home</router-link> |
-      <router-link to="/about">About</router-link>
+      <router-link to="/about">About</router-link> |
+      <router-link to="/about2">About2</router-link>
     </nav>
     <router-view/>
   </div>
diff --git a/src/router/index.js b/src/router/index.js
index a395a1f..5d09db5 100644
--- a/src/router/index.js
+++ b/src/router/index.js
@@ -17,6 +17,11 @@ const routes = [
     // this generates a separate chunk (about.[hash].js) for this route
     // which is lazy-loaded when the route is visited.
     component: () => import(/* webpackChunkName: "about" */ '../views/AboutView.vue')
+  },
+  {
+    path: '/about2',
+    name: 'about2',
+    component: () => import(/* webpackChunkName: "about" */ '../views/AboutView.vue')
   }
 ]

diff --git a/src/views/AboutView.vue b/src/views/AboutView.vue
index 3fa2807..16bb285 100644
--- a/src/views/AboutView.vue
+++ b/src/views/AboutView.vue
@@ -1,5 +1,17 @@
 <template>
   <div class="about">
-    <h1>This is an about page</h1>
+    <h1>This is an {{$route.name}} page</h1>
   </div>
 </template>
+
+<script>
+export default {
+  name: 'AboutView',
+  created () {
+    console.log('AboutView.vue')
+    console.log(this.$router)
+    console.log(this.$route)
+    console.log(this.$route.path)
+  }
+}
+</script>

diff --git a/src/App.vue b/src/App.vue
index 69ddd1a..4f3e76c 100644
--- a/src/App.vue
+++ b/src/App.vue
@@ -8,6 +8,7 @@
     <router-view
+      :key="$route.fullPath"/>
   </div>
 </template>

diff --git a/src/App.vue b/src/App.vue
index 4f3e76c..e4e7a4a 100644
--- a/src/App.vue
+++ b/src/App.vue
@@ -8,7 +8,8 @@
     <router-view
       :parentString="string"
       @reloadComponentEvent="emitReloadComponentEvent($event)"
+      :key="componentKey"
+      @forceRerenderEvent="emitForceRerenderEvent($event)"
       v-if="isRouterAlive"/>
   </div>
 </template>
@@ -18,7 +19,8 @@ export default {
   data () {
     return {
       isRouterAlive: true,
+      componentKey: 0
     }
   },
   methods: {
@@ -28,6 +30,14 @@ export default {
     },
     emitReloadComponentEvent () {
       this.reload()
+    },
+    forceRerender () {
+      this.componentKey += 1
+    },
+    emitForceRerenderEvent (name) {
+      console.log('emitForceRerenderEvent')
+      console.log(name)
+      this.forceRerender()
     }
   }
 }
diff --git a/src/views/AboutView.vue b/src/views/AboutView.vue
index fafb0f5..7678eb2 100644
--- a/src/views/AboutView.vue
+++ b/src/views/AboutView.vue
@@ -1,6 +1,7 @@
 <template>
   <div class="about">
     <h1 @click="reloadComponent">This is an {{$route.name}} page:{{parentString}}</h1>
+    <button @click="clickForceRerender">forceRerender</button>
   </div>
 </template>

@@ -17,6 +18,10 @@ export default {
     reloadComponent () {
       console.log('reloadComponent')
       this.$emit('reloadComponentEvent', this.$route.name)
+    },
+    clickForceRerender () {
+      console.log('forceRerender')
+      this.$emit('forceRerenderEvent', this.$route.name)
     }
   },
   props: {

diff --git a/src/App.vue b/src/App.vue
index 2995013..3eb8189 100644
--- a/src/App.vue
+++ b/src/App.vue
@@ -5,10 +5,31 @@
       <router-link to="/about">About</router-link> |
       <router-link to="/about2">About2</router-link>
     </nav>
-    <router-view/>
+    <router-view
+      @reloadComponentEvent="emitReloadComponentEvent($event)"
+      v-if="isRouterAlive"/>
   </div>
 </template>

+<script>
+export default {
+  data () {
+    return {
+      isRouterAlive: true
+    }
+  },
+  methods: {
+    reload () {
+      this.isRouterAlive = false
+      this.$nextTick(() => (this.isRouterAlive = true))
+    },
+    emitReloadComponentEvent () {
+      this.reload()
+    }
+  }
+}
+</script>
+
 <style>
 #app {
   font-family: Avenir, Helvetica, Arial, sans-serif;
diff --git a/src/views/AboutView.vue b/src/views/AboutView.vue
index 16bb285..545956a 100644
--- a/src/views/AboutView.vue
+++ b/src/views/AboutView.vue
@@ -1,6 +1,6 @@
 <template>
   <div class="about">
-    <h1>This is an {{$route.name}} page</h1>
+    <h1 @click="reloadComponent">This is an {{$route.name}} page</h1>
   </div>
 </template>

@@ -12,6 +12,12 @@ export default {
     console.log(this.$router)
     console.log(this.$route)
     console.log(this.$route.path)
+  },
+  methods: {
+    reloadComponent () {
+      console.log('reloadComponent')
+      this.$emit('reloadComponentEvent', this.$route.name)
+    }
   }
 }
 </script>
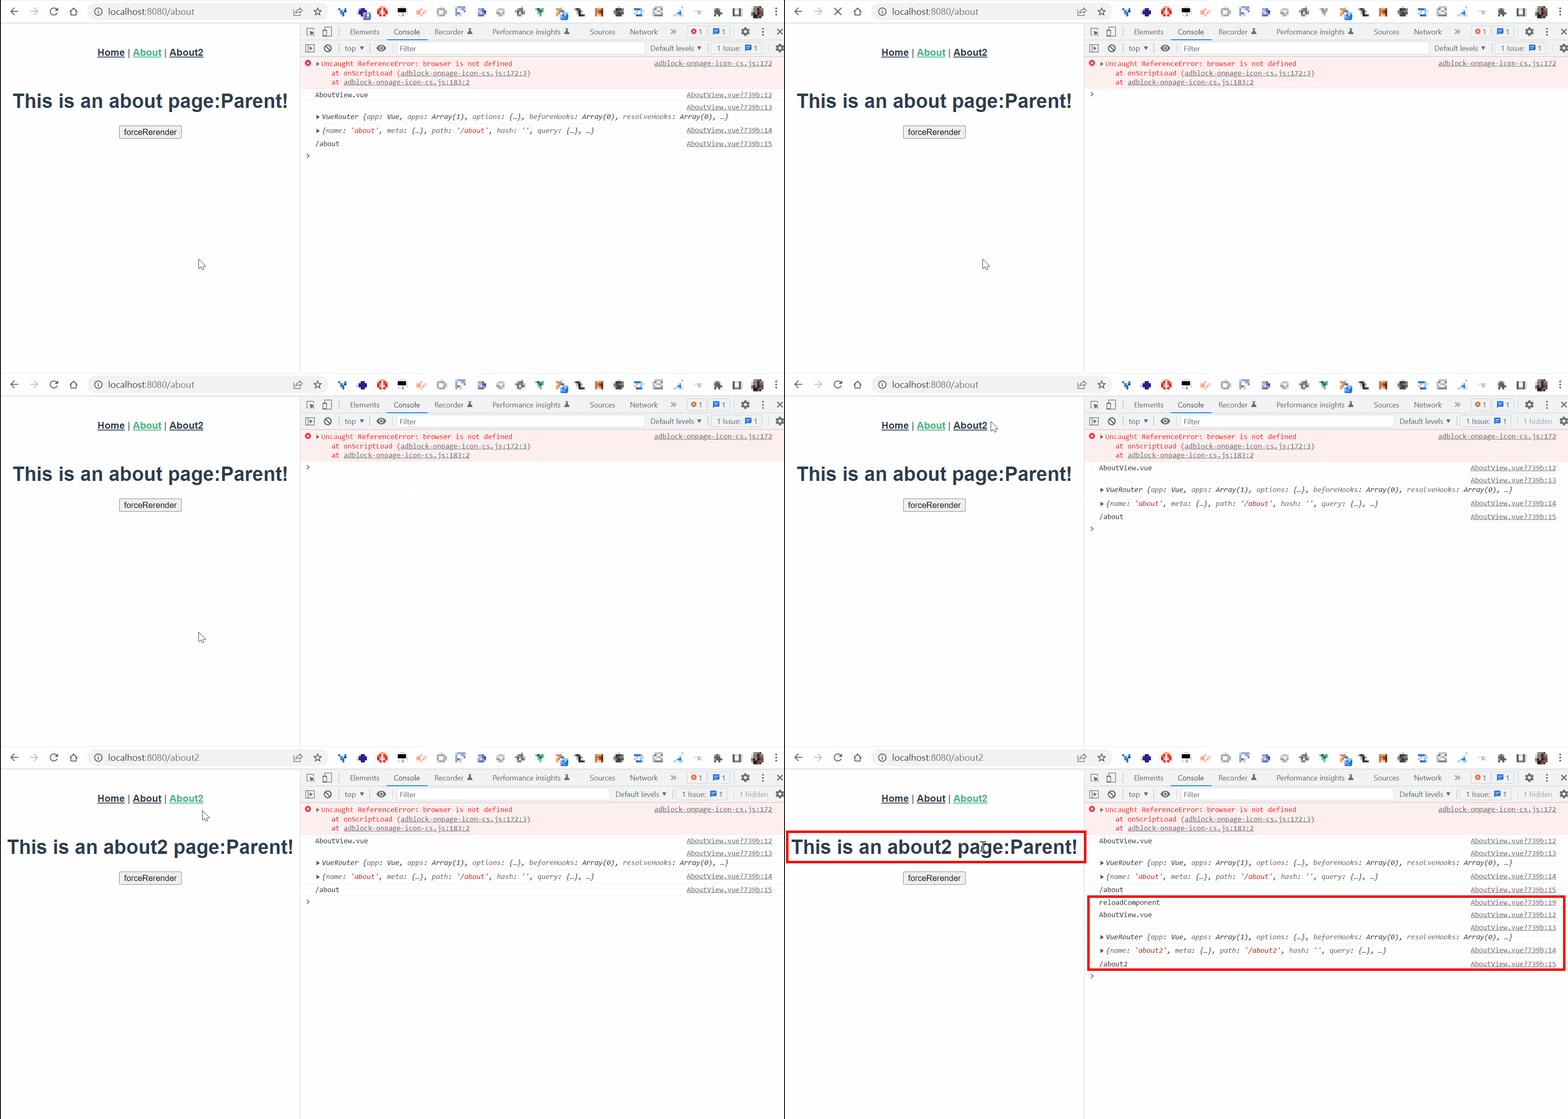
diff --git a/src/App.vue b/src/App.vue
index eda18d3..588bafb 100644
--- a/src/App.vue
+++ b/src/App.vue
@@ -5,12 +5,14 @@
       <router-link to="/about">About</router-link> |
       <router-link to="/about2">About2</router-link>
     </nav>
+    <keep-alive>
+      <router-view v-if="$route.meta.keepAlive">
+        <!-- 这里是会被缓存的视图组件,比如 home -->
+      </router-view>
+    </keep-alive>
+    <router-view v-if="!$route.meta.keepAlive">
+      <!-- 这里是不被缓存的视图组件,比如 about、about2 -->
+    </router-view>
   </div>
 </template>

diff --git a/src/components/HelloWorld.vue b/src/components/HelloWorld.vue
index 1c544cb..f59096c 100644
--- a/src/components/HelloWorld.vue
+++ b/src/components/HelloWorld.vue
@@ -37,6 +37,9 @@ export default {
   name: 'HelloWorld',
   props: {
     msg: String
+  },
+  created () {
+    console.log('HelloWorld.vue')
   }
 }
 </script>
diff --git a/src/router/index.js b/src/router/index.js
index 5d09db5..1b097c7 100644
--- a/src/router/index.js
+++ b/src/router/index.js
@@ -8,7 +8,10 @@ const routes = [
   {
     path: '/',
     name: 'home',
+    component: HomeView,
+    meta: {
+      keepAlive: true // 需要被缓存
+    }
   },
   {
     path: '/about',
@@ -16,12 +19,18 @@ const routes = [
   {
     path: '/about',
     name: 'about',
-    component: () => import(/* webpackChunkName: "about" */ '../views/AboutView.vue')
+    component: () => import(/* webpackChunkName: "about" */ '../views/AboutView.vue'),
+    meta: {
+      keepAlive: false // 不需要被缓存
+    }
   },
   {
     path: '/about2',
     name: 'about2',
-    component: () => import(/* webpackChunkName: "about" */ '../views/AboutView.vue')
+    component: () => import(/* webpackChunkName: "about" */ '../views/About2View.vue'),
+    meta: {
+      keepAlive: false // 不需要被缓存
+    }
   }
 ]

diff --git a/src/views/About2View.vue b/src/views/About2View.vue
new file mode 100644
index 0000000..28f3639
--- /dev/null
+++ b/src/views/About2View.vue
@@ -0,0 +1,18 @@
+<template>
+  <div class="about">
+    <h1>This is an {{$route.name}} page:</h1>
+    <button>forceRerender</button>
+  </div>
+</template>
+
+<script>
+export default {
+  name: 'About2View',
+  created () {
+    console.log('About2View.vue')
+    console.log(this.$router)
+    console.log(this.$route)
+    console.log(this.$route.path)
+  }
+}
+</script>
diff --git a/src/views/HomeView.vue b/src/views/HomeView.vue
index e8d96d7..2eca718 100644
--- a/src/views/HomeView.vue
+++ b/src/views/HomeView.vue
@@ -13,6 +13,9 @@ export default {
   name: 'HomeView',
   components: {
     HelloWorld
+  },
+  created () {
+    console.log('HomeView.vue')
   }
 }
 </script>

diff --git a/src/components/ChildComponent.vue b/src/components/ChildComponent.vue
index e47d61b..7e2b2fe 100644
--- a/src/components/ChildComponent.vue
+++ b/src/components/ChildComponent.vue
@@ -1,12 +1,22 @@
 <template>
   <div class="child">
     ChildComponent
+    <div>{{obj.title}}</div>
+    <div>{{obj.content}}</div>
   </div>
 </template>

 <script>
 export default {
-  name: 'ChildComponent'
+  name: 'ChildComponent',
+  props: {
+    obj: {
+      type: Object,
+      default: function () {
+        return {}
+      }
+    }
+  }
 }
 </script>

diff --git a/src/views/ParentView.vue b/src/views/ParentView.vue
index adb9021..304371a 100644
--- a/src/views/ParentView.vue
+++ b/src/views/ParentView.vue
@@ -6,7 +6,9 @@
       <div id="right">right<br>right line 2</div>
       <div class="clear"></div>
     </div>
-    <child-component></child-component>
+    <child-component
+      :obj="singleObj"
+    ></child-component>
   </div>
 </template>

@@ -16,6 +18,14 @@ import ChildComponent from '@/components/ChildComponent'
 export default {
   name: 'ParentView',
   components: { ChildComponent },
+  data () {
+    return {
+      singleObj: {
+        title: 'props',
+        content: '父傳子'
+      }
+    }
+  },
   created () {
     console.log('ParentView.vue')
   }
diff --git a/src/components/ChildComponent.vue b/src/components/ChildComponent.vue
index 7e2b2fe..45920ee 100644
--- a/src/components/ChildComponent.vue
+++ b/src/components/ChildComponent.vue
@@ -3,12 +3,18 @@
     ChildComponent
     <div>{{obj.title}}</div>
     <div>{{obj.content}}</div>
+    <button @click="callParent">子傳父</button>
   </div>
 </template>

 <script>
 export default {
   name: 'ChildComponent',
+  data () {
+    return {
+      count: 0
+    }
+  },
   props: {
     obj: {
       type: Object,
@@ -16,6 +22,12 @@ export default {
         return {}
       }
     }
+  },
+  methods: {
+    callParent () {
+      this.count++
+      this.$emit('callParentEvent', this.count)
+    }
   }
 }
 </script>
diff --git a/src/views/ParentView.vue b/src/views/ParentView.vue
index 304371a..0b2cfdd 100644
--- a/src/views/ParentView.vue
+++ b/src/views/ParentView.vue
@@ -8,7 +8,9 @@
     </div>
     <child-component
       :obj="singleObj"
+      @callParentEvent="callMe($event)"
     ></child-component>
+    <div>{{parentCount}}</div>
   </div>
 </template>

@@ -23,11 +25,18 @@ export default {
       singleObj: {
         title: 'props',
         content: '父傳子'
-      }
+      },
+      parentCount: null
     }
   },
   created () {
     console.log('ParentView.vue')
+  },
+  methods: {
+    callMe (count) {
+      console.log(count)
+      this.parentCount = count
+    }
   }
 }
 </script>
diff --git a/src/store/index.js b/src/store/index.js
index ceffa8e..c0deccd 100644
--- a/src/store/index.js
+++ b/src/store/index.js
@@ -1,17 +1,26 @@
+import { COUNT_MUTATION } from '@/store/mutation-types'

 Vue.use(Vuex)

 export default new Vuex.Store({
   state: {
+    count: 0
   },
   getters: {
   },
   mutations: {
+    [COUNT_MUTATION] (state, n) {
+      state.count += n
+    }
   },
   actions: {
   },
diff --git a/src/store/mutation-types.js b/src/store/mutation-types.js
new file mode 100644
index 0000000..492a305
--- /dev/null
+++ b/src/store/mutation-types.js
@@ -0,0 +1,2 @@
+export const COUNT_MUTATION = 'COUNT_MUTATION'
diff --git a/src/views/TestView.vue b/src/views/TestView.vue
index 0b2cfdd..e3e3708 100644
--- a/src/views/TestView.vue
+++ b/src/views/TestView.vue
@@ -1,21 +1,27 @@
 <template>
   <div>
     <div>TestView.vue</div>
+    <div @click="increase(1)">increase 1</div>
+    <div @click="increase(2)">increase 2</div>
   </div>
 </template>

 <script>
 import ChildComponent from '@/components/ChildComponent'
+import store from '@/store'

 export default {
   name: 'TestView',
@@ -36,7 +42,19 @@ export default {
     callMe (count) {
       console.log(count)
       this.parentCount = count
+    },
+    increase (n) {
+      store.commit('COUNT_MUTATION', n)
+    }
   }
 }
 </script>

diff --git a/src/store/index.js b/src/store/index.js
index a0bfcb7..24dff6e 100644
--- a/src/store/index.js
+++ b/src/store/index.js
@@ -8,6 +8,9 @@ export default new Vuex.Store({
     count: 0
   },
   getters: {
+    countInGetters (state) {
+      return state.count
+    }
   },
   mutations: {
     increment (state, n) {
diff --git a/src/views/TestView.vue b/src/views/TestView.vue
index 3b4e0b9..3e8272f 100644
--- a/src/views/TestView.vue
+++ b/src/views/TestView.vue
@@ -14,12 +14,14 @@
     <div>{{parentCount}}</div>
     <div @click="increase(1)">increase 1</div>
     <div @click="increase(2)">increase 2</div>
+    <div @click="testGetter()">test</div>
   </div>
 </template>

 <script>
 import ChildComponent from '@/components/ChildComponent'
 import store from '@/store'
+import { mapGetters } from 'vuex'

 export default {
   name: 'TestView',
@@ -43,7 +45,16 @@ export default {
     },
     increase (n) {
       store.commit('increment', n)
+    },
+    testGetter () {
+      console.log(store.getters.countInGetters)
+      console.log(this.countInGetters)
     }
+  },
+  computed: {
+    ...mapGetters([
+      'countInGetters'
+    ])
   }
 }
 </script>

diff --git a/src/store/index.js b/src/store/index.js
index 24dff6e..c856f10 100644
--- a/src/store/index.js
+++ b/src/store/index.js
@@ -1,5 +1,5 @@
 import Vue from 'vue'
-import Vuex from 'vuex'
+import Vuex, { createLogger } from 'vuex'

 Vue.use(Vuex)

@@ -20,5 +20,6 @@ export default new Vuex.Store({
   actions: {
   },
   modules: {
-  }
+  },
+  plugins: [createLogger()]
 })

diff --git a/src/views/TestView.vue b/src/views/TestView.vue
index e3e3708..79024b7 100644
--- a/src/views/TestView.vue
+++ b/src/views/TestView.vue
@@ -22,6 +22,7 @@
 import ChildComponent from '@/components/ChildComponent'
 import store from '@/store'
 import { mapGetters } from 'vuex'
+import _ from 'lodash'

 export default {
   name: 'TestView',
@@ -32,11 +33,26 @@ export default {
         title: 'props',
         content: '父傳子'
       },
-      parentCount: null
+      parentCount: null,
+      todos: [
+        {
+          id: 1,
+          text: 'text 1',
+          done: true
+        },
+        {
+          id: 2,
+          text: 'text 2',
+          done: false
+        }
+      ]
     }
   },
   created () {
     console.log('TestView.vue')
+    console.log(_.get(this.todos, '0.text')) // text 1
+    console.log(_.get(this.todos, '1.id')) // 2
+    console.log(_.get(this.todos, '2.id')) // undefined
   },
   methods: {
     callMe (count) {
<template>
  <Transition name="modal">
    <div v-if="show" class="modal-mask">
      <div class="modal-wrapper">
        <div class="modal-container">
          <div class="modal-header">
            <slot name="header">default header</slot>
          </div>

          <div class="modal-body">
            <slot name="body">default body</slot>
          </div>

          <div class="modal-footer">
            <slot name="footer">
              default footer
              <button
                class="modal-default-button"
                @click="$emit('close')"
              >OK
              </button>
            </slot>
          </div>
        </div>
      </div>
    </div>
  </Transition>
</template>

<script>
export default {
  name: 'ModalComponent',
  props: {
    show: Boolean
  }
}
</script>

<style scoped>
.modal-mask {
  position: fixed;
  z-index: 9998;
  top: 0;
  left: 0;
  width: 100%;
  height: 100%;
  background-color: rgba(0, 0, 0, 0.5);
  display: table;
  transition: opacity 0.3s ease;
}

.modal-wrapper {
  display: table-cell;
  vertical-align: middle;
}

.modal-container {
  width: 300px;
  margin: 0px auto;
  padding: 20px 30px;
  background-color: #fff;
  border-radius: 2px;
  box-shadow: 0 2px 8px rgba(0, 0, 0, 0.33);
  transition: all 0.3s ease;
}

.modal-header h3 {
  margin-top: 0;
  color: #42b983;
}

.modal-body {
  margin: 20px 0;
}

.modal-default-button {
  float: right;
}

/*
 * The following styles are auto-applied to elements with
 * transition="modal" when their visibility is toggled
 * by Vue.js.
 *
 * You can easily play with the modal transition by editing
 * these styles.
 */

.modal-enter-from {
  opacity: 0;
}

.modal-leave-to {
  opacity: 0;
}

.modal-enter-from .modal-container,
.modal-leave-to .modal-container {
  -webkit-transform: scale(1.1);
  transform: scale(1.1);
}
</style>
diff --git a/src/views/TestView.vue b/src/views/TestView.vue
index d9c5d70..b79c879 100644
--- a/src/views/TestView.vue
+++ b/src/views/TestView.vue
@@ -12,9 +12,28 @@
       @callParentEvent="callMe($event)"
     ></child-component>
     <div>{{parentCount}}</div>
+    <button id="show-modal" @click="showModal = true">Show Modal</button>
+    <!-- use the modal component, pass in the prop -->
+    <modal-component :show="showModal" @close="showModal = false">
+      <template v-slot:header>
+        <h3>custom header1,  {{ slotProps.user.firstName }}</h3>
+      </template>
+    </modal-component>
   </div>
 </template>

@@ -23,10 +42,14 @@ import ChildComponent from '@/components/ChildComponent'
 import store from '@/store'
 import { mapGetters } from 'vuex'
 import _ from 'lodash'
+import ModalComponent from '@/components/ModalComponent'

 export default {
   name: 'TestView',
+  components: {
+    ModalComponent
+  },
   data () {
     return {
       singleObj: {
@@ -45,7 +68,15 @@ export default {
           text: 'text 2',
           done: false
         }
-      ]
+      ],
+      showModal: false
     }
   },
   created () {
<template>
    {{ timerCount }}
</template>
<script>
    export default {
        data() {
            return {
                timerCount: 30
            }
        },
        watch: {
            timerCount: {
                handler(value) {
                    if (value > 0) {
                        setTimeout(() => {
                            this.timerCount--;
                        }, 1000);
                    }
                },
                immediate: true // This ensures the watcher is triggered upon creation
            }
        }
    }
</script>