2019年8月24日 星期六

phpstorm心得

起因:

因為sublime 的 Xdebug 插件已經很久沒在更新了
https://github.com/martomo/SublimeTextXdebug
所以在新版的php和xdebug中會有不兼容的情況
https://github.com/martomo/SublimeTextXdebug/issues/172#issuecomment-363770737 
而且workerman 的events.php 裡面因為xdebug版本太低斷不到,而xdebug版本太高sublime又不兼容。所以轉向有在維護更新的phpstorm


熱鍵

Settings => ctrl + alt + s
Settings => Keymap => 選Sublime Text

搜尋某個熱鍵榜定了什麼功能(有無被使用)
Keymap => 點擊搜尋圖示 => 輸入熱鍵。ex. ctrl+shift+p 查出已經榜訂了Find Action
打開Version Control 面板(看git log) => alt + 9
Sublime: ( set_mark + select_to_mark ) => ( Find Action )Toggle Sticky Selection 
Sublime: alignment ( ctrl+alt+a ) => ( Find Action ) Reformat Code
Sublime: Emmet - Go to Matching Pair => ctrl + m ( Move Caret to Matching Brace )
快速加入try / catch: 選擇代碼範圍 => ( Find Action ) Surround With => try / catch ... finally 要手動加
對某段(HTML)代碼縮排 => 選擇後 => ( Find Action ) Auto-Indent Lines - Ctrl+Alt+I

複製純文本(貼上word時不帶樣式)

ctrl  + shift + p (Find Action) => Copy as Plain Text  

找檔案中下一個error

ctrl  + shift + p (Find Action) => Next Highlighted Error    


自定義熱鍵

Resume Program(XDebug Run,跳到下一個breakpoint):F9
https://stackoverflow.com/questions/14223631/in-phpstorm-how-do-you-untab-to-the-previous-tabstop/14746035
Unindent:Shift + Tab

Next Line Bookmark in Editor

原本2021.2.2原本 F2 是在同一個文件中跳到下一個書籤,2022.1.1 是會跨文件跳書籤。如果要維持在同一個文件中跳書籤:
Next Line Bookmark:F2 => Next Line Bookmark in Editor:F2

Toggle Sticky Selection: ctrl+alt+shift+s   
=> 避免使用shift + s,因為中文輸入時按shift + s打不出S

Path with line number 

在某個新版後,在Find in Files(Ctrl+Shift+F)中Copy Reference 不再帶行號
Copy Reference:Ctrl+Alt+Shift+C => Path with line number:Ctrl+Alt+Shift+C 


樣式:

配色方案(color scheme)
使用sublime 預設的Monokai
File => Settings => Editor => Color Scheme
因為弱報錯提示不明顯,所以不使用 Monokai ,如圖:

使用PHPStorm預設的Darcula?

斷點時string和int的顏色區別不明顯,所以不使用Darcula


使用Monokai Pro Theme

Settings => Plugins => Marketplace 下載安裝 Monokai Pro Theme
Appearance & Behavior => Appearance => Theme 改回Darcular
Editor => Color Scheme 選擇 Monokai Pro  (非 Monokai Pro(Classic))


字型大小:

Settings => Editor => Font

字型大小(外觀Appearance):

改變編輯器(Editor)以外的字型和大小
Settings => Appearance & Behavior => Appearance 


改變前

改變後


版本控制(以github 為例)

1. 安裝git bash => PHPStorm 會自動偵測到git路徑,因為git也加Windows PowerShell 的環境變量上了

2. git bash 新增公鑰和私鑰
$ ssh-keygen -C "username@email.com" -t rsa
然後把公鑰 .ssh/id_rsa.pub 上傳到github上
ps. 現在github可以開私人project了

3. 拉取代碼
Find Action.. => Checkout from version control =>  Git => 設定路徑

ps. 效果等同在 git bash上直接 git clone下來


Live Template

如同sublime 的 sinppet,

例:
epc
Applicable in ... => 該template 在什麼語言的什麼地方會提示
echo "<pre>\$VARIABLE$:";
print_r($VARIABLE$);
echo "</pre>";

Editor

General 

https://stackoverflow.com/questions/20486542/selecting-entire-variable-with-double-click  Selecting entire variable with double click
點兩下變數不選$:Settings => Editor => General => Smart Keys => Select variable name without '$' sign on double click (預設沒勾,勾了就不選$)

避免打開太多tab使得PHPstorm把tab關掉

Editor | General | Editor Tabs | Tab closing policy | tab limit 設一個大一點的數

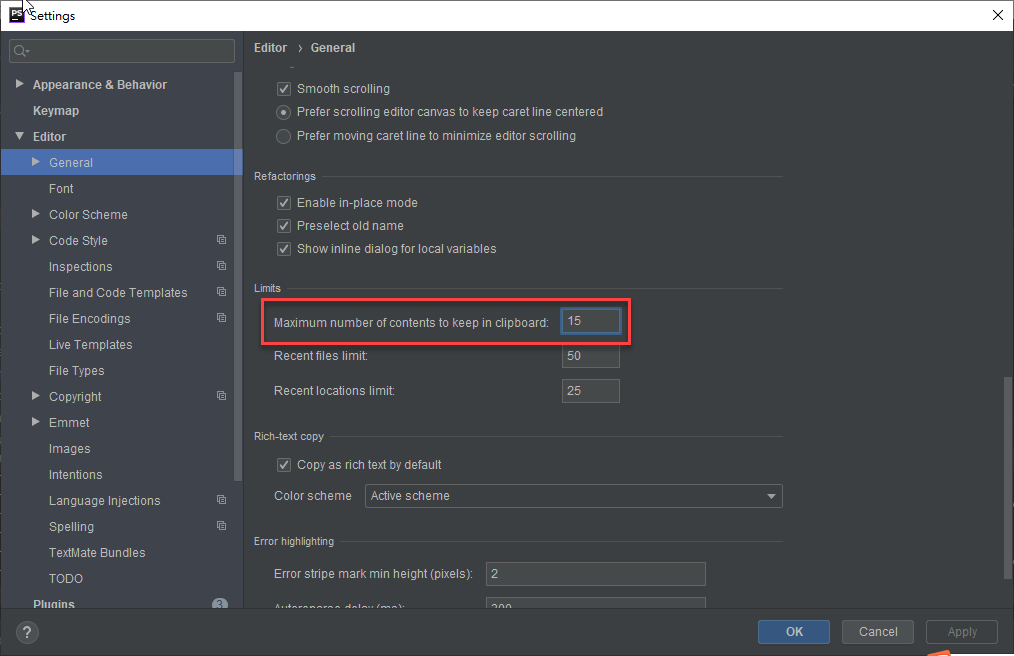
增加剪貼板(clipboard )歷史記錄

https://stackoverflow.com/a/10337122  How to increase PHPStorm clipboard history size?
Settings (Preferences on Mac) | Editor | Maximum number of contents to keep in clipboard.

自動在頭部use命名空間

https://blog.csdn.net/vcit102/article/details/117081161  phpstorm 自动在头部 use 命名空间
Editor | General | Auto Import | PHP | (勾選)Enable auto-import in file scope


Code Style

縮排風格,如:將 function的左大括號不換行


註解comment 不要從第一行開始

https://stackoverflow.com/a/48694397  How to set the style of line comment in phpstorm

Preferences > Editor > Code Style > PHP > (tab) Code Generation > Comment Code > (uncheck) Line comment at first column + 勾選"Add a space at comment start"

https://intellij-support.jetbrains.com/hc/en-us/community/posts/206332339-Tabs-and-Indents-are-2-spaces-despite-setting-at-4-spaces?page=1#community_comment_206876035  Tabs and Indents are 2 spaces despite setting at 4 spaces
如果 Reformat Code 不生效,請嘗試
Settings => Editor => Code Style => 取消勾選 "Detect and use existing file indents for editing"

讓 array 的key和value對齊

https://stackoverflow.com/a/29795404  Stop PhpStorm from aligning associative arrays
Settings | Editor | Code Style | PHP | Wrapping and Braces --> Array initializer | Align key-value pairs

讓 class的 const 和value 對齊

Settings | Editor | Code Style | PHP | Wrapping and Braces --> Class field/constant groups | Align constants

Diff

選擇文件與當前文件比較
ctrl + shift + p => compare with  

剪貼簿與當前文件比較
ctrl + shift + p => compare with  Clipboard

underscore.js template

在Settings 中的 Plugins => Marketplace => 搜尋EJS => install 安裝,裝完須重啟IDE
(也可以離線安裝 https://plugins.jetbrains.com/plugin/7296-ejs )


設置特定文件為EJS格式:Settings => Editor => File Types => EJS => 新增文件名
.env 我用 INI Config
.env - Plugins下載 .env files support 

Deployment

Settings => Deployment => Connection
配置SFTP 
Root path: 專案路徑
Encoding for client-server communication: UTF-8
Mappings:
Deployment path: /
Excluded Paths:
本地的 .idea、vendor (PHPStorm 資料夾)不要上傳

Settings => Deployment => Options
Upload changed files automatically to default server: Always
ps. 所有git 操作都在Windows上 PHPStorm的git 或 ConEmu64 + git bash,如果是從Server上Deployment下載下來的話,會下載完又馬上同步上Server(有點坑)
ps2.  Server 分支不用管,全看Windows上 git bash的分支。除非弄亂了再兩邊切到同一個分支的同一個commit再繼續工作
ps3. 如果項目沒git,Upload changed files automatically to default server等先 Deployment  => Download from x.x.x.x 下載完之後再改Always,第一次下載完就不會馬上同步上去

上傳時報錯:Failed to change timestamp of the file 'your.php'

Settings => Deployment => Options
Preserve files timestamps:取消勾選

在Find in Files (Ctrl+Shift+F)中換行

直接點圖Soft-Wrap Preview Editor  

在所選裡面搜尋search in selection

Ctrl+f搜尋逗號(,)=>選擇範圍 => Search In Selection => Select All Occurrences 


XDebug

遠程調試

適用於:本機http調試(xampp、phpstudy)、虛擬機或內網測試機http調試+cli調試
如果忽然不能斷點,檢查本機IP是否變動,更改php.ini的 xdebug.client_host 為本機IP 

Open edit Run/Debug configurations dialog
Add New Configuration -> PHP Remote Debug
IDE key(session id): PHPSTORM   (搭配 chrome 的 Xdebug helper)
Server 不需要配,打開 Start Listening for PHP Debug Connections 和 Xdebug helper 會自動import
如果server 上裝了兩個PHP(5.5 + 7.3 ) 都裝了XDebug,但是只有 5.5的能進斷點,7.3進不了 => 解法:不要裝在同一台,hyper-v 開虛擬機裝PHP 7.3環境。或把php 7.3 + XDebug 跑在laradock上
(可選)Settings => Languages & Framworks => PHP => 配置 PHP language level 和 CLI Interpreter (本機php環境選擇 Local Path to Interpreter...)

Settings => Languages & Framworks => PHP => Debug => External connections => Break at first line in PHP scripts 勿勾選,以免workerman 調試時一直斷在新進程開始處


laradock 中找不到路徑
解法:
在servers中配置laradock的server

對物件斷點

以laravel passport 登錄時
vendor/league/oauth2-server/src/AuthorizationServer.php:192 
為例,$this->enabledGrantTypes跑foreach時,只需要在 personal_access 時斷點
在192行設置斷點,Condition:
strpos("\Laravel\Passport\Bridge\PersonalAccessGrant", get_class($grantType)) !== false

註:
get_class($grantType) => 因為foreach沒指定index,這邊用get_class去取出類命名空間
‌Laravel\Passport\Bridge\PersonalAccessGrant 
strpos => 判斷是否子字串
false => 0也是判斷成功,false才是失敗

\Laravel\Passport\Bridge\PersonalAccessGrant 怎麼快速複製出來?
展開 $this->enabledGrantTypes => 右鍵 => Copy Type
更多:
Jump To Type Source => 打開 vendor/laravel/passport/src/Bridge/PersonalAccessGrant.php
More (Ctrl + Shift + F8) => 顯示所有斷點

本地調試

 適用於:本機cli(腳本、爬蟲),勿使用git bash(斷不到)

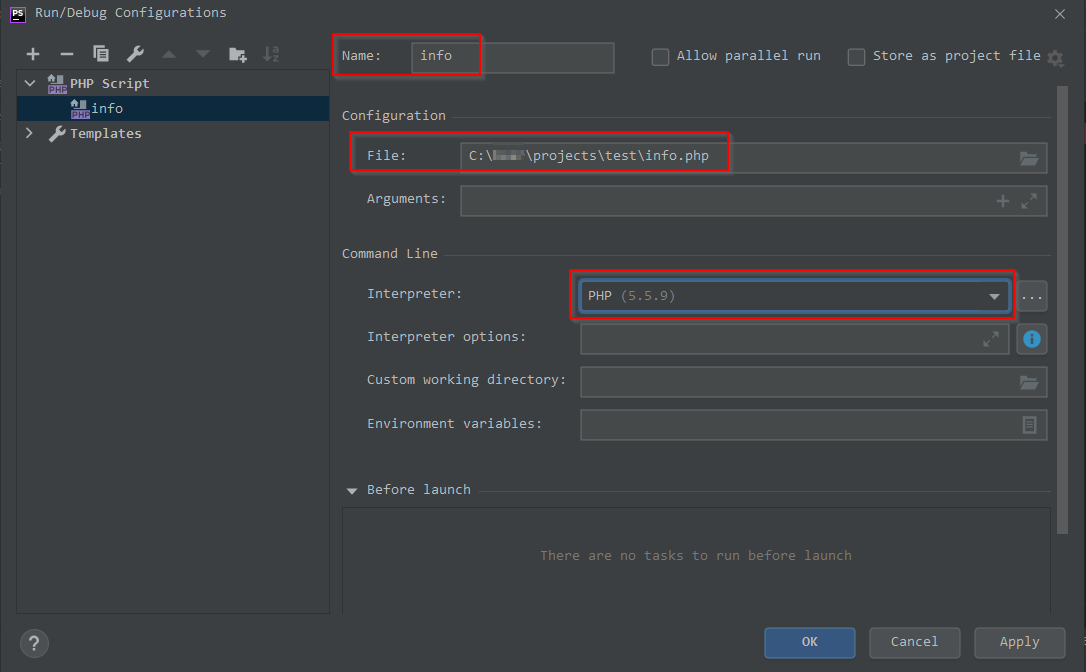
Add configuration ...

Add New Configuration  => PHP Script 
設定 Name, File, Interpreter 

設定 CLI  Interpreter 


如果沒設 CLI Interpreter  會報這個錯誤(Debugger extension is not detected )
然後點擊【Debug】
開始快樂斷點


PHPStorm的XDebug也會有bug

https://www.reddit.com/r/phpstorm/comments/un5e97/debug_console_output_only_shows_array_item_count/  Debug console output only shows array item count instead of contents
reddit 上的網友遇到了這個問題,斷點時在console打印array或object只會顯示array的長度,估計是使用最新版本2022.1.1,如圖:
有網友回復他到YouTrack(jetbrains的jira)回報問題

Debug console output only shows array item count instead of contents

官方回復會在 2022.2 修正這個問題

Debug console cannot evaluate arrays or objects

不降版本可以用print_r($a, true) 
https://youtrack.jetbrains.com/issue/WI-66067/Debug-console-cannot-evaluate-arrays-or-objects#focus=Comments-27-6090147.0-0  
PhpStorm 2021.3.2 是最後正常的版本,2021.3.3後就會有這個問題


Docker

.idea

jet brains 系列編輯器會把IDE配置存在項目的.idea 目錄下
如果有人把.idea 加到git 且推到master 分支上,你拉下來用PHPStorm 打開項目時會吃到他的設定。
解法:
關掉PHPStorm ,切到開發分支dev(別的分支 .idea/ 有被gitignore),刪除.idea/ ,然後打開PHPStorm解決

composer

在windows上的PHPStorm直接執行composer而不用 terminal 連上服務器執行

在windows上安裝composer

參考 https://getcomposer.org/download/ 打開 XAMPP for Windows 的終端安裝
# php -v
PHP 7.4.1 (cli) (built: Dec 17 2019 19:24:02) ( ZTS Visual C++ 2017 x64 )
Copyright (c) The PHP Group
Zend Engine v3.4.0, Copyright (c) Zend Technologies

...
放在 C:\Users\bear\Downloads 下是不行的
bear@BEAR-PC C:\Users\bear\Downloads
# php composer-setup.php
All settings correct for using Composer
The installation directory "C:\Users\bear\Downloads" is not writable

bear@BEAR-PC C:\bear
# php -r "copy('https://getcomposer.org/installer', 'composer-setup.php');"

bear@BEAR-PC C:\bear
# php -r "if (hash_file('sha384', 'composer-setup.php') === 'e0012edf3e80b6978849f5eff0d4b4e4c79ff1609dd1e613307e16318854d24ae64f26d17af3ef0bf7cfb710ca74755a') { echo 'Installer verified'; } else { echo 'Installer corrupt'; unlink('composer-setup.php'); } echo PHP_EOL;"
Installer verified

bear@BEAR-PC C:\bear
# php composer-setup.php
All settings correct for using Composer
Downloading...

Composer (version 1.10.1) successfully installed to: C:\bear\composer.phar
Use it: php composer.phar

bear@BEAR-PC C:\bear
# php -r "unlink('composer-setup.php');"

在PHPStorm中設定composer

Settings => Tools => Command Line Tool Support => Add(+) => Choose tool: Composer
Path to PHP executable:  C:\xampp\php\php.exe => 即使和server php版本不一樣,用XAMPP 的 PHP 7.4 沒事
Path to composer.phar or composer: C:\bear\composer.phar => 官網上下載
Alias: c => composer

使用方法(會自動 auto-complete):
Run Command: composer dump-autoload
Windows 的 git bash 一樣要設 git config --global core.autocrlf false 避免 composer dump-autoload 後會有 CRLF will be replaced by LF in xxx 錯誤

windows + PHPStorm + git bash 避免CRLF will be replaced by LF in xxx 錯誤

Settings => Editor => Code Style => General => Line Separator: Unix and macOS(\n)
composer install 或 composer require 安裝插件時只在Linux 上執行
就是確保所有新建文件的Line Separator是\n


artisan

Settings => Tools => Command Line Tool Support => Add(+) => Choose tool: Tool based on Symfony Console.
Path to PHP executable: C:\xampp\php\php.exe
Path to script: C:\PhpstormProjects\project\artisan
Alias: php artisan
如果報錯:
Problem
Failed to parse output as xml: ParseError at [row,col]:[2,1]
Message: 前言中不允许有内容。.
Command
d2564ee6-4324-47ee-b9f2-6bb9789fff37 D:\path\laravel\artisan list --format=xml
Output

Warning: require(D:\path\laravel/vendor/autoload.php): Failed to open stream: No such file or directory in D:\path\laravel\artisan on line 18

Fatal error: Uncaught Error: Failed opening required 'D:\path\laravel/vendor/autoload.php' (include_path='.;C:\php\pear') in D:\path\laravel\artisan:18
Stack trace:
#0 {main}
  thrown in D:\path\laravel\artisan on line 18
檢查下vendor目錄,是不是沒有composer install


Plugins

Case conversion

不用這個,改用String Manipulation

.env files support

EJS

Mongo Plugin

Quick File Preview

SQL Formatter

Sublime的 SqlBeautifier 替代品,但還是覺得Navicat查詢的美化SQL做的比較好

String Manipulation

熱鍵:alt+m
https://stackoverflow.com/a/36477843  Auto increment number for multiple lines in PhpStorm
Sublime的Text Pastry替代品,但用起來沒那麼順手,還是開sublime好。也有 Case conversion功能

.ignore

Ideolog

Rainbow Brackets

Php Inspections (EA Extended)

熱鍵:alt+enter - show context action

GitToolBox

每一行後面顯示git commit(時間 作者 commit內容)


laravel idea

自動生成Model

ctrl+shift+p => laravel =>Code Generation => Create Model 


自動提示DB字段

新增fruits表
CREATE TABLE `fruits` (
  `id` int(11) NOT NULL AUTO_INCREMENT COMMENT 'ID',
  `name` varchar(255) COLLATE utf8mb4_unicode_ci NOT NULL DEFAULT '' COMMENT '名字',
  `class` tinyint(1) NOT NULL DEFAULT '1' COMMENT '等級',
  `quantity` tinyint(2) NOT NULL DEFAULT '0' COMMENT '數量',
  `created_at` datetime NOT NULL COMMENT '創建時間',
  `updated_at` datetime NOT NULL ON UPDATE CURRENT_TIMESTAMP COMMENT '修改時間',
  PRIMARY KEY (`id`)
) ENGINE=InnoDB AUTO_INCREMENT=4 DEFAULT CHARSET=utf8mb4 COLLATE=utf8mb4_unicode_ci;
s

設定Database
Database(View=>Tool Window) => + => Data Source => MySQL 
第一次打開需要安裝Driver
顯示你專案的資料庫


Helper Code Parameters... 


使用laravel idea Create Model  後(Models/Fruit.php)
先Laravel => Generate Helper Code,然後在 $fillable 中  alt+insert (Generate)

新增字段後。Database先Refresh,然後Generate Helper Code,這樣新增的字段才生效


Languages & Framworks

避免composer.json改變專案的PHP版本

https://stackoverflow.com/a/51222031  How can I set the PHP version in PHPStorm?
PHP => Composer => 取消勾選:Synchronize IDE settings with composer.json


和sublime比較

列模式貼上比sublime強

將剪貼板中的 2 行的內容:
Title1
Title2
取代目標內容的title
- title: Example Title 1
  color: '#03fccf'
  profile: CMD (clink)
  commands:
     - ls
     - cd ..
- title: Example Title 2
  color: '#fc036b'
  profile: 1
- title: Example Title 3
  color: '#302a57'

當剪貼板中的行數(2) 不等於取代目標內容(3)

Sublime


PHPStorm


選擇偶數行

https://stackoverflow.com/a/16273692  How can I select every other line with multiple cursors in Sublime Text?
正則搜索:.*\n.*\n  ,alt+enter 全選, 左鍵 ← ,下鍵 ↓ 


WebStorm

避免切視窗時自動保存文件

不然vue 會自動重新編譯,等手動ctrl+s 保存時再編譯
https://stackoverflow.com/a/15605487  How to Turn off automatic saving on web storm
File | Settings | Appearance & Behavior | System Settings > 取消勾選:
Save files when switching to a different application or a built-in terminal


2019年7月1日 星期一

斷網開發


安裝Redis Desktop Manager

https://sourceforge.net/projects/redis-desktop-manager.mirror/
安裝時會卡在這一步然後報錯:
Beginning download of VC++ 14 Redistributable.
Result: SendRequest Error
Download failed: SendRequest Error. Please install it manually and try again: $VCplus_URL
解法:
手動下載安裝 Visual C++ Redistributable
https://www.techspot.com/downloads/6776-visual-c-redistributable-package.html (Windows 64-bit (2015 to 2019))
重新安裝就正常了

chrome extensions 離線安裝

https://yurl.sinaapp.com/crx.php 輸入應用ID
如 JSONView商店地址是:
https://chrome.google.com/webstore/detail/jsonview/chklaanhfefbnpoihckbnefhakgolnmc
應用ID就是 chklaanhfefbnpoihckbnefhakgolnmc
第二步:在这里右键另存为 即可下载 ( extension_0_0_32_3.crx )
安裝:
將 extension_0_0_32_3.crx 改成 extension_0_0_32_3.zip ,然後拖到chrome 擴展程序(chrome://extensions/)中

使用 chrome 插件:CRX Extractor/Downloader 下載zip,然後再解壓縮,在chrome 擴展程序(chrome://extensions/)中載入


JSON美化+壓縮
chrome 應用程式 - Alchemize
https://chrome.google.com/webstore/detail/alchemize/ehjicobhjldomnjicohkkejcgljecncf


使用 git bash+ ConEmu64 

因為斷網沒法透過 Microsoft Store 安裝 WSL(ubuntu),我習慣的git操作為命令行。
解法:
使用git bash(也會順便安裝linux 常見命令)
但是沒法裝screen?怎麼辦?
解法:
git bash + ConEmu64
https://stackoverflow.com/questions/20202269/set-up-git-bash-to-work-with-tabs-on-windows
Set up git bash to work with tabs on windows
安裝 ConEmu64  https://sourceforge.net/projects/conemu/
打開 ConEmu64 => 右上角打開Settings => Startup => Tasks
1. 新增一個Task
2. 點擊Tab..
3. 設定Startup命令
4. 設定路徑
5. 設定熱鍵
開新tab(預設的) => ctrl + t
設定切換Tab熱鍵,預設是ctrl +1 ~9 ,手感不好改成alt
切換下一個tab(Switch previous console)和上一個tab(Switch next console)
ps. Description 好像翻譯錯誤...

git bash 中使用composer

直接編輯.bashrc 寫入
alias composer="/c/phpstudy_pro/Extensions/php/php7.3.4nts/php /c/user/downloads/composer.phar"
alias composer2="/c/phpstudy_pro/Extensions/php/php7.3.4nts/php /c/user/downloads/composer2.phar"

使用

$ composer --version
Composer version 1.10.22 2021-04-27 13:10:45

$ composer2 --version
Composer version 2.1.3 2021-06-09 16:31:20


比較軟體

Sublime (portable) 安裝 Diffy 插件


搜狗輸入法

【簡繁切換】預設熱鍵是 Ctrl+Shift+F ,但此熱鍵和PHPStorm(Sublime熱鍵)中的全局搜尋衝突
在11.2版本中因為UI的改變,要怎麼修改【簡繁切換】?
輸入法上右鍵 => 更多設置

屬性設置 => 按鍵 => 系統功能快捷鍵設置
【簡繁切換】設置成 Ctrl+Shift+W 
這裡有個bug,即使設置成功再次點進來,【簡繁切換】會顯示預設的 Ctrl+Shift+F 。但是請使用 Ctrl+Shift+W 【簡繁切換】


2019年3月13日 星期三

hyper-v 安裝CentOS 7.6

Windows 10 Pro 內建 Hyper-v
安裝 CentOS 7.6 + PHP 7.3 + nginx + laravel 5.8

安裝Hyper-v 和 WSL( Windows Subsystem for Linux ) - 略
ps. WSL可以在Microsoft Store 搜尋Linux 下載不同版本Linux(Kali、ubuntu、Debian...)等Subsystem
ps. Hyper-v 和安卓的夜神模擬器nox無法同時執行,Windows會報錯SYSTEM_SERVICE_EXCEPTION 藍色畫面
https://www.reddit.com/r/windows/comments/9wdmcc/help_bsod_when_i_start_nox_player_hyperv_enabled/
NOX cannot run when Hyper-V is enabled.
ps. BlueStacks 和 Hyper-v 也無法同時執行


該使用WSL還是Hyper-v?
結論:你不應該使用WSL
1. Microsoft did not design or build WSL for production workloads.
微軟設計WSL不是為了生產環境
2. Running a virtual machine (VM) can be more efficient.
虛擬機更高效
3. 4. 5. 略

Windows 10 啟用hyper-v

https://www.itread01.com/content/1550134651.html  WIN10 Hyper-V 安裝 CentOS 7
https://dotblogs.com.tw/gelis/2010/07/30/16892  開啟Hyper-V的內部虛擬網路

下載Minimal版本

開啟hyper-v 功能

設定 =》 應用程式 =》 應用程式與功能 =》 選用功能 =》 更多Windows功能 =》 開啟hyper-v
(開啟後需重開機)

新增虛擬交換器

hyper-v 管理員 =》 虛擬交換器管理員 =》 新虛擬網路交換器 =》 新增【外部網路】,選擇有線網卡


虛擬機器 =》 設定 =》 網路界面卡 =》 選擇剛剛新增的【外部網路】虛擬交換器

新裝的機器要有網路

開機自動啟動eth0網路
# vi /etc/sysconfig/network-scripts/ifcfg-eth0
ONBOOT=no
ONBOOT=yes


hyper-v 虛擬交換器 使用「外部網路」,(ThinkPad T460)不要使用無線網卡,使用網路線連接區域連線,不然虛擬機和win 10 hosts會同一個內網ip,win 10 SSH連不上虛擬機

Hyper-v 儲存後即使重開Windows 10 ,再重開虛擬機器,工作狀態還在,等於沒有重開虛擬機

安裝完CentOS 7.6後


安裝一些常用package
# yum install vim epel-release screen git bash-completion telnet
裝完bash-completion後讓root可以正常使用
# source /etc/profile.d/bash_completion.sh
查裝什麼package才能用netstat
# yum provides */netstat
安裝net-tools以使用netstat
# yum install net-tools

升級git

因為yum安裝的git版本是1.8.3.1 ,用以下方法安裝2.x 最新版本的git

移除git

# yum -y remove git

新增 End Point 倉庫

# yum -y install https://packages.endpoint.com/rhel/7/os/x86_64/endpoint-repo-1.9-1.x86_64.rpm
然後安裝2.x版本的git
# yum install git

檢查

# git --version
git version 2.30.1

End Point 倉庫過期造成yum無法更新

# yum update
...
https://packages.endpoint.com/rhel/7/os/x86_64/repodata/repomd.xml: [Errno 14] curl#6 - "Could not resolve host: packages.endp
oint.com; Unknown error"

解法

# yum-config-manager --disable endpoint

安裝php、php-fpm、nginx

安裝remi
# yum install http://rpms.remirepo.net/enterprise/remi-release-7.rpm
如果你要最新的php 7.3.x,必須這樣做
# yum --enablerepo=remi,remi-php73 update -y
查remi的版本
# yum info remi-release
開啟remi-php73
# yum-config-manager --enable remi-php73
安裝php7.3
# yum install php73-php
使php能夠呼叫到php 7.3 bash ( 直接加到.bashrc 可以自動enable )
# source /opt/remi/php73/enable
查php版本
# php -v
PHP 7.3.3 (cli) (built: Mar  5 2019 13:50:38) ( NTS )
Copyright (c) 1997-2018 The PHP Group
Zend Engine v3.3.3, Copyright (c) 1998-2018 Zend Technologies
安裝 php 7.3的php-fpm
# yum install php73-php-fpm
安裝nginx
# yum install nginx
啟動php-fpm
# systemctl start php73-php-fpm
查php-fpm狀態
# systemctl status php73-php-fpm
啟動nginx
# systemctl start nginx
查nginx 開機是否自動啟動
# systemctl is-enabled nginx
disabled
開機自動啟動nginx、php-fpm
# systemctl enable nginx
# systemctl enable php73-php-fpm.service

訪問網頁不通時,打開80 port
# firewall-cmd --zone=public --add-port=80/tcp --permanent
success
# firewall-cmd --reload
success
檢查配置是否生效
# iptables-save | grep 80
-A IN_public_allow -p tcp -m tcp --dport 80 -m conntrack --ctstate NEW -j ACCEPT

關閉端口

https://docs.fedoraproject.org/en-US/quick-docs/firewalld/  Using firewalld
# firewall-cmd --remove-port=port-number/port-type
# firewall-cmd --runtime-to-permanent
如:
# firewall-cmd --remove-port=80/tcp
# firewall-cmd --runtime-to-permanent

查當前zone開放的端口

# firewall-cmd --list-ports


下載composer-steup.php
# php -r "copy('https://getcomposer.org/installer', 'composer-setup.php');"
# ls
anaconda-ks.cfg  composer-setup.php
# php -r "if (hash_file('sha384', 'composer-setup.php') === '48e3236262b34d30969dca3c37281b3b4bbe3221bda826ac6a9a62d6444cdb0dcd0615698a5cbe587c3f0fe57a54d8f5') { echo 'Installer verified'; } else { echo 'Installer corrupt'; unlink('composer-setup.php'); } echo PHP_EOL;"
Installer verified
安裝composer
# php composer-setup.php
All settings correct for using Composer
Downloading...

Composer (version 1.8.4) successfully installed to: /root/composer.phar
Use it: php composer.phar
# ls
anaconda-ks.cfg  composer.phar  composer-setup.php
刪除 composer-setup.php
# php -r "unlink('composer-setup.php');"
讓composer方便呼叫
# mv composer.phar /usr/local/bin/composer
# which composer
/usr/local/bin/composer

更新composer

$ composer --version
Composer version 1.7.2
$ composer self-update
Updating to version 1.8.5 (stable channel).
   Downloading (100%)
Use composer self-update --rollback to return to version 1.7.2

加速composer

$ composer global require hirak/prestissimo
...
    Failed to download hirak/prestissimo from dist: The zip extension and unzip command are both missing, skipping.
Your command-line PHP is using multiple ini files. Run `php --ini` to show them.
    Now trying to download from source
解決上面黃底的錯誤
# yum install zip unzip php73-php-pecl-zip

安裝 https://laravel.com/docs/5.8/installation  上laravel 5.8 必裝的php extension
檢查php extension有無安裝
# php -m | grep mbstring

安裝laravel 5.8需要的php extension

# yum install php73-php-pdo
# yum install php73-php-mbstring
# yum install php73-php-xml
# yum install php73-php-bcmath

安裝Xdebug

# yum install php73-php-pecl-xdebug

xdebug.ini報 invalid ELF header 錯誤

$ php --ini | grep xdebug
Failed loading /etc/opt/remi/php73/php.d/15-xdebug.ini:  /etc/opt/remi/php73/php.d/15-xdebug.ini: invalid ELF header
Additional .ini files parsed:      /etc/opt/remi/php73/php.d/15-xdebug.ini,
解法:
重新安裝php73-php-common
# yum remove php73-php-common
# yum install php73-php php73-php-fpm php73-php-pdo php73-php-mbstring php73-php-xml php73-php-bcmath php73-php-pecl-xdebug 
當然 php73-php-fpm 需重啟和重新enable
# systemctl start php73-php-fpm
# systemctl enable php73-php-fpm.service

讓XDebug  CLI 生效

.bashrc 加入
export XDEBUG_CONFIG="remote_host=192.168.1.7 idekey=PHPSTORM"
export PHP_IDE_CONFIG="serverName=localhost"
/etc/opt/remi/php73/php.d/15-xdebug.ini 修改:
xdebug.remote_enable = true


安裝 php-process

如果你要用workerman需要安裝php-process,否則啟動時會報錯
Uncaught Error: Call to undefined function posix_getpid()
# yum install php73-php-process

安裝memcached擴展

# yum install php73-php-pecl-memcached

安裝pdo_mysql擴展

# yum install php73-php-pecl-mysql

yum安裝時404報錯

# yum install php73-php-pecl-memcached
...
http://repo.mongodb.org/yum/redhat/7/mongodb-org/4.2/x86_64/repodata/repomd.xml: [Errno -1] Error importing repomd.xml for MongoDB: Damaged repomd.xml file
Trying other mirror.
http://mirror.pregi.net/centos/7.7.1908/os/x86_64/repodata/repomd.xml: [Errno 14] HTTP Error 404 - Not Found
Trying other mirror.
...

解法

# yum clean all --enablerepo=*
Loaded plugins: fastestmirror
Cleaning repos: C7.0.1406-base C7.0.1406-centosplus C7.0.1406-extras ...
...
Cleaning up list of fastest mirrors
必須清除yum緩存。這邊和IP無關,使用 proxychains4 掛代理IP執行無效

避免出現Memcached::get(): could not unserialize value, no igbinary support的錯誤

memcached有個memcached.serializer,預設採用igbinary。但是,當主機上沒有安裝igbinary時,則會改用php模式(standard PHP serializer)。如果有台主機沒有安裝Igbinary,且該主機的程式由memcache取回資料時為Igbinary格式,因無法使用Igbinary而發生錯誤。所以統一改為使用php模式。

檢查當前PHP CLI的memcached.serializer是什麼值:

# php -r "echo ini_get('memcached.serializer');"
igbinary
# php -i | grep memcached.serializer
memcached.serializer => igbinary => igbinary

查配置文件路徑

# php --ini | grep memcached
/etc/opt/remi/php73/php.d/50-memcached.ini,

修改 /etc/opt/remi/php73/php.d/50-memcached.ini 的 memcached.serializer配置為php

memcached.serializer = "php"

檢查修改後的結果(直接生效)

# php -r "echo ini_get('memcached.serializer');"
php
# php -i | grep memcached.serializer
memcached.serializer => php => php


安裝 laravel 5.8

$ composer create-project --prefer-dist laravel/laravel blog

配置nginx

nginx.conf 將server 改成以下
server {
    listen       80;
    server_name  localhost;
    root /var/www/html/blog/public;
    index index.php index.html index.htm;
    location / {
    #   autoindex on; // 如果想要開啟顯示資夾目錄的話加入這條
    #                  // 建議只在debug階段開啟
        try_files $uri $uri/ /index.php?$query_string;
    }
    #error_page  404              /404.html;
    # redirect server error pages to the static page /50x.html
    #
    error_page   500 502 503 504  /50x.html;
    location = /50x.html {
        root   /usr/share/nginx/html;
    }
    location ~ \.php$ {
        root /var/www/html/blog/public;
        fastcgi_pass   127.0.0.1:9000;
        fastcgi_index  index.php;
        include        fastcgi_params;
        fastcgi_param  SCRIPT_FILENAME  $document_root$fastcgi_script_name;
    }
}
如果前一步驟沒配好,訪問網頁會直接下載index.php 文件
https://stackoverflow.com/questions/25591040/nginx-serves-php-files-as-downloads-instead-of-executing-them/41838767#41838767
I had similar problem which was resolved by emptying the browser cache (also worked fine with different browser).
調好後要清空瀏覽器緩存


當storage 為777時,仍然報錯 storage/logs/laravel.log Permission denied
這個是 selinux 的問題
關掉selinux以證明這個問題
# setenforce 0
(可正常訪問)
這解法不好,因為你把被添加的服務器安全,所以把它改回去
# setenforce 1
應使用 SELinux 所允許的寫檔命令
blog ]$ sudo chcon -R -t httpd_sys_rw_content_t storage

laravel連不同(實體)機器DB時報錯

SQLSTATE[HY000] [2002] Permission denied
但是用mysql 命令或Navicat ssh通道卻能連,只有laravel不能連
https://stackoverflow.com/a/56381932  SQLSTATE[HY000] [2002] Permission denied Laravel PDO Driver (credentials working via artisan migrate)
解法:
# setsebool httpd_can_network_connect_db 1

beanstalk也不通 - 
Socket error 13: Permission denied  
https://stackoverflow.com/a/44092808 SQLSTATE[HY000] [2002] Permission denied
# setsebool httpd_can_network_connect 1


安裝workerman/gateway-worker

$ composer require workerman/gateway-worker
https://learnku.com/articles/13151/using-laravel-to-carry-out-socket-communication-in-workerman

新增 Workerman 啟動文件

用命令 php artisan make:command WorkermanCommand 新增 Workerman 啟動文件 app/Console/Commands/WorkermanCommand.php
  namespace App\Console\Commands;

use GatewayWorker\BusinessWorker;
use GatewayWorker\Gateway;
use GatewayWorker\Register;
use Illuminate\Console\Command;
use Workerman\Worker;

class WorkermanCommand extends Command
{

    protected $signature = 'workman {action} {--d}';

    protected $description = 'Start a Workerman server.';

    public function handle()
    {
        global $argv;
        $action = $this->argument('action');

        $argv[0] = 'wk';
        $argv[1] = $action;
        $argv[2] = $this->option('d') ? '-d' : '';

        $this->start();
    }

    private function start()
    {
        $this->startGateWay();
        $this->startBusinessWorker();
        $this->startRegister();
        Worker::runAll();
    }

    private function startBusinessWorker()
    {
        $worker                  = new BusinessWorker();
        $worker->name            = 'BusinessWorker';
        $worker->count           = 1;
        $worker->registerAddress = '127.0.0.1:1236';
        $worker->eventHandler    = \App\Workerman\Events::class;
    }

    private function startGateWay()
    {
        $gateway = new Gateway("websocket://0.0.0.0:2346");
        $gateway->name                 = 'Gateway';
        $gateway->count                = 1;
        $gateway->lanIp                = '127.0.0.1';
        $gateway->startPort            = 2300;
        $gateway->pingInterval         = 30;
        $gateway->pingNotResponseLimit = 0;
        $gateway->pingData             = '{"type":"@heart@"}';
        $gateway->registerAddress      = '127.0.0.1:1236';
    }

    private function startRegister()
    {
        new Register('text://0.0.0.0:1236');
    }
}

創建事件監聽文件

namespace App\Workerman;

class Events
{

    public static function onWorkerStart($businessWorker)
    {
    }

    public static function onConnect($client_id)
    {
    }

    public static function onWebSocketConnect($client_id, $data)
    {
    }

    public static function onMessage($client_id, $message)
    {
    }

    public static function onClose($client_id)
    {
    }
}
s

啟動Workerman 服務端

$ php artisan workman start --d

檢查是否啟動成功

瀏覽器打開看到這個畫面就是啟動成功
在hyper-v上(不在容器內)竟然也能啟動成功...

設定固定IP

https://www.cyberciti.biz/faq/howto-setting-rhel7-centos-7-static-ip-configuration/

使用 Network Manager 文字GUI,比較無腦
# nmtui edit eth0
IPv4 CONFIGURATION:<Manual>
Addresses:192.168.1.x
Gateway:192.168.1.1
DNS servers:192.168.1.1   (使用host的DNS,沒配置ping 不到域名)

點擊<OK>後即是自動修改了 /etc/sysconfig/network-scripts/ifcfg-eth0
BOOTPROTO="dhcp"
BOOTPROTO=none
IPADDR=192.168.1.x
PREFIX=24
GATEWAY=192.168.1.1

重啟網路服務
# systemctl restart network
機器ip即固定 192.168.1.x ,原本的ssh會斷掉重連 192.168.1.x 即可

如果常常有時候連不上 hyper-v  192.168.1.9 (ping不通,但是瀏覽器打得開的詭異現象),重啟網卡(hyper-v CentOS + Windows) 無效
解法:
Bear-WAN先改【內部網路】再改【外部網路】,再重啟hyper-v 虛擬機

調整pagefile.sys到D碟後ssh無法登陸

http://www.xiaobaixitong.com/win10jiaocheng/31951.html  win10的pagefile.sys是什么文件?文件太大如何移动到其它盘
因為C碟只有100G,使用TreeSizeFreePortable發現pagefile.sys就佔了16G,要把他移動到D碟。
設置完需重啟電腦,移動完發現hyper-v重啟,gitlab更新不了,而且ssh也登陸不上了。以後需要注意此操作

2019年2月28日 星期四

Redis 心得

https://stackoverflow.com/questions/16613580/redis-how-to-access-keys-in-specific-keyspace
指定keyspace
$ redis-cli -n 1 KEYS '*'
獲取key值
127.0.0.1:6379[1]> GET "laravel_cache:App\\Models\\User:15"
xxx
亦可下載redis gui管理工具: redis desktop manager

使用Redis鎖處理併發問題

redis命令
> SET lockKey value NX EX 30
NX -- 當key不存在時才能設置
NX -- Only set the key if it does not already exist. - "SET if Not eXists" 
EX seconds -- 設置過期時間(秒)
EX seconds -- Set the specified expire time, in seconds.

邏輯

try {
    if (! $lock = RedisLock::lock('do-some-thing', 100000)) {
        throw new Exception('Resource locked.');
    }
    // 業務邏輯
} catch (Exception $e) {
    throw $e;
} finally {
    RedisLock::unlock($lock);
}

實現

$time = microtime();
$max = 1000; //1 second

do {  //针对问题1,使用循环
    $timeout = 10;
    $roomid = 10001;
    $key = 'room_lock';
    $value = 'room_'.$roomid;  //分配一个随机的值针对问题3
    $isLock = Redis::set($key, $value, 'ex', $timeout, 'nx');//ex 秒
    if ($isLock) {
        if (Redis::get($key) == $value) {  //防止提前过期,误删其它请求创建的锁
            //执行内部代码
            Redis::del($key);
            continue;//执行成功删除key并跳出循环
        }
    } else {
        usleep(5000); //睡眠,降低抢锁频率,缓解redis压力,针对问题2
    }
} while(!$isLock && ((microtime() - $time) < $max) );

綠色:限制時間,避免等太久
__destruct() 可能要解鎖,避免「內部代碼」異常一直鎖著

laradock中容器連host的redis報錯

https://blog.51cto.com/crfsz/1878137  redis解决(DENIED Redis is running in protected mode because prote)
DENIED Redis is running in protected mode because protected mode is enabled, no bind address was specified, no authentication password is requested to clients. In this mode connections are only accepted from the loopback interface. If you want to connect from external computers to Redis you may adopt one of the following solutions: 1) Just disable protected mode sending the command 'CONFIG SET protected-mode no' from the loopback interface by connecting to Redis from the same host the server is running, however MAKE SURE Redis is not publicly accessible from internet if you do so. Use CONFIG REWRITE to make this change permanent. 2) Alternatively you can just disable the protected mode by editing the Redis configuration file, and setting the protected mode option to 'no', and then restarting the server. 3) If you started the server manually just for testing, restart it with the '--protected-mode no' option. 4) Setup a bind address or an authentication password. NOTE: You only need to do one of the above things in order for the server to start accepting connections from the outside.

原因

redis 的protected mode被開啟

解法

編輯 /etc/redis.conf  
protected-mode yes  => protected-mode no
重啟redis
# service redis restart

檢查

# redis-cli
127.0.0.1:6379> CONFIG GET protected*
1) "protected-mode"
2) "no"


參考資料:

https://blog.csdn.net/iastro/article/details/83304188  redis锁处理并发问题
https://www.jianshu.com/p/81b0f1bd1328  Redis锁机制的几种实现方式
https://github.com/ginnerpeace/laravel-redis-lock/blob/master/src/Processor.php  laravel-redis-lock


2019年2月18日 星期一

Gitlab+Jenkins實現自動部署

1. 安裝(使用yum安裝,略)

jenkins 2.150.1
gitlab ( GitLab Community Edition 11.5.0 )

2. 配置gitlab

打開project、配置SSH密鑰、上傳code(略)

3. 配置Jenkins

a. 新增插件

Manage Jenkins => Manage Plugins => 安裝以下插件
Gitlab Hook
Build Authorization Token Root
Publish Over SSH
Gitlab Authentication
Gitlab

添加完插件重啟jenkins,開始添加要部署代碼的主機,注意一定是要能夠ssh登陸的用户

b. 添加主機

Manage Jenkins => Configure System => Publish over SSH

c. 新建任務

New Item => (填寫任務名字)Freestyle project => Source Code Management
Build Triggers
Build
Exec command:
# 重啟nginx
/usr/local/nginx/sbin/nginx -s reload
# 同步.git 目錄(git log)
rsync -r /var/lib/jenkins/workspace/test/.git /path/test/jenkins_cd
# 切到develop分支
git --git-dir=/path/test/jenkins_cd/.git remote update
git --git-dir=/path/test/jenkins_cd/.git branch -D develop
git --git-dir=/path/test/jenkins_cd/.git checkout -b develop remotes/origin/develop

4. 配置gitlab,當有代碼提交時,觸發jenkins的部屬操作


出現Hook executed successfully: HTTP 200 => 說明配置成功

5. 加入git-flow

test-release (預發佈分支的jenkins item)

Source Code Management
Branches to build - Branch Specifier (blank for 'any'): */master => 從master生release分支
Build Triggers
Allowed branches - Filter branches by regex - Target Branch Regex: .*master
Build
SSH Publishers - Transfers - Remote directory: /path/test/jenkins_release
SSH Publishers - Transfers - Exec command:
/usr/local/nginx/sbin/nginx -s reload
# 同步 release worksapce的git log 到release項目路徑上
rsync -r /var/lib/jenkins/workspace/test-release/.git /path/test/jenkins_release
# 切換到release 分支
git --git-dir=/path/test/jenkins_release/.git remote update
git --git-dir=/path/test/jenkins_release/.git branch -D release
git --git-dir=/path/test/jenkins_release/.git checkout -b release remotes/origin/master
# 配置.git目录权限
chmod 777 -R /path/test/jenkins_release/.git/


test-master(線上分支的jenkins item)

Source Code Management
Branches to build - Branch Specifier (blank for 'any'): */master
Build Triggers
Allowed branches - Filter branches by regex - Target Branch Regex: .*master
Build
SSH Publishers - Transfers - Remote directory: /path/test/jenkins_master
SSH Publishers - Transfers - Exec command:
/usr/local/nginx/sbin/nginx -s reload
# 同步 master worksapce的git log 到master項目路徑上
rsync -r /var/lib/jenkins/workspace/test-master/.git /path/test/jenkins_master
# 可以使用一些jenkins中的變量
echo "$PWD bear $JOB_NAME-$BUILD_NUMBER $GIT_COMMIT $GIT_PREVIOUS_COMMIT $GIT_PREVIOUS_SUCCESSFUL_COMMIT start" >> /tmp/bear2
# 可以使用bash的條件判斷
if [ "$GIT_COMMIT" = "$GIT_PREVIOUS_COMMIT" ]
then
    echo "var is 123"  >> /tmp/bear2
else
    echo "var is 456"  >> /tmp/bear2
fi
# 切換到master分支
git --git-dir=/path/test/jenkins_master/.git remote update
git --git-dir=/path/test/jenkins_master/.git branch -D master
git --git-dir=/path/test/jenkins_master/.git checkout -b master remotes/origin/master
# 合併release分支內容
git --git-dir=/path/test/jenkins_master/.git --work-tree=/path/test/jenkins_master/ merge remotes/origin/release
# 更新到倉庫的master分支
git --git-dir=/path/test/jenkins_master/.git push origin master:master
# 删除release远程分支
git --git-dir=/path/test/jenkins_master/.git push origin --delete release
# 删除release环境
rm -rf /path/test/jenkins_release/*
rm -rf /path/test/jenkins_release/.git//

ps. test-release、test-master皆需配gitlab webhook

6. 流程

開發在本地環境開發完+自測後更新到develop分支,jenkins會自動部屬測試環境給測試測,測試測完build test-release環境(從master分支分出來的),release環境只有一個,兩人同時要上時必須等待,開發上release環境將develop分支中的commit cherry-pick到release分支中,測試測完release後更新到release分支,線上發佈時build test-master,部屬完更新到master分支、刪除倉庫release分支、release環境

7. Jenkins 建置狀態回寫gitlab

a. 安裝gitlab、jenkins安裝gitlab plugin


b. Gitlab 使用者設定

GitLab 主畫面開啟帳號圖像下拉選單,依序點選「Settings」 → 「Access Tokens」
產生一個Personal Access Tokens
然後你就可以用這個token存取gitlab api
ex. http://gitlab.server.com/api/v4/projects?private_token=xxx

c. Jenkins 設定

Manage Jenkins => Configure System => Gitlab
Gitlab區塊輸入「Connection name」與「Gitlab host URL」
於「Credentials」旁按下【Add】 → 【Jenkins】,開啟「新增 Credentials」頁面
然後填入以下欄位(API token為你剛剛在gitlab生成的access tokens)

d. 工作組態設定

test item => Configure
General
GitLab Connection: 選擇 Gitlab
Post-build Actions
按下【Build Now】,此時此項工作會進行建置並使用 GitLab connection 將建置狀態發送至 GitLab 上。

8. 可能的報錯

a. Gitlab webhook 報錯: 500 Internal Server Error - URI::InvalidURIError

使用root登入gitlab => Admin area => Settings => Network => Outbound requests => 勾選「Allow requests to the local network from hooks and services」
ps. 可能會因為gitlab 版本不同,而菜單位置有差異

b. 永遠使用英文介面

因為jenkins 預設文字為用戶瀏覽器語言,但是網路上查到的資料都是英文的,如何使介面為英文?
i. Jenkins安裝 Locale Plugin
ii. Jenkins configuration => Locale => Default Language: en

參考資料:

https://hk.saowen.com/a/286fcee36ef6c80c697b392adeb8249047a9c282b50fe82b42526af3f673562a  Gitlab+Jenkins實現自動部署(主要)
https://dotblogs.com.tw/echo/2018/04/29/jenkins_plugin_gitlab_publishbuildstatus  【Jenkins】外掛套件:GitLab(Jenkins 建置狀態回寫)(次要)
https://linuxize.com/post/how-to-install-jenkins-on-centos-7/  How To Install Jenkins on CentOS 7
https://web.devdon.com/archives/10  GitLab搭配Jenkins實現可持續集成開發
https://blog.csdn.net/u010947098/article/details/61922969  jenkins使用publishover ssh插件连接应用机器时,报Message [Auth fail]的问题(jenkins.plugins.publish_over.BapPublisherException: Failed to connect and initialize SSH connection. Message: [Failed to connect session for config [测试机]. Message [Auth fail]])
https://stackoverflow.com/questions/49626860/gitlab-webhook-get-error-500-internal-server-error-uriinvalidurierror  Gitlab webhook get error: 500 Internal Server Error - URI::InvalidURIError
https://stackoverflow.com/questions/1386291/git-git-dir-not-working-as-expected  git --git-dir not working as expected
https://stackoverflow.com/questions/12350707/jenkins-in-windows-shows-ui-in-russian-language  Jenkins in Windows shows UI in russian language
https://alexbilbie.com/2015/04/setting-up-jenkins/  Setup Jenkins and test a PHP project