環境
windows 10
檢查python版本
(使用git bash)
$ python --version
Python 3.7.7
查pip版本
$ pip --version
pip 19.2.3 from c:\users\user\appdata\local\programs\python\python37-32\lib\site-packages\pip (python 3.7)
看目前系統有安裝哪些套件
$ pip list
Package Version
---------- -------
pip 19.2.3
setuptools 41.2.0
WARNING: You are using pip version 20.2.3; however, version 20.3.3 is available.
You should consider upgrading via the 'c:\users\bear\appdata\local\programs\python\python39\python.exe -m pip install --upgrade pip' command.
升級pip
$ python -m pip install --upgrade pip
Collecting pip
Downloading pip-21.0-py3-none-any.whl (1.5 MB)
|████████████████████████████████| 1.5 MB 469 kB/s
Installing collected packages: pip
Attempting uninstall: pip
Found existing installation: pip 20.2.3
Uninstalling pip-20.2.3:
Successfully uninstalled pip-20.2.3
Successfully installed pip-21.0
$ pip --version
pip 21.0 from c:\users\user\appdata\local\programs\python\python39\lib\site-packages\pip (python 3.9)
升級python
https://stackoverflow.com/a/57292808 How do I upgrade the Python installation in Windows 10?
直接到python官網下載最新的python安裝檔
如果你是要升級小版本3.x.y 到 3.x.z,可以直接【Upgrade Now】
如果你是要升級中版本3.x 到 3.y,安裝檔會提示你【Install Now】
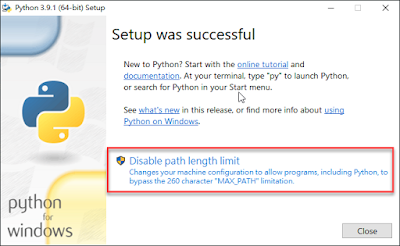
安裝完成(我有禁用path length limit)In this case, you are not upgrading, but you are installing a new version of Python. You can have more than one version installed on your machine. They will be located in different directories.
這種情況,你不是升級,你是安裝新版本的python。你的系統有多個python版本在不同的目錄。
使用py指定python版本
$ py -3.7
Python 3.7.7 (tags/v3.7.7:d7c567b08f, Mar 10 2020, 09:44:33) [MSC v.1900 32 bit (Intel)] on win32
Type "help", "copyright", "credits" or "license" for more information.
>>>
$ py -3.9
Python 3.9.1 (tags/v3.9.1:1e5d33e, Dec 7 2020, 17:08:21) [MSC v.1927 64 bit (AMD64)] on win32
Type "help", "copyright", "credits" or "license" for more information.
>>>
設定環境變量
設定=》系統=》關於=》進階系統設定
環境變數
編輯Path
將原本python 3.7的路徑改成3.9的C:\Users\user\AppData\Local\Programs\Python\Python37-32\Scripts\
C:\Users\user\AppData\Local\Programs\Python\Python37-32\
改成
C:\Users\user\AppData\Local\Programs\Python\Python39\Scripts\
C:\Users\user\AppData\Local\Programs\Python\Python39\
然後開新的prompt檢查版本
$ python --version
Python 3.9.1
$ pip --version
pip 20.2.3 from c:\users\user\appdata\local\programs\python\python39\lib\site-packages\pip (python 3.9)
編輯器
PyCharm Professional 2020.3
斷點
File => Open (打開空目錄時,如C:\python\hello),會自動生成 main.py
這個檔案會教你怎麼用PyCharm的斷點,Debug(Shift+F9)即可開始斷點
熱鍵
自定義
Resume Program => F9
正確打開新項目的姿勢
File => New Project
New environment using(環境使用):【Virtualenv】(venv)
Base interpreter: C:\Users\user\AppData\Local\Programs\Python\Python39\python.exe (如果你裝了2個python(3.7和3.9),要在這邊選IDE環境的python版本)
這樣項目下才會有venv目錄
.gitignore 忽略掉venv和.idea目錄
.gitignore
venv/
.idea/
爬蟲
https://www.learncodewithmike.com/2020/05/python-selenium-scraper.html [Python爬蟲教學]整合Python Selenium及BeautifulSoup實現動態網頁爬蟲
在PyCharm 中安裝Selenium
https://www.jetbrains.com/help/pycharm/installing-uninstalling-and-upgrading-packages.html Install, uninstall, and upgrade packages
Settings => Project: project_name => Python Interpreter => +
搜尋Selenium =》 Install Package然後就可以看到成功安裝selenium,和相依賴的package(urllib3)
$ python crawler.py
Traceback (most recent call last):
File "C:\bear\python\hello3\crawler.py", line 1, in <module>
from selenium import webdriver
ModuleNotFoundError: No module named 'selenium'
系統安裝selenium
$ pip install selenium
Collecting selenium
Using cached selenium-3.141.0-py2.py3-none-any.whl (904 kB)
Collecting urllib3
Using cached urllib3-1.26.2-py2.py3-none-any.whl (136 kB)
Installing collected packages: urllib3, selenium
Successfully installed selenium-3.141.0 urllib3-1.26.2
命令行執行(需先配置好webdriver)
$ python crawler.py
DevTools listening on ws://127.0.0.1:60865/devtools/browser/c51ba9ea-08d4-45f8-bee0-5780695b15ef
老天尊的死期
安裝Webdriver
前往Python套件儲存庫PyPI(Python Package Index) 查詢Selenium
點進去後,往下可以看到Drivers的地方,下載chromedriver
下載你chrome瀏覽器相對應的 ChromeDriver
解壓縮 chromedriver_win32.zip 放到Python網頁爬蟲的專案資料夾中,如下圖:第一個爬蟲程式
from selenium import webdriver
from selenium.webdriver.chrome.options import Options
import time

options = Options()
options.add_argument("--disable-notifications")

chrome = webdriver.Chrome('./chromedriver', options=options)
chrome.get("https://carlislebear.blogspot.com/")

print(chrome.title)
chrome.quit()
s
Line 5-6:options物件,主要用途為取消網頁中的彈出視窗,避免妨礙網路爬蟲的執行。
Line 8:就是建立webdriver物件,傳入剛剛所下載的「瀏覽器驅動程式路徑(chromedriver)-可略」及「瀏覽器設定(options)-可選」
執行
Line 11:chrome.title打印爬蟲網頁的標題,在Console 中也可以打印變數
第二個爬蟲程式
https://officeguide.cc/windows-python-selenium-automation-scripts-tutorial-examples/ Windows 使用 Python + Selenium 自動控制瀏覽器教學與範例
https://stackoverflow.com/a/39191349 NoSuchElementException - Unable to locate element
https://stackoverflow.com/a/44834542 Switch to an iframe through Selenium and python
目的:打開blog =》 搜尋python =》 取第一篇文章的標題
from selenium import webdriver
from selenium.webdriver.chrome.options import Options

from selenium.common.exceptions import TimeoutException
from selenium.webdriver.support.ui import WebDriverWait
from selenium.webdriver.support import expected_conditions as EC
from selenium.webdriver.common.by import By

options = Options()
options.add_argument("--disable-notifications")

# chrome = webdriver.Chrome('./chromedriver', options=options)
chrome = webdriver.Chrome()
chrome.get("https://carlislebear.blogspot.com/")

iframe = chrome.find_element_by_name('navbar-iframe')
chrome.switch_to.frame(iframe)
b_query = chrome.find_element_by_id('b-query').send_keys('python')
chrome.find_element_by_xpath('//*[@id="b-query-icon"]').click()

try:
    WebDriverWait(chrome, 3).until(EC.element_to_be_clickable((By.XPATH, '//*[@id="Blog1"]/div[1]')))
    print(chrome.find_element_by_xpath('//*[@id="Blog1"]/div[1]/div[3]/div/div/div/h3').text)
except TimeoutException:
    print('等待逾時!')

chrome.quit()
s
Line 5-7 & Line 23-24:搜尋後直到內容出來後再打印出第一篇文章標題
Line 16-17:切換到上方iframe,否則會報錯
NoSuchElementException: Message: no such element: Unable to locate element
Line 16、18、19:可以使用find_element_by_name、find_element_by_id、find_element_by_xpath選擇DOM
如何快速寫出XPATH?
chrome 開發者工具DOM上右鍵 =》Copy=》 Copy XPath
剪貼簿中得到://*[@id="b-query-icon"]
需安裝beautifulsoup4
from selenium.webdriver.support import expected_conditions as EC
from selenium.webdriver.common.by import By
+from bs4 import BeautifulSoup
+
options = Options()
options.add_argument("--disable-notifications")
@@ -21,6 +23,11 @@ chrome.find_element_by_xpath('//*[@id="b-query-icon"]').click()
try:
WebDriverWait(chrome, 3).until(EC.element_to_be_clickable((By.XPATH, '//*[@id="Blog1"]/div[1]')))
print(chrome.find_element_by_xpath('//*[@id="Blog1"]/div[1]/div[3]/div/div/div/h3').text)
+ soup = BeautifulSoup(chrome.page_source, 'html.parser')
+ titles = soup.find_all('h3', {
+ 'class': 'post-title'})
+ for title in titles:
+ print(title.getText())
except TimeoutException:
print('等待逾時!')


