2018年10月20日 星期六

laravel-admin 使用心得

使用laravel-admin快速搭建後台模版
PHP >=7.0.0
Laravel >= 5.5.0

安裝最新版的 laravel 5.7
$ composer create-project --prefer-dist laravel/laravel blog

安裝laravel-admin
$ composer require encore/laravel-admin

列出你裝了哪些packages
$ composer show -i

發佈assets 和 config
$ php artisan vendor:publish --provider="Encore\Admin\AdminServiceProvider"

配置 .env 的db連線
檢查mysql的auto_increment_increment ,避免id兩個一跳造成 php artisan admin:install 報錯 // Menu::find(2)->roles()->save(Role::first()); // add role to menu. 查不到admin_menu.id = 2的資料,因為id跳到3
mysql> SHOW VARIABLES LIKE '%auto_increment_increment%';
如果是2,要改my.cnf改成1

然後你可以在 config/admin.php 配置 laravel-admin的路徑、db連線、table名字
跑以下命令完成安裝
$ php artisan admin:install

預設帳號:admin,密碼:admin

開管理員出現錯誤:
http://laravel.admin/admin/auth/users/create
Disk [admin] not configured, please add a disk config in `config/filesystems.php`
https://github.com/z-song/laravel-admin/issues/1327
http://laravel-admin.org/docs/#/en/model-form-upload?id=upload-to-local
config/filesystems.php 新增
'disks' => [
    ... ,

    'admin' => [
        'driver' => 'local',
        'root' => public_path('uploads'),
        'visibility' => 'public',
        'url' => env('APP_URL').'/uploads', // 要改.env的 APP_URL为正确访问的网址
        'url' => admin_asset('uploads'), // 避免{{ Admin::user()->avatar }}破圖
    ],
],
ps. laravel-admin會破圖的views是放在 vendor/encore/laravel-admin/resources/views/partials/sidebar.blade.php

為什麼 {{ Admin::user()->avatar }} 是取出完整網址,但db只存對應路徑?
vendor/encore/laravel-admin/src/Auth/Database/Administrator.php
Administrator的 getAvatarAttribute() 把它改了
return admin_asset('/vendor/laravel-admin/AdminLTE/dist/img/user2-160x160.jpg'); // 沒上傳頭像返回預設圖,預設圖不破圖

admin_asset() 如何運作?
在vendor/encore/laravel-admin/src/helpers.php 的 admin_asset()這裡

不要在config裡面用helpers
https://github.com/laravel/framework/issues/7671
這樣會造成 composer dumpautoload報錯
$ composer dumpautoload
Generating optimized autoload files
> Illuminate\Foundation\ComposerScripts::postAutoloadDump
> @php artisan package:discover

In UrlGenerator.php line 111:

  Argument 2 passed to Illuminate\Routing\UrlGenerator::__construct() must be
   an instance of Illuminate\Http\Request, null given, called in /var/wwwroot
  /project/vendor/laravel/framework/src/Illuminate/Routing/RoutingServicePro
  vider.php on line 61

Script @php artisan package:discover handling the post-autoload-dump event returned with error code 1


參考資料:
https://github.com/z-song/laravel-admin

2018年9月22日 星期六

laravel 常見問題


重複使用query builder

https://stackoverflow.com/questions/30235551/laravel-query-builder-re-use-query-with-amended-where-statement
使用 clone
$oQuery = Model::where('is_test', '=', '0')->groupBy('name');

$oQuery1 = clone $oQuery;
$oQuery1Results = $oQuery1->where('content','like','%2%')->get();
$oQuery2 = clone $oQuery;
$oQuery2Results = $oQuery2->where('content','like','%0%')->get();


安裝Start Bootstrap Admin 2( SB Admin 2 )

https://startbootstrap.com/template-overviews/sb-admin-2/
Step 1. 安裝新的Laravel
$ composer create-project --prefer-dist laravel/laravel blog
Step 2. 下載 SB Admin 
Download SB Admin Theme
Point 1. 新建 public/theme/ 目錄
Point 2. 將SB Admin解壓縮出來的data, dist, vendor目錄放到theme目錄
Step 3. 生成路由
routes/web.php 新增
Route::get('my-home', 'HomeController@myHome');
Route::get('my-users', 'HomeController@myUsers');
Step 4. 新增控制器
app/Http/Controllers/HomeController.php
(內容見上面教程)
Step 5. 設定theme 的blade檔案
新建 resources/views/theme/ 目錄,並生成三個文件
resources/views/theme/default.blade.php
resources/views/theme/header.blade.php
resources/views/theme/sidebar.blade.php
(內容見上面教程)
ps . <script src="{!! asset('theme/data/morris-data.js') !!}"></script> 必須有畫圖表再加載,否則會報js錯誤
Step 6. 使用theme
新建下面兩個檔案
resources/views/myHome.blade.php
resources/views/myUsers.blade.php
(內容見上面教程)

生成.env的APP_KEY

$ php artisan key:generate

名詞

Accessor - 訪問器 => getFirstNameAttribute()
Mutator - 修改器 => setFirstNameAttribute()
guards - 看守器
providers - 提供器

用戶認證(Authentication)

https://laravel-china.org/docs/laravel/5.7/authentication/2269
https://laravel.com/docs/5.7/authentication
快速生成身分驗證所需的路由和視圖
$ php artisan make:auth
打開註冊頁
http://laravel.localhost/login
點Register註冊一個新帳號,users.password 將會以Hash儲存,然後就能以此新帳號登入

使用username登入
https://laracasts.com/discuss/channels/laravel/how-to-use-authentication-using-username-instead-of-email
app/Http/Controllers/Auth/LoginController.php 新增
public function username(){
    return 'username';
}
resources/views/auth/login.blade.php 前端也要做處理,以免被input.type=email擋住
使用email或username登入
https://stackoverflow.com/questions/42708942/allow-login-using-username-or-email-in-laravel-5-4
app/Http/Controllers/Auth/LoginController.php
public function username() {
   $login = request()->input('login');
   $field = filter_var($login, FILTER_VALIDATE_EMAIL) ? 'email' : 'username';
   request()->merge([$field => $login]);
   return $field;
}
讓Ardent能夠使用Authenticatable
https://stackoverflow.com/questions/46419933/laravel-ardent-with-authenticatable-user-model/46421896#46421896
建議參考 Illuminate/Foundation/Auth/User 的User類別的實作方式到你的model上,然後繼承Ardent

使用Tinker

https://www.sunzhongwei.com/using-laravel-tinker-for-laravel-admin-add-background-administrator
Tinker(修補匠) - 與你的laravel應用程式互動(Interact with your application)
$ php artisan tinker
Psy Shell v0.9.9 (PHP 7.1.7 — cli) by Justin Hileman
>>> $user = new App\Models\User();
=> App\Models\User {#3116}
>>> $user->password = Hash::make('1234qwer');
=> "$2y$10$KRgwZyc8j.3rgE0kBMW/8usLnsc3DGuZ6GtT3JiI1zgsBlxstq8RG"
>>> $user->email = 'tinker@example.com';
=> "tinker@example.com"
>>> $user->save();
=> true
可以直接在命令行執行laravel

不同網站同一個專案
https://stackoverflow.com/questions/40604788/multiple-websites-with-one-laravel-installation
Route::group(['domain' => 'example.com')], function () {
    // All routes for the first domain go here.
}

多個域名走同一個路由
https://stackoverflow.com/questions/18603330/can-i-group-multiple-domains-in-a-routing-group-in-laravel
$appRoutes = function() {
    Route::get('/',function(){
        ...
    }); 
};

Route::group(array('domain' => 'app.example.com'), $appRoutes);
Route::group(array('domain' => 'dev.app.example.com'), $appRoutes);

子域名路由不作用
https://stackoverflow.com/questions/41703192/laravel-subdomain-routing-is-not-working
因為路由有先後順序(先來先服務),所以子域名同路徑的路由必須寫在前面
Route::group(['domain' => 'admin.localhost'], function () {
    Route::get('/', function () {
        return "This will respond to requests for 'admin.localhost/'";
    });
});

Route::get('/', function () {
    return "This will respond to all other '/' requests.";
});
下面例子子域名路由不作用
Route::get('/', function () {
    return "This will respond to all '/' requests before the route group gets processed.";
});

Route::group(['domain' => 'admin.localhost'], function () {
    Route::get('/', function () {
        return "This will never be called";
    });
});

在路由中動態加載域名
https://stackoverflow.com/questions/34501476/laravel-5-routes-group-domains-from-rows-in-database
這邊可以使用Eloquent
$domains = \App\Domain::where('status', '1')->get()->pluck('email');

foreach ($domains as $domain) {
    Route::group(['domain' => $domain], function () {
        Route::get('/{linkName}', 'RetargetController@retarget');
        Route::get('/', function () {
            abort(404);
        });
    });
}

php artisan make:auth 與Ardent的衝突
laravel 官方驗證 php artisan make:auth後會生成 Http/Controllers/Auth/RegisterController.php 其中的創建用戶方法create()是這麼寫的
return User::create([
  ...
  'password' => Hash::make($data['password']),  => $data['password']
如果你的User已經繼承了Ardent,而且 autoHashPasswordAttributes 了 password這個欄位,password將會被Hash兩次造成登入不了的bug... 這時候需在 RegisterController::create()中取消password字段的Hash


2018年9月4日 星期二

PHP中的自動加載

目的:
new一個class時不需要寫require。 PHP 5.2 新增自動加載的魔術方法__autoload($class_name)

一、__autoload()的使用

__autoload.php
$db = new DB();

Height::test();  //也是支持静态方法直接调用的

function __autoload($className)
{
    require $className . '.php';
}
DB.php(同個目錄下)
class DB
{
    public function __construct()
    {
        echo 'Hello DB';
    }
}
Height.php(同個目錄下)
class Height
{
    public function __construct()
    {
        echo 'Hello Height';
    }

    public static function test(){
     echo 'Hello Height test';
    }
}

二、spl_autoload_register 使用

__autoload()不允許加載不同路徑的文件,因為一個項目中只能有一個__autoload()。因此spl_autoload_register()誕生。當我們new一個找不到的class時,PHP會自動調用spl_autoload_register註冊的函數
class autoloading{
    //必须是静态方法,不然报错
    public static function load($className)
    {
        require $className . '.php';
    }
}
//2种方法都可以
spl_autoload_register(array('autoloading','load')); 
// spl_autoload_register('autoloading::load');
$db = new DB(); //会自动找到

三、多个spl_autoload_register的使用

function load1($className)
{
    echo 1;
    if (is_file($className . '.php')) {
        require $className . '.php';
    }
}
function load2($className)
{
    echo 2;
    if (is_file('./app/' . $className . '.php')) {
        require './app/' . $className . '.php';
    }
}
function __autoload($className)
{
    echo 3;
    if (is_file('./lib/' . $className . '.php')) {
        require './lib/' . $className . '.php';
    }
}
//注册了3个
spl_autoload_register('load1');
spl_autoload_register('load2');
spl_autoload_register('__autoload');
$db = new DB(); //DB就在本目录下
$info = new LibInfo(); //LibInfo 在/lib/LibInfo.php

var_dump(spl_autoload_functions());

輸出:
1
Hello DB
1
2
3
Hello LibInfo
array (size=3)
  0 => string 'load1' (length=5)
  1 => string 'load2' (length=5)
  2 => string '__autoload' (length=10)

使用spl_autoload_functions() 來查一共註冊了多少個自動加載
spl_autoload_register()使用時,__autoload()會無效,必須重新註冊進來才有效

四、spl_autoload_register自動加載+namespace命名空間

根據 PSR-0 的規範,使用namespace就能找到詳細的路徑,從而找到class文件
spl_autoload_register_namespace.php
//定义当前的目录绝对路径
define('DIR', dirname(__FILE__));
//加载这个文件
require DIR . '/loading.php';
//采用`命名空间`的方式注册。php 5.3 加入的
//也必须是得是static静态方法调用,然后就像加载namespace的方式调用,注意:不能使用use
spl_autoload_register("\\AutoLoading\\loading::autoload"); 

$oMySQL = new Libary\Db\MySQL();
$oMySQL->bear();

// 调用2个namespace类
//定位到Libary目录下的Name.php 
Libary\Name::test();
//定位到App目录下Android目录下的Name.php
App\Android\Name::test();

loading.php
namespace AutoLoading;
class loading {
    public static function autoload($className) {
        //根据PSR-O的第4点 把 \ 转换层(目录风格符) DIRECTORY_SEPARATOR ,
        //便于兼容Linux文件找。Windows 下(/ 和 \)是通用的
        //由于namspace 很规格,所以直接很快就能找到
        $fileName = str_replace('\\', DIRECTORY_SEPARATOR, DIR . '\\' . $className) . '.php';
        if (is_file($fileName)) {
            require $fileName;
        } else {
            echo $fileName . ' is not exist';die;
        }
    }
}

Libary/Db/MySQL.php
namespace Libary\Db;
use Libary\Name; // use放這
class MySQL
{
    public function __construct()
    {
        echo __NAMESPACE__ . "";
    }
    public static function test()
    {
        echo  __NAMESPACE__ . ' static function test ';
    }
    public function bear(){
        Name::getInstance(); // 呼叫 Libary/Name.php 的 static function getInstance()
    }
}

Libary/Name.php
namespace Libary;
use Libary\Db\MySQL; // use放在這
class Name
{
    public function __construct()
    {
        echo __NAMESPACE__ . "";
    }
    public static function test()
    {
        // $oMySQL = new Libary\Db\MySQL();  // D:\bear\www\test\autoload\Libary\Libary\Db\MySQL.php is not exist
        // $oMySQL = new Db\MySQL(); // OK
        // use Libary\Db\MySQL; // Parse error: syntax error, unexpected 'use' (T_USE)
        $oMySQL = new MySQL(); // 打印第二個 Libary\Db
        echo  __NAMESPACE__ . ' static function test ';
    }
    public static function getInstance(){
        echo __NAMESPACE__ . ":getInstance";
    }
}

App/Android/Name.php
namespace App\Android;
class Name
{
    public function __construct()
    {
        echo __NAMESPACE__ . "";
    }
    public static function test()
    {
        echo  __NAMESPACE__ . ' static function test ';
    }
}

輸出:
Libary\Db
Libary:getInstance
Libary\Db
Libary static function test
App\Android static function test

s


...using __autoload() is discouraged and may be deprecated or removed in the future.
使用 __autoload() 是將會被棄用的(PHP 7.2.0),因為只能使用一次。應使用spl_autoload_register() 

use Libary\Db\MySQL;  // use 使用絕對路徑,放在class外面,namespace後面

參考資料:
https://www.zybuluo.com/phper/note/66447  PHP中的自动加载
https://stackoverflow.com/questions/12702527/how-to-call-autoload-in-php-code  How to call __autoload() in php code
https://stackoverflow.com/questions/33342994/unexpected-use-t-use-when-trying-to-use-composer  unexpected 'use' (T_USE) 
https://www.php-fig.org/psr/psr-0/  PSR-0: Autoloading Standard

2018年8月6日 星期一

git revert merge commit心得

情境
developer_c 將未測過的分支merge到主分支上,然而要如何處理此情況?
(下圖中 developer_c 所有的提交都是沒測過的,線上git log沒有的)

$ git log --graph --decorate
* commit 17d7378fbc6158ba78dda5bee3888946262dae00 (origin/v/1.0)
| Author: developer_c <you@example.com>
| Date:   Wed Aug 1 14:27:36 2018 +0800
|
|     developer_c commit 2
|
*   commit 343d7522c01f0a23694c23bf100e64c73fd564ac
|\  Merge: 11a53f7 d785818
| | Author: developer_c <you@example.com>
| | Date:   Wed Aug 1 14:26:41 2018 +0800
| |
| |     Merge branch 'v/1.0' of www.gitlab.com:root/admin into v/1.0.cy
| |
| *   commit d7858187c1047c3070b7cf22e8ecc73662fa36ff
| |\  Merge: 3152999 3aa9df2
| | | Author: developer_y <developer_y@example.com>
| | | Date:   Mon Jul 30 16:43:21 2018 +0800
| | |
| | |     Merge branch 'v/1.0' of www.gitlab.com:root/admin into v/1.0
| | |
| | * commit 3aa9df2a1bce8a2140dbdc284c99281101d13c28
| | | Author: developer_k <developer_k@developer_k-VirtualBox>
| | | Date:   Sat Jul 28 14:39:24 2018 +0800
| | |
| | |     developer_k commit 3
| | |
| | * commit 5613362f2dd3f880dd51e93490674b09ad002658
| | | Author: developer_k <developer_k@developer_k-VirtualBox>
| | | Date:   Sat Jul 28 13:42:34 2018 +0800
| | |
| | |     developer_k commit 2
| | |
| | * commit c1c959dff6814d3265f83a74abe7ada284d1fcd4
| | | Author: developer_k <developer_k@developer_k-VirtualBox>
| | | Date:   Fri Jul 27 18:44:38 2018 +0800
| | |
| | |     developer_k commit 1
| | |
| | * commit 061a2e49e399a52fa9750f6ac283f00bdfdbc839
| | | Author: developer_b <developer_b@example.com>
| | | Date:   Thu Jul 26 16:55:41 2018 +0800
| | |
| | |     developer_b commit 1
| | |
| * | commit 315299970b9e47c35e1f5b623fbfc063a9f2f2b7
| |/  Author: developer_y <developer_y@example.com>
| |   Date:   Mon Jul 30 16:43:01 2018 +0800
| |
| |       developer_y commit 4
| |
| * commit ea2d0d563cfd576a59d174d684411d3d7209f7c4
| | Author: developer_y <developer_y@example.com>
| | Date:   Thu Jul 26 10:03:13 2018 +0800
| |
| |     developer_y commit 3
| |
* |   commit 11a53f77caf39dc0444852d97e7e647cf1a2227c
|\ \  Merge: daa70a6 67528e6
| |/  Author: developer_c <you@example.com>
| |   Date:   Wed Jul 25 18:49:01 2018 +0800
| |
| |       Merge branch 'v/1.0' of www.gitlab.com:root/admin into v/1.0.cy
| |
| * commit 67528e6cd2e20c128637f23adb9672d7eddfbca4
| | Author: developer_y <developer_y@example.com>
| | Date:   Tue Jul 24 15:27:15 2018 +0800
| |
| |     developer_y commit 2
| |
| * commit 24ea51e72478735b03a86e9beab9d49036d62278
| | Author: developer_y <developer_y@example.com>
| | Date:   Mon Jul 23 13:51:06 2018 +0800
| |
| |     developer_y commit 1
| |
* | commit daa70a6a8514ee0ff790b15433f92d0d2f58d6c7 (origin/v/1.0.cy)
|/  Author: developer_c <you@example.com>
|   Date:   Fri Jul 20 10:27:21 2018 +0800
|
|       developer_c commit 1
|

developer_c commit 2 ( 17d7378 ) 因為是合併後再提交的,所以直接revert就好
$ git revert 17d7378fbc6158ba78dda5bee3888946262dae00

Merge branch 'v/1.0' of www.gitlab.com:root/admin into v/1.0.cy ( 343d752 ) 因為是merge 的commit ,必須指名 -m 參數才能revert。然而這分支中間又合併了一次 Merge branch 'v/1.0' of www.gitlab.com:root/admin into v/1.0.cy (11a53f7
所以必須 -m 2343d752 分支上的  11a53f7daa70a6 回復
$ git revert -m 2 343d7522c01f0a23694c23bf100e64c73fd564ac

使用git log -p file_name、 git show commit 檢查中間commit(如 3aa9df2、3152999)的修改沒有受影響

參考資料:
https://stackoverflow.com/questions/7099833/how-to-revert-a-merge-commit-thats-already-pushed-to-remote-branch  How to revert a merge commit that's already pushed to remote branch?


2018年7月30日 星期一

wireshark 使用心得

抓包本機(192.168.1.190)到測試機(192.168.1.154)所有api.xxx.com(測試機154上可能有多個網址,但是我們只要觀察api網址)的http封包
過濾器:
http && ip.addr == 192.168.1.154 && ip.src == 192.168.1.190 && ip.dst == 192.168.1.154 && http.host == "api.xxx.com"


抓包中文亂碼

如用wireshark抓包搜索時的ajax請求
但是wireshark中 Follow -> HTTP Stream 顯示的中文無法顯示
要把 Show data as 改成 UTF-8


2018年7月5日 星期四

netstat 使用心得

$ netstat -ant
Rellik:通常是拿來 debug
服務可能被 ddos 之類的
要看總連線數
-ant 可能會發現 established 異常過高, 或是 time_wait 連線數異常之類的
就情境不太依樣

$ netstat -tlunp
只看哪些服務被listen

-l 通常只是列出本機有在 listen
t = tcp
u = udp
p = 列出哪隻程式


netstat 也能看出有沒跑起怪東西
sshd有兩個是因為 :::xxxx 是ipv6的關係

避免memcached 的port對外
/etc/sysconfig/memcached
OPTIONS="-l 127.0.0.1 -U 0"

Proto Recv-Q Send-Q Local Address           Foreign Address         State       PID/Program name
tcp        0      0 127.0.0.1:11211         0.0.0.0:*               LISTEN      19291/memcached
tcp        0      0 0.0.0.0:22              0.0.0.0:*               LISTEN      3396/sshd

0 0.0.0.0:22 => 對外
以防止被當做DDos攻擊跳板

參考資料:
https://blog.gslin.org/archives/2018/02/28/8177/%E9%80%8F%E9%81%8E-memcached-udp-port-11211-%E7%9A%84%E6%94%BB%E6%93%8A/  透過 memcached UDP (Port 11211) 的攻擊...
https://www.digitalocean.com/community/tutorials/how-to-install-and-secure-memcached-on-centos-7  How To Install and Secure Memcached on CentOS 7


2018年7月4日 星期三

chrome 刪除網址列搜尋建議

如圖,想把第一個和第二個搜尋建議刪除掉
解法:
Shift+Del

參考資料:
https://superuser.com/questions/1076461/how-to-delete-address-bar-suggestions  How to delete address bar suggestions
http://www.yosia.net/article/375  如何移除 chrome 裡的搜尋建議


2018年6月21日 星期四

解決 307 Internal Redirect

某個網址原本有https被拿掉後,chrome輸入http的網址自動轉跳到https然後顯示 ERR_CONNECTION_REFUSED
開發者工具勾選Preserve Log看,發現是 307 Internal Redirect

如何解決?
https://stackoverflow.com/questions/25277457/google-chrome-redirecting-localhost-to-https/28586593#28586593
chrome瀏覽器打開 chrome://net-internals/#hsts 
先在 Query HSTS/PKP domain 查你被 307 Internal Redirect 的域名,如果是Not Found,這邊就不是你要的答案
如果有內容,如下圖
那就到 Delete domain security policies 輸入你被 307 Internal Redirect 的網址,然後Delete 他
現在你能使用HTTP訪問該網址了


2018年4月26日 星期四

解決JSON.stringify()報錯Converting circular structure to JSON

因為現在遇到一套程式一部分被js uglify過了。使用JSON.stringify()要看他的object全貌,報錯
JSON.stringify(gagame.Games.getCurrentGame().getCurrentGameMethod())
Uncaught TypeError: Converting circular structure to JSON
    at JSON.stringify (<anonymous>)
    at <anonymous>:1:6
解法:
使用 circular-json
將 circular-json.js  直接貼到console下就可以照下面方法用了
CircularJSON.stringify(gagame.Games.getCurrentGame().getCurrentGameMethod())
...// json string will show here
(然後複製貼到sublime後去美化JSON觀察這個object)


參考資料:
https://stackoverflow.com/questions/11616630/json-stringify-avoid-typeerror-converting-circular-structure-to-json/31817879#31817879  JSON.stringify, avoid TypeError: Converting circular structure to JSON
https://github.com/WebReflection/circular-json  CircularJSON


2018年3月28日 星期三

VirtualBox 安裝CentOS-6.9

使用VirtualBox(5.2.8 -> 4.3.10) 安裝CentOS 6.9
PHP 5.5 Redis Memcache Supervisor Beanstalk
MySQL 5.6(略,裝在Windows7 host機上 )

開機自動啟動eth0網路
# vi /etc/sysconfig/network-scripts/ifcfg-eth0
ONBOOT=no
ONBOOT=yes

6.9 yum預設安裝的php是5.3.3版本
因為CentOS通常提供7-10年的生命週期,所以這很難讓php(和其他packages)維持在最新的版本,你能這麼做:
1. 裝5.3.3版
2. 使用源碼(source)去編譯安裝(build)
3. 使用有提供可選擇的三方源( 3rd party repository )

我選擇#3

使用webtatic.com源
https://webtatic.com/packages/php55/
Webtatic has now ended support for PHP 5.5
Webtatic 已終止PHP 5.5的支持

使用remirepo源
https://blog.remirepo.net/post/2016/09/10/PHP-5.5-is-dead
安裝remirepo源
# wget http://rpms.famillecollet.com/enterprise/remi-release-6.rpm
# rpm -Uvh remi-release-6*.rpm
warning: remi-release-6.rpm: Header V4 DSA/SHA1 Signature, key ID 00f97f56: NOKEY
Preparing...                ########################################### [100%]
   1:remi-release           ########################################### [100%]
查remirepo源版本
# yum info remi-release
...
Name        : remi-release
Version     : 6.9
如果你要最新的php 5.5.x,必須這樣做
# yum --enablerepo=remi,remi-php55 update -y
安裝PHP 5.5
# yum install php55-php

因為安裝的是remi源的php 5.5,所以命令行直接輸入php會找不到指令,要輸入php55
解法
# source /opt/remi/php55/enable

安裝php-fpm(yum預設的php-fpm是5.3.3的,所以要照下面這樣裝)
# yum install php55-php-fpm

安裝nginx
# yum install nginx

安裝memcached
# yum install memcached

安裝redis
# yum install redis

安裝supervisor
# yum install supervisor
啟動supervisor
# supervisord -c /etc/supervisord.conf
只有supervisor比較特殊,如果用service supervisor start的話,只會執行php artisan queue:listen tube-name 但不會生成 php artisan queue:work tube-name

安裝beanstalk
# yum install beanstalkd

配置nignx
/etc/nginx/conf.d/default.conf
server {
    ...

    location / {
        index index.php  index.html index.htm;
    }
    ...
    # pass the PHP scripts to FastCGI server listening on 127.0.0.1:9000
    #
    location ~ \.php$ {
        root           /usr/share/nginx/html;
        fastcgi_pass   127.0.0.1:9000;
        fastcgi_index  index.php;
        fastcgi_param  SCRIPT_FILENAME   $document_root$fastcgi_script_name;
        include        fastcgi_params;
    }
}
s

啟動php-fpm、nginx、memcached、redis、beanstalkd
# service php55-php-fpm start
# service nginx start
# service memcached start
# service redis start
# service beanstalkd start

開啟80 port
# iptables -I INPUT 5 -i eth0 -p tcp --dport 80 -m state --state NEW,ESTABLISHED -j ACCEPT
# service iptables save
如不開啟 Windows chrome訪問 VM會報錯 ERR_CONNECTION_TIMED_OUT
telnet 會不通,但是在VM上 curl http://localhost 能訪問
配置後,記得換瀏覽器試試,不然chrome配置前訪問過,配置後仍然會卡住
看iptables有哪些規則
# iptables -S
# iptables --line -vnL

開機自動啟動php-fpm、nginx、memcached、redis、beanstalkd
# chkconfig nginx on
# chkconfig php55-php-fpm on
# chkconfig memcached on
# chkconfig redis on
# chkconfig beanstalkd on
檢查
#  chkconfig  --list nginx
nginx           0:off   1:off   2:on    3:on    4:on    5:on    6:off
0~6是linux的runlevel

Virtualbox降版本
原本使用最新版Virtualbox 5.2.8
因為重裝一台Virtualbox也會遇到開機卡在creating process for virtual machine (gui/qt) ... (1/2) 的問題
https://www.youtube.com/watch?v=20p-r5WzYXg
這邊說要降版本到4.3.10
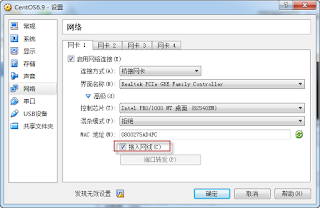
降到4.3.10後打開虛擬機會有連不上網路的問題
# ifup eth0
Determining IP information for eth0... failed; no link present. Check cable?
解法
Virtualbox選你的虛擬機 => 設置 => 網路 => 選你的網卡 => 高級 => 勾選"接入網線"
降版本後開機報錯HostAudioNotResponding
解法(因為當虛擬機當web server用不需要聲音)
Virtualbox選你的虛擬機 => 設置 =>聲音 => 取消勾選"啟用聲音"

安裝php所需擴展
# yum install php55-php-mcrypt
# yum install php55-php-pdo
# yum install php55-php-pecl-memcached
# yum install php55-php-gd  //防止圖片驗證碼報錯:Call to undefined function Johntaa\Captcha\imagecreatefrompng()
# yum install php55-php-pecl-xdebug
# service php55-php-fpm restart


laravel 連不上redis
網頁報錯 Permission denied [tcp://127.0.0.1:6379]
但是 telnet 127.0.0.1 6379 和 redis-cli 可以通
因為
# getsebool httpd_can_network_connect
httpd_can_network_connect --> off
解法
# /usr/sbin/setsebool httpd_can_network_connect=1
Use -P option makes the change permanent. Without this option, the boolean would be reset to 0 at reboot.
使用-P選項使其永久更改,否則重開機設定會被重置
# /usr/sbin/setsebool -P httpd_can_network_connect=1  => VM下實測跑不過
解法2
把它寫到 /etc/rc.d/rc.local 下 => 解決

laravel虛擬域名千萬不能配置有底線(_) 否則會被轉跳到
http://x_web.centos/http://x_web.centos/auth/signin

讓php能在command line使用
因為用remi裝的php55,所以命令行輸入php會找不到,只能用php55
解法:
# source /opt/remi/php55/enable
因為supervisor執行時吃不到這句,所以command路徑要寫完全
command = /opt/remi/php55/root/usr/bin/php /path/artisan queue:listen ga2-xxx

查remi裝的php.ini在哪
# php -i | grep "Loaded Configuration File"
Loaded Configuration File => /opt/remi/php55/root/etc/php.ini

解決 could not find driver 錯誤
# php -m | grep pdo
pdo_sqlite  // 只有這個,沒有pdo_mysql所以出錯
安裝php55-php-mysqlnd(其實我安裝的是php55-php-pecl-mysqlnd-qc,但是會一起裝php55-php-mysqlnd)
# yum install php55-php-pecl-mysqlnd-qc
為什麼會裝php55-php-pecl-mysqlnd-qc?
因為
# yum search pdo_mysql
...
php55-php-pecl-mysqlnd-qc.x86_64 : A query cache plugin for mysqlnd


參考資料:
https://unix.stackexchange.com/questions/138019/php-5-5-13-on-centos-6-5-with-yum  PHP 5.5.13 on CentOS 6.5 with yum
https://webtatic.com/packages/php55/  PHP 5.5 on CentOS/RHEL 7.2, 6.8 and 5.11 via Yum
https://www.binarytides.com/open-http-port-iptables-centos/  Open http port ( 80 ) in iptables on CentOS
https://zh.wikipedia.org/wiki/%E8%BF%90%E8%A1%8C%E7%BA%A7%E5%88%AB  執行級別
https://www.shellhacks.com/ubuntu-centos-enable-disable-service-autostart-linux/  Ubuntu, CentOS – Enable or Disable Service Autostart in Linux
https://stackoverflow.com/questions/27982024/php-command-not-found-after-yum-install-php55-php-cli  php command not found after yum install php55-php-cli
https://stackoverflow.com/questions/8765848/troubleshooting-permission-denied-when-attempting-to-connect-to-redis-from-php  Troubleshooting “Permission denied” when attempting to connect to Redis from PHP script
https://stackoverflow.com/questions/27982024/php-command-not-found-after-yum-install-php55-php-cli  php command not found after yum install php55-php-cli
https://stackoverflow.com/questions/2852748/pdoexception-could-not-find-driver  PDOException “could not find driver”
https://stackoverflow.com/questions/17850787/where-is-the-php-ini-file-on-a-linux-centos-pc  Where is the php.ini file on a Linux/CentOS PC? [duplicate]
https://stackoverflow.com/questions/36019111/pdo-mysql-is-not-available-on-centos-6-7  pdo_mysql is not available on centos 6.7
https://serverfault.com/questions/240015/how-do-i-allow-mysql-connections-through-selinux  how do I allow mysql connections through selinux