2020年4月30日 星期四

Photoshop 使用心得

打開尺標

檢視 => 尺標 ( ctrl + r )

單位改成像素px

https://zhidao.baidu.com/question/76698771  photoshop单位如何把像素改成厘米
編輯 => 偏好設定 => 單位和尺標

向上加大圖片大小

影像 => 版面尺寸 => 高度 = 高度 + xx px

把圖層放到下層

https://tw.answers.yahoo.com/question/index?qid=20110518000015KK04903  請問如何將圖片 移到最下層 (photoshop cs4)
右側開啟圖層面板 => 將圖層放到下面

測間距

切片工具 => 選取區域 => 右鍵 => 編輯切片選項


2020年4月25日 星期六

Windows 10 使用心得

IE 走SSR 代理

IE => 設定 => 進階 => 開啟Proxy設定 => 手動Proxy設定 => 使用Proxy設定「開啟」 => 輸入本機位址和本地SSR 監聽端口
Microsoft Store 和Skype 都會吃到這個設定


在github issues留言時插入code

如果要插入css,使用三個 ` 包起來,前面聲明css


```css
@font-face {  
  ...  
  src: url("assets/vant-icon-db1de1.woff2") format('woff2')  
}
```
s
結果是:


2020年4月22日 星期三

Windows 10的Cordova心得

目標

使用 Cordova https://cordova.apache.org/  搭建 Hybrid App

環境

Windows 10

安裝nodejs、git bash

node、npm、git會自動加到windows的環境變數,如果沒有要手動加
git bash裡面也能執行npm、node

安裝cordova

可在git bash上安裝,cmd一樣也會有cordova
$ npm install -g cordova
npm WARN deprecated request@2.88.2: request has been deprecated, see https://github.com/request/request/issues/3142
C:\Users\user\AppData\Roaming\npm\cordova -> C:\Users\user\AppData\Roaming\npm\node_modules\cordova\bin\cordova
+ cordova@9.0.0
added 434 packages from 357 contributors in 90.515s

檢查版本

$ cordova --version
9.0.0 (cordova-lib@9.0.1)

$ npm list -g cordova
C:\Users\user\AppData\Roaming\npm
`-- cordova@9.0.0

升級cordova

$ npm i -g cordova

新建項目

$ cordova create hello com.example.hello HelloWorld

新增平台(browser)

$ cd hello
$ cordova platform add browser
Using cordova-fetch for cordova-browser@^6.0.0
Adding browser project...
Creating Cordova project for cordova-browser:
        Path: C:\Users\user\WebstormProjects\hello\platforms\browser
        Name: HelloWorld
Plugin 'cordova-plugin-whitelist' found in config.xml... Migrating it to package.json
Discovered saved plugin "cordova-plugin-whitelist". Adding it to the project
Installing "cordova-plugin-whitelist" for browser
Adding cordova-plugin-whitelist to package.json

檢查現在設置的平台

(請注意 platform 和 platforms 命令是同義語.)
$ cordova platform ls
Installed platforms:
  browser 6.0.0
Available platforms:
  android ^8.0.0
  electron ^1.0.0
  ios ^5.0.0
  osx ^5.0.0
  windows ^7.0.0

檢查你build 平台時是否滿足要求(requirements)

$  cordova requirements
Requirements check results for browser:

執行

https://www.youtube.com/watch?v=DEDuc4FpYZs  How To Install Apache Cordova On Windows For Beginners
$ cordova run browser
會打開瀏覽器
修改www/index.html後需重新執行 cordova run browser 才生效

在Android上運行

https://www.youtube.com/watch?v=IA3c2lpoOtU&t=373s  Install Cordova, Import to Android studio to Deploy using PhoneGap Cordova Plugin
https://www.youtube.com/watch?v=31kO-qS4qig&t=192s  Setting up/Installing Cordova - Part 1
安裝Android Studio (略)

安裝java JDK


Cordova 只支持 JDK 1.8

https://stackoverflow.com/a/50644399
You may have a version that is greater than 8 but Cordova only supports JDK 1.8. View this link Cordova Documentation
否則在Android Studio run時會報錯
"C:\Program Files\Android\Android Studio\bin\runnerw.exe" C:\Users\user\AppData\Roaming\npm\cordova.cmd run android
Checking Java JDK and Android SDK versions
Requirements check failed for JDK 8 ('1.8.*')! Detected version: 14.0.1

ps. JAVA SE 8 是 LTS版本,官方支持到 2030 年 12 月

設定java環境變數

本機 => 內容 => 進階系統設定 => 環境變數 => 「Path」點兩下編輯 => 新增 C:\Program Files\Java\jdk1.8.0_251\bin
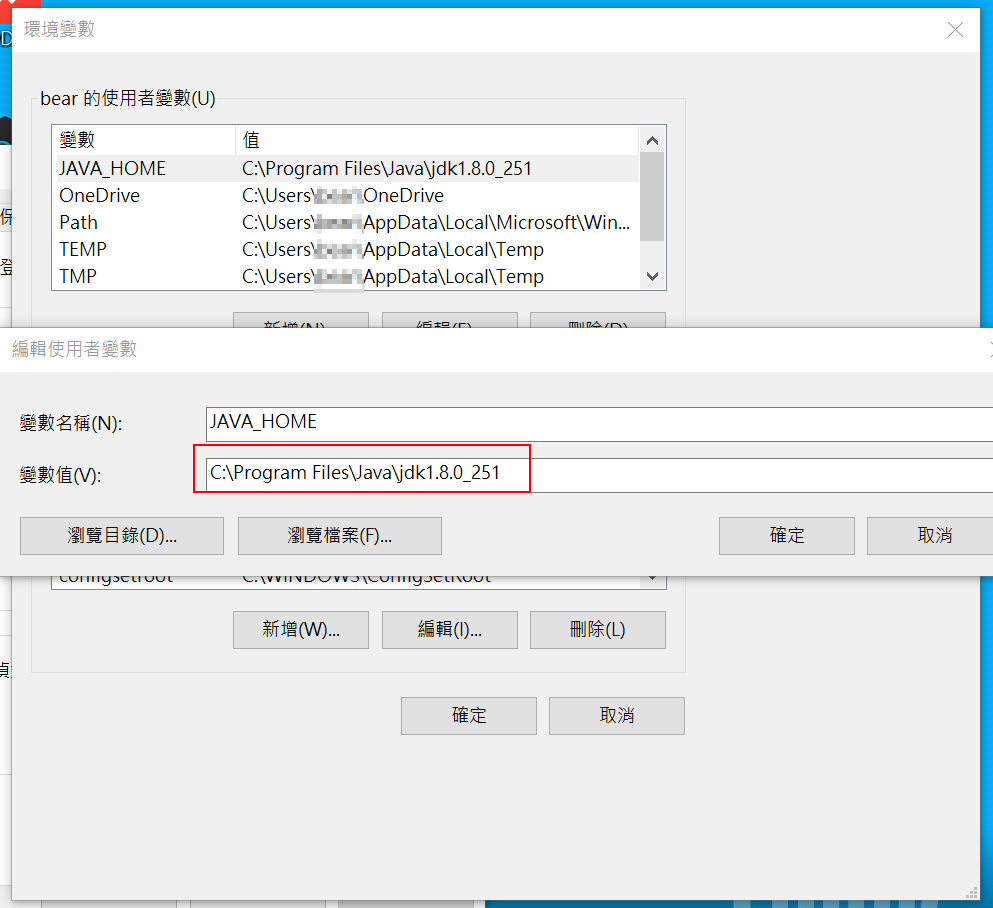
新增使用者變數 JAVA_HOME: C:\Program Files\Java\jdk1.8.0_251
配置完要重新開git bash的session才生效
$ javac -version
javac 1.8.0_251

安裝Android command line tools

到 Android SDK Command Line tools installation page   下載 commandlinetools-win-6200805_latest.zip
新建 C:\android 目錄( ANDROID_HOME ),將 commandlinetools-win-6200805_latest.zip 解壓縮到 C:\android\tools
配置環境變數 ANDROID_HOME :  C:\android  ( 勿設為 C:\android\tools ,否則build時會報這個錯: > Failed to find target with hash string 'android-28' in: C:\android\tools )
設定 Path: %ANDROID_HOME%\tools\bin

安裝Gradle

到 gradle releases page ,下載最新  binary-only 的 Gradle ( gradle-6.3-bin.zip )
解壓縮後將 gradle-6.3 目錄重新命名成 gradle 放到  C:\android\gradle
配置環境變  GRADLE_HOME : C:\android\gradle
設定 Path : %ANDROID_HOME%\gradle\bin

執行 sdkmanager 和 avdmanager 命令

(我在git bash執行)
$ cd /c/android/tools/bin
$ ./sdkmanager.bat --sdk_root=$ANDROID_HOME "build-tools;25.0.3" "emulator" "extras;intel;Hardware_Accelerated_Execution_Manager" "platforms;android-25" "platform-tools" "system-images;android-25;google_apis;x86" --verbose

https://stackoverflow.com/a/60454207  Android Command line tools sdkmanager always shows: Warning: Could not create settings

--sdk_root=$ANDROID_HOME 必須加,否則會報錯:
Warning: Could not create settings
java.lang.IllegalArgumentException


執行完會新增以下資料夾

build-tools - Cordova build Android app使用的工具
emulator - 安卓模擬器,用來預覽你的APP
platforms - Android SDK,以不同版本分開。上面的命令下載了(當時的)最新版本(25)
platform-tools - 管理安卓設備的命令行工具
system-images - 模擬器所需的images

在cmd上就是這樣執行

>sdkmanager --sdk_root=%ANDROID_HOME% --version
3.6.0

$ ./avdmanager.bat -v create avd -n x86 -k "system-images;android-25;google_apis;x86" -g "google_apis"

ps ./sdkmanager.bat 和 ./avdmanager.bat 因為是bat檔不是exe檔,設 Path 後依然沒法在bash全局呼叫

設定環境變數Path

%ANDROID_HOME%\emulator
%ANDROID_HOME%\platform-tools
測試是否正確設置Path
$ adb version
Android Debug Bridge version 1.0.41
Version 29.0.6-6198805
Installed as C:\android\platform-tools\adb.exe

$ gradle -v
Welcome to Gradle 6.3!
...
------------------------------------------------------------
Gradle 6.3
------------------------------------------------------------

Build time:   2020-03-24 19:52:07 UTC
Revision:     bacd40b727b0130eeac8855ae3f9fd9a0b207c60

Kotlin:       1.3.70
Groovy:       2.5.10
Ant:          Apache Ant(TM) version 1.10.7 compiled on September 1 2019
JVM:          1.8.0_251 (Oracle Corporation 25.251-b08)
OS:           Windows 10 10.0 amd64

buid時可能的報錯

File C:\Users\user\.android\repositories.cfg could not be loaded.

https://stackoverflow.com/a/47028911  repositories.cfg could not be loaded in Windows 10 [closed]
建一個空的 repositories.cfg 檔案

Gradle path

Could not find an installed version of Gradle either in Android Studio,
or on your system to install the gradle wrapper. Please include gradle 
in your path, or install Android Studio
Path 設定 gradle\bin 即可

licences have not been accepted

Checking the license for package Android SDK Platform 28 in C:\Users\user\AppData\Local\Android\sdk\licenses
FAILURE: Build failed with an exception.
Warning: License for package Android SDK Platform 28 not accepted.

$ ./sdkmanager.bat --sdk_root=$ANDROID_HOME --licenses 
不要用Android Stuido 的 Cordova Plugins build

創建安卓範例APP

$ cordova create cordova-hello-world
$ cd cordova-hello-world
$ cordova platform add android
$ cordova build
Checking Java JDK and Android SDK versions
ANDROID_SDK_ROOT=undefined (recommended setting)
ANDROID_HOME=C:\android (DEPRECATED)
Starting a Gradle Daemon (subsequent builds will be faster)

BUILD SUCCESSFUL in 27s
1 actionable task: 1 executed
Subproject Path: CordovaLib
Subproject Path: app
...
WARNING: The specified Android SDK Build Tools version (25.0.3) is ignored, as it is below the minimum supported version (28.0.3) for Android Gradle Plugin 3.3.0.
Android SDK Build Tools 28.0.3 will be used.
To suppress this warning, remove "buildToolsVersion '25.0.3'" from your build.gradle file, as each version of the Android Gradle Plugin now has a default version of the build tools.
...
Built the following apk(s):
        C:\Users\user\WebstormProjects\cordova-hello-world\platforms\android\app\build\outputs\apk\debug\app-debug.apk

app-debug.apk 可丟到安卓手機上安裝運行

在模擬器上運行範例APP

到 C:\android\extras\intel\Hardware_Accelerated_Execution_Manager 雙擊 intelhaxm-android.exe 安裝模擬器,然後
$ cordova emulate android
如果報錯 Intel virtualization technology (vt,vt-x) is not enabled ,改在真機上運行

部屬範例APP在你的手機

啟用「開發人員選項」,開啟USB偵錯 (略)
電腦連接上你的手機,允許USB偵錯
用adb令檢查
$ adb devices
List of devices attached
5200d17c4b0845c7        unauthorized => device
部屬APP到你的手機
$ cordova run android
或指定target
$ cordova run android --target=5200d17c4b0845c7

將vue 項目和cordova連結

項目位置
cordova: /c/Users/user/WebstormProjects/cordova-hello-world
vue:/c/Users/user/WebstormProjects/hello-world

如果要使用軟連結

https://askubuntu.com/a/600732  Creating a symlink from one folder to another with different names?
If you want to have a symlink /var/www/html pointing to /home/user/project then you should not have the directory html present beforehand. So, you should only have /var/www and then running the following will create the desired symlink
如果你要將 /var/www/html 做軟連結指向 /home/user/project ,你不應該有 html 目錄。所以你只能有  /var/www 。然後執行這個命令:
$ ln -s /home/user/project /var/www/html

所以,刪除 cordova-hello-world 的 www/ ,然後
$ ln -s /c/Users/user/WebstormProjects/hello-world/dist /c/Users/user/WebstormProjects/cordova-hello-world/www

ps. git bash的軟連結感覺只是複製過去一次。沒法像linux一樣源目錄內容改了後就自動改。最後還是無腦build 出來後複製dist/ 下面檔案過去 www/

安卓上白屏

https://headsigned.com/posts/fixing-blank-screen-on-cordova-phonegap-and-vue/  Fixing blank screen on Cordova/PhoneGap and Vue
因為 Cordova 中檔案是以 file:/// 協議請求,所以跟Vue預設 publicPath '/' 衝突:
<link as="style" href="/css/app.3e7d65e5.css" rel="preload"></link>
<script src="/js/app.85d5fc84.js">
如果配置空字串而不是'/'則是
<link href=css/app.3e7d65e5.css rel=preload as=style>
<script src=js/app.85d5fc84.js>

解法

diff --git a/vue.config.js b/vue.config.js
 module.exports = {
+  publicPath: '',
   chainWebpack: config => {
     config.module.rules.delete('eslint');
   },

router bug

https://stackoverflow.com/a/42300688  vue v2, vue-router and cordova
一樣是因為 "file://" 的關係,導致瀏覽器 history API不作用,所以從router中移除"mode: history"即可
diff --git a/src/router/index.js b/src/router/index.js
 const router = new VueRouter({
-  mode: 'history',
+  // mode: 'history',
   base: process.env.BASE_URL,
   routes
 })

mode:history => http://192.168.1.7:8100/about
非mode:history => http://192.168.1.7:8100/#/about

無法對接口發起請求

用cordova打包出的apk,在部分安卓手機(Samsung J6 2018、Oppo F11 V1)上使用axios無法對接口發起請求,在catch裡面alert出來的error是【Error: Network Error】或【TypeError: Cannot read property 'status' of undefined】,Wireshark抓包也抓不到,但部分安卓手機(Xiaomi-Redmi-5、Vivo X20A)可以

原因

https://stackoverflow.com/a/54752717  Why am I seeing net::ERR_CLEARTEXT_NOT_PERMITTED errors after upgrading to Cordova Android 8?
The default API level in the Cordova Android platform has been upgraded. On an Android 9 device, clear text communication is now disabled by default.
Cordova Android平台的預設API等級已經升級了,在Android 9設備明文通訊(clear text communication)預設被禁用  => https接口估計不受影響
所以Vivo X20A (安卓版本 8.15.1)可以請求,但安卓版本10(Samsung J6 2018、Oppo F11 V1)不行

解法

To allow clear text communication again, set the android:usesCleartextTraffic on your application tag to true:
再次啟用明文通訊(clear text communication),在application標籤中設置android:usesCleartextTraffictrue
明文通訊(clear text communication)就是http,安卓9以上禁用了http,只允許https
cordova專案修改config.xml
diff --git a/config.xml b/config.xml
index 7434b5e..be66291 100644
--- a/config.xml
+++ b/config.xml
@@ -1,6 +1,6 @@
 <?xml version='1.0' encoding='utf-8'?>
-<widget id="io.cordova.hellocordova" version="1.0.0" xmlns="http://www.w3.org/ns/widgets" xmlns:cdv="http://cordova.apache.org/ns/1.0">
-    <name>HelloCordova</name>
+<widget id="io.cordova.hellocordova" version="1.0.0" xmlns="http://www.w3.org/ns/widgets" xmlns:cdv="http://cordova.apache.org/ns/1.0" xmlns:android="http://schemas.android.com/apk/res/android">
+    <name>HelloCordova2</name>
     <description>
         A sample Apache Cordova application that responds to the deviceready event.
     </description>
@@ -18,6 +18,9 @@
     <allow-intent href="geo:*" />
     <platform name="android">
         <allow-intent href="market:*" />
+        <edit-config file="app/src/main/AndroidManifest.xml" mode="merge" target="/manifest/application">
+            <application android:usesCleartextTraffic="true" />
+        </edit-config>
     </platform>
     <platform name="ios">
         <allow-intent href="itms:*" />
...
+   <icon src="res/icon.png" />

在  <platform name="android"> 新增

<edit-config file="app/src/main/AndroidManifest.xml" mode="merge" target="/manifest/application">
    <application android:usesCleartextTraffic="true" />
</edit-config>
以修改 platforms/android/app/src/main/AndroidManifest.xml 的manifest.application 新增android:usesCleartextTraffic="true"


<name>HelloCordova2</name>

修改APP的名字

xmlns:android="http://schemas.android.com/apk/res/android"

As noted in the comments, if you have not defined the android XML namespace previously, you will receive an error: unbound prefix during build. This indicates that you need to add it to your widget tag in the same config.xml, like so:
如果你還沒定義android XML命名空間,避免 cordova build 時報 error: unbound prefix 錯誤,需要在config.xmlwidget標籤新增 xmlns:android="http://schemas.android.com/apk/res/android" 

https://github.com/dpa99c/cordova-custom-config/issues/24#issuecomment-172981002  Error parsing XML: unbound prefix when doing cordova build android
ps.
因為加了<tag android:abc>(<application android:usesCleartextTraffic="true" />),如果直接cordova build會報錯(unbound prefix),但是還是會修改 platforms/android/app/src/main/AndroidManifest.xml ,但是 platforms/ 被corodva根目錄gitignore了,你也不會發現有改變(坑)。所以要加 xmlns:android="http://schemas.android.com/apk/res/android" 

<icon src="res/icon.png" />

設定APP的圖標,不設定就是用cordova預設的圖標

iOS打包

$ cordova create hello com.example.hello "HelloWorld"
$ cd hello
$ cordova platform add ios
$ cordova build ios
在模擬器上執行
$ cordova emulate ios
查看到所有可用的目標
$ cordova run ios --list
Available ios devices:
Available ios virtual devices:
Apple-TV-1080p, tvOS 13.4
Apple-TV-4K-4K, tvOS 13.4
Apple-TV-4K-1080p, tvOS 13.4
Apple-Watch-Series-4-40mm, watchOS 6.2
Apple-Watch-Series-4-44mm, watchOS 6.2
Apple-Watch-Series-5-40mm, watchOS 6.2
Apple-Watch-Series-5-44mm, watchOS 6.2
iPhone-8, 13.4
iPhone-8-Plus, 13.4
iPhone-11, 13.4
iPhone-11-Pro, 13.4
iPhone-11-Pro-Max, 13.4
iPhone-SE--2nd-generation-, 13.4
iPad-Pro--9-7-inch-, 13.4
iPad--7th-generation-, 13.4
iPad-Pro--11-inch---2nd-generation-, 13.4
iPad-Pro--12-9-inch---4th-generation-, 13.4
iPad-Air--3rd-generation-, 13.4

生成ipa

https://medium.com/@vosorio/build-ios-ipa-from-cordova-command-line-80f3e1794e0  Cheatsheet: Build IOS ipa from Cordova command line.
cordova build ios 後,打開 Xcode(必須使用Mac,因為只有Xcode能打包)
1. Open the workspace
./platforms/ios/[app_title].xcworkspace/  (./platforms/ios/HelloWorld.xcworkspace/)
2. 在專案preferences中設定簽名(在Xcode先登錄applie 開發者賬號)


2020年4月16日 星期四

Vue心得

安裝nodejs和npm

https://tecadmin.net/install-latest-nodejs-and-npm-on-centos/  How To Install Latest Nodejs on CentOS/RHEL 7

新增Node.js Yum Repository - Stable 版本(12.x)

# yum install -y gcc-c++ make
# curl -sL https://rpm.nodesource.com/setup_12.x | sudo -E bash -

安裝Node.js

# yum install nodejs

檢查 Node.js 和 NPM 版本

# node -v
v12.16.2
# npm -v
6.14.4

npm命令自動完成

$ npm completion >> ~/.bashrc
$ . ~/.bashrc


升級npm


npm i 就是npm install,只是簡寫
https://stackoverflow.com/questions/6237295/how-can-i-update-nodejs-and-npm-to-the-next-versions  How can I update NodeJS and NPM to the next versions?
# npm install -g npm

安裝/升級Vue Cli

https://cli.vuejs.org/zh/guide/installation.html
# npm install -g @vue/cli
...
-g : 同--global ,global模式安裝,將會安裝到 /usr/lib/node_modules/@vue/cli 下

檢查版本

# vue --version
@vue/cli 4.3.1

npm install的--save是什麼意思

https://stackoverflow.com/a/19578808  What is the --save option for npm install?
npm 5.0.0 後預設將modules裝在dependency,所以 --save 已經不再需要了。另外--save-dev將套件存在devDependencies、--save-optional將套件存在optionalDependencies


創建一個新項目

https://ithelp.ithome.com.tw/articles/10222966  Day28 vue.js - Vue cli 3.0 環境建置

$ vue create hello-world

手動選取要 preset (預先裝置) 的特性

? Please pick a preset:
  default (babel, eslint)
❯ Manually select features

選取要安裝的特性 (用space多選)

預設選了Babel、Linter / Formatter
? Check the features needed for your project: (Press <space> to select, <a> to toggle all, <i> to invert selection)
 ◉ Babel
 ◯ TypeScript
 ◯ Progressive Web App (PWA) Support
 ◉ Router
 ◉ Vuex
 ◉ CSS Pre-processors
 ◉ Linter / Formatter
 ◯ Unit Testing
 ◯ E2E Testing

Babel : JavaScript 編譯器、轉譯器。
Router : Vue 的路由器
Vuex vuex(vue的狀態管理模式)
CSS Pre-processors : CSS 前處理器(如:less、sass)
Linter / Formatter : 程式碼風格檢查和格式化(如:ESlint)

是否使用 Router 歷史記錄模式

? Use history mode for router? (Requires proper server setup for index fallback in production) (Y/n) Y
history 模式,這種模式充分利用 -history.pushState API 來完成 URL 跳轉而無須重新加載頁面。

css預先處理器

? Pick a CSS pre-processor (PostCSS, Autoprefixer and CSS Modules are supported by default): (Use arrow keys)
❯ Sass/SCSS (with dart-sass)
  Sass/SCSS (with node-sass)
  Less
  Stylus

https://stackoverflow.com/a/56422541  Vue CLI CSS pre-processor option: dart-sass VS node-sass?  
簡單說選 dart-sass而不是node-sass 的原因:官方推薦、比較快

ESLint 協助讓你寫的程式符合規範的輔助工具,區分嚴謹程度

? Pick a linter / formatter config:
  ESLint with error prevention only
  ESLint + Airbnb config
❯ ESLint + Standard config
  ESLint + Prettier

提示錯誤的時間點

? Pick additional lint features: (Press <space> to select, <a> to toggle all, <i> to invert selection)
❯◉ Lint on save
 ◯ Lint and fix on commit

配置文件怎麼放

? Where do you prefer placing config for Babel, ESLint, etc.? (Use arrow keys)
❯ In dedicated config files
  In package.json

是否將上述配置儲存到 preset 的 default

? Save this as a preset for future projects? (y/N) N

運行專案項目(開發用)

$ cd hello-world
$ npm run serve

運營專案指定端口

https://cli.vuejs.org/zh/config/#devserver
新增 vue.config.js
所有 webpack-dev-server 的选项 都支持。 vue.config.js 加入:
module.exports = {
  devServer: {
    port: 8100
  }
}
s
然後就能以  http://192.168.1.x:8100/ 訪問專案(當然server 8100端口防火牆要記得開)

關閉ESLint

https://stackoverflow.com/questions/49121110/how-to-disable-eslint-on-vue-cli-3  How to disable eslint on vue-cli 3?
vue.config.js 新增
module.exports = {
    chainWebpack: config => {
        config.module.rules.delete('eslint');
    }
}
這樣 npm run serve 時就不會做 eslint 檢查
WebStorm => Settings => Languages & Frameworks => Javascript => Code Quality Tools => ESLint => 勾選 Disable ESLint

用vue-native-websocket做長連結

https://juejin.im/post/5dd4ebdff265da47c8603e02   9012年末,带你快速上手vue-native-websocket

使用Mint-ui

https://zhuanlan.zhihu.com/p/61403630  2019最受欢迎的前端7个UI框架
https://juejin.im/post/5d674d87e51d4561fa2ec0a6  基于Vue CLI3 搭建五脏俱全的移动端H5应用


安裝

$ npm i mint-ui

使用

src/views/Test.vue:
import Vue from 'vue'
import Mint from 'mint-ui'
import 'mint-ui/lib/style.css'

Vue.use(Mint)
Mint.Toast('提示信息2')
s

import Vue from 'vue'
import Toast from 'mint-ui/lib/toast'
import 'mint-ui/lib/toast/style.css'

Vue.component(Toast.name, Toast)
Toast('提示信息4')
s
或安裝 babel-plugin-component ,可自動加載css
$ npm i babel-plugin-component -D
然後修改 babel.config.js
module.exports = {
  presets: [
    '@vue/cli-plugin-babel/preset'
  ],
  "plugins": [
    ["component", {
      "libraryName": "mint-ui",
      "style": true
    }]
  ]
}

需重新 npm run serve ,就可以這樣使用
import Vue from 'vue'
import { Cell, Checklist, Toast } from 'mint-ui'

Vue.component(Toast.name, Toast)
Toast('提示信息3')
s

打包項目到dist目錄

$ npm run build

如果在Windows上報錯

'vue-cli-service' 不是内部或外部命令,也不是可运行的程序

原因

node_modules/ 是在 CentOS上npm install的,專案在Windows卻不能 npm run serve、build

解法

https://github.com/vuejs/vue-cli/issues/1119#issuecomment-382105533  vue-cli-service does not run in cmd.exe or Powershell
在Windows 上刪除 node_modules/ 後重新 npm install

使用Vant

因為 mint-ui 已經2年以上沒更新了,改用還有在更新的vant
https://youzan.github.io/vant/#/zh-CN/quickstart  快速上手
https://github.com/youzan/vant  youzan/vant

安裝Vant

$ npm i vant -S

檢查已安裝插件的版本

$ npm list vant
hello-world@0.1.0 C:\Users\user\WebstormProjects\hello-world
`-- vant@2.6.3

使用

diff --git a/src/views/About.vue b/src/views/About.vue
 <template>
   <div class="about">
     <h1>This is an about page</h1>
+    <van-button type="primary">主要按钮2</van-button>
   </div>
 </template>
+<script>
+import Vue from 'vue'
+import Button from 'vant/lib/button'
+import 'vant/lib/button/style'
+Vue.component(Button.name, Button)
+export default {
+}
+</script>

Vue.component(Button.name, Button) - 沒引入會報錯 [Vue warn]: Unknown custom element: <van-button> - did you register the component correctly? For recursive components, make sure to provide the "name" option.
https://github.com/youzan/vant/issues/359#issuecomment-347491408  全局注册的组件在单文件中不识别 #359
chenjiahan: Vue.use 是注册插件用的,注册组件请使用 Vue.component
export default {} - 沒寫會報錯 TypeError: Cannot set property 'render' of undefined
https://stackoverflow.com/a/51021896  Cannot set property 'render' of undefined

自動引入style

安裝babel-plugin-import 插件
$ npm i babel-plugin-import -D

babel 7 在 babel.config.js 配置
diff --git a/babel.config.js b/babel.config.js
   plugins: [
     ['component', {
       libraryName: 'mint-ui',
       style: true
     }],
+    ['import', {
+      libraryName: 'vant',
+      libraryDirectory: 'es',
+      style: true
+    }, 'vant']
   ]
 }
一定要用 babel-plugin-import,用 babel-plugin-component 會報錯
Module not found: Error: Can't resolve 'vant/lib/toast/style.css' in

import Vue from 'vue'
import { Button } from 'vant'
Vue.component(Button.name, Button)
export default {
}
就是少寫import css那一行

ps. https://www.npmjs.com/package/@vue/cli-plugin-babel  @vue/cli-plugin-babel
@vue/cli-plugin-babel 使用 Babel 7

修正Cordova中字體文件路徑錯誤

環境: vant@2.6.3cordova@9.0.0
https://github.com/youzan/vant/issues/2366  file://协议下加载字体文件路径错误 #2366
https://stackoverflow.com/q/14575208  Using css font-face in a Phonegap Windows Phone 8 app

Tabbar 上的圖是用 vant-icon-db1de1.woff2 畫出來的,但在cordova中一樣因為 file:// 協議的關係,使得字型缺失
vant-icon-db1de1.woff2 是在 node_modules/vant/es/icon/index.css 的 @font-face 中請求 https://img.yzcdn.cn/vant/vant-icon-db1de1.woff2 來的

解法

將 vant-icon-db1de1.woff2 下載到本地  src/assets/vant-icon-db1de1.woff2 。 src/App.vue 加入( 從node_modules/vant/es/icon/index.css 的 @font-face 粘過來修改)
@font-face {
  font-weight: 400;
  font-family: vant-icon;
  font-style: normal;
  font-display: auto;
  src: url("assets/vant-icon-db1de1.woff2") format('woff2')
}
即可


2020年4月14日 星期二

DesignPatternsPHP

下載

https://github.com/domnikl/DesignPatternsPHP
$ git clone git@github.com:domnikl/DesignPatternsPHP.git

瀏覽文檔(可選)

修改端口

因為8080被laradock佔用了,所以要改端口
docker-compose.yml
services:
  nginx:
    port:
      - "8090:80"

# docker-compose up --build
然後打開 http://192.168.1.x:8090/ 即可瀏覽像  https://designpatternsphp.readthedocs.io/en/latest/README.html 一樣的文檔
這個步驟新增了幾個images:
designpatternsphp_nginx   latest              3867bfce0be3        2 minutes ago       139MB
composer                  latest              b7fba84aad57        20 hours ago        179MB
python                    latest              d47898c6f4b0        9 days ago          933MB
nginx                     latest              ed21b7a8aee9        10 days ago         127MB

進入容器後發現沒php

# docker exec -it designpatternsphp_nginx_1 bash
root@adcb4fe4d5bb:/usr/share/nginx/html# php -v
bash: php: command not found

因為這個commit 把 php:7.3.8-cli 拿掉了..
commit be66dcc037f8b2293134efe3cc3f2e87a25b8f80
Author: Dominik Liebler <liebler.dominik@gmail.com>
Date:   Fri Apr 3 13:56:33 2020 +0200

    #376 use multi-stage Docker build

diff --git a/Dockerfile b/Dockerfile
index d62cca0..e319867 100644
--- a/Dockerfile
+++ b/Dockerfile
@@ -1,9 +1,17 @@
-FROM php:7.3.8-cli
+FROM composer AS composer
...

所以容器內跑不動 phpunit ...而且還沒composer install,所以 ./vendor/bin/phpunit 還不存在

跑composer install

我的hyper-v PHP 版本是7.3
# composer install
...
  Problem 1
    - This package requires php >=7.4 but your HHVM version does not satisfy that requirement.
因為
commit 579a5ac946330c8b966a23ba3a53434487c26941
Author: Dominik Liebler <liebler.dominik@gmail.com>
Date:   Sat Dec 14 12:50:05 2019 +0100

    update deps & install rector
...
diff --git a/composer.json b/composer.json
...
-        "php": ">=7.2",
+        "php": ">=7.4",

使用composer容器做composer install

[root@localhost DesignPatternsPHP]# docker run --rm --interactive --tty \
>   --volume $PWD:/app \
>   composer install

--rm : 自動移除容器,當離開時
--interactive :即-i ,保持STDIN開啟,即使不attached
--tty : 即-t
--volume :即-v

即可順利composer install 建立vendor/
但是還是不能用 php 7.3 跑 DesignPatternsPHP,因為用到了7.4的語法
# ./vendor/bin/phpunit
PHP Parse error:  syntax error, unexpected 'Handler' (T_STRING), expecting function (T_FUNCTION) or const (T_CONST) in /root/DesignPatternsPHP/Behavioral/ChainOfResponsibilities/Tests/ChainTest.php on line 14


使用php7.4-cli

新建 Dockerfile2 
FROM php:7.4-cli
COPY . /usr/src/myapp
WORKDIR /usr/src/myapp
RUN pecl install xdebug-2.8.1 \
    && docker-php-ext-enable xdebug \
    && echo "xdebug.remote_enable=1" >> /usr/local/etc/php/php.ini \
    && echo "xdebug.remote_connect_back=1" >> /usr/local/etc/php/php.ini \
    && echo "xdebug.idekey=PHPSTORM" >> /usr/local/etc/php/php.ini \
    && echo "xdebug.remote_log=/tmp/xdebug.log" >> /usr/local/etc/php/php.ini

CMD [ "php", "./vendor/bin/phpunit" ]

[root@localhost DesignPatternsPHP]# docker build -f Dockerfile2 -t my-php-7.4-cli .
這個步驟新增了幾個images:
my-php-7.4-cli            latest              11a27014b3a0        35 seconds ago      489MB
php                       7.4-cli             76a5dae0c884        9 days ago          405MB

要用run -it ,如果 run -d容器會起來後跑完 ./vendor/bin/phpunit 後就 Exited
# docker run -it --name my-running-php-7.4-cli -v /root/DesignPatternsPHP:/usr/src/myapp -e XDEBUG_CONFIG="remote_host=192.168.1.7 idekey=XDEBUG" -e PHP_IDE_CONFIG="serverName=localhost" my-php-7.4-cli:latest bash

-e :進入容器前設定環境變數,等同在容器內執行 export XDEBUG_CONFIG="remote_host=192.168.1.7 idekey=XDEBUG" 和 export PHP_IDE_CONFIG="serverName=localhost"

使用PHPStorm 時idekey要設PHPSTORM =》
export XDEBUG_CONFIG="remote_host=192.168.1.7 idekey=PHPSTORM"
export PHP_IDE_CONFIG="serverName=localhost"


PHPStorm中可能的報錯

To fix it set server name by environment variable PHP_IDE_CONFIG and restart debug session.
解法:
https://www.jetbrains.com/help/phpstorm/debugging-a-php-cli-script.html
容器中執行 export PHP_IDE_CONFIG="serverName=localhost"
Can't find a source position. Server with name 'localhost' doesn't exist.
點擊"Configure servers" 設定Servers:localhost
# ./vendor/bin/phpunit
Cannot find a local copy of the file on server /usr/src/myapp/Standard input code
解法:
指定Tests不要一次全跑
# ./vendor/bin/phpunit Creational/AbstractFactory/Tests/AbstractFactoryTest.php


2020年4月11日 星期六

修正MTPuTTY在 Windows 10 字很大的問題

環境

ThinkPad T460
Windows 10 (由Win 7 升級上來)
解析度:1920*1080

打開MTPuTTY 時字很大

解法

https://github.com/sulakshm/superputty/issues/427#issuecomment-421077564

MTPuTTY 右鍵 => 內容 => 相容性 => 變更高DPI設定 => 勾選「覆寫高DPI縮放比例行為」 => 縮放執行者:系統(增強)


如果縮放執行者選擇「系統」而不是「系統(增強)」
字會比較小,而且顏色比較淡。所以我選「系統(增強)」


2020年4月2日 星期四

mongoDB 安裝和使用


安裝

新增repo檔案並加入

# vim /etc/yum.repos.d/mongodb.repo
[MongoDB]
name=MongoDB Repository
baseurl=http://repo.mongodb.org/yum/redhat/$releasever/mongodb-org/4.2/$basearch/
gpgcheck=1
enabled=1
gpgkey=https://www.mongodb.org/static/pgp/server-4.2.asc

安裝

# yum install mongodb-org

啟動  - For CentOS 8/7

# systemctl start mongod.service

開機自動啟動 - For CentOS 8/7

# systemctl enable mongod.service

查版本

# mongod --version
db version v4.2.5
git version: 2261279b51ea13df08ae708ff278f0679c59dc32
OpenSSL version: OpenSSL 1.0.1e-fips 11 Feb 2013
allocator: tcmalloc
modules: none
build environment:
    distmod: rhel70
    distarch: x86_64
    target_arch: x86_64

使用

# mongo
MongoDB shell version v4.2.5
connecting to: mongodb://127.0.0.1:27017/?compressors=disabled&gssapiServiceName=mongodb
Implicit session: session { "id" : UUID("317a2efd-8d1e-4781-abcf-38d8a0907eb4") }
MongoDB server version: 4.2.5
Welcome to the MongoDB shell.
...
> use mydb;
switched to db mydb
> db.test.save( { a: 1 } )
WriteResult({ "nInserted" : 1 })
>  db.test.find()
{ "_id" : ObjectId("5e84098b7cf1f4aa0558d5e6"), "a" : 1 }


使用

客戶端使用PHPStorm的Plugins: Mongo Plugin

配置連線

因為 IP+端口不通,可使用SSH通道,URL: IP(不需指定port) 


參考資料

https://tecadmin.net/install-mongodb-on-centos/  How to Install MongoDB 4.2 on CentOS/RHEL 8/7/6